Découvrez nos
ressources


Vous retrouverez ici l'ensemble du contenu pédagogique élaboré par nos experts en Intelligence Artificielle afin de vous guider au mieux dans votre apprentissage des concepts de l'intelligence artificielle en utilisant la solution AlphAI.
- Si vous n'avez pas encore téléchargé le logiciel AlphAI, nous vous invitons à vous rendre sur la page téléchargement afin de bénéficier des 60 jours d'essai gratuit.
- Si vous découvrez tout juste notre solution, nous vous invitons d'abord à en apprendre un peu plus sur celle-ci en visitant la page La Solution AlphAI.
Le logiciel est conçu pour fonctionner sans connexion internet (à l’exception de l’activation de la licence et des mises à jour).
Il demande néanmoins une connexion wifi (recommandé) ou bluetooth pour communiquer avec le robot.
Si vous n’avez pas encore acheté de licence, vous pouvez profiter d’une version d’essai de 60 jours !
Installation Windows
Attention : la vidéo a été réalisée sur notre ancien site web mais le principe reste le même.
- Téléchargez le logiciel
- Lancez le programme d’installation
- Suivez les instructions puis lancez le logiciel !
Vous obtenez cet écran une fois le logiciel téléchargé :
.png)
Configuration requise:
- Windows 8.1 minimum*
- 4 Go de RAM
- 2 Go de place sur le disque dur
- OpenGL version ≥ 2.1
- Accès à internet (à l’installation uniquement pour la récupération de la licence)
* Windows 7 n’est pas supporté par Python 3.9, notre logiciel ne peut donc pas y être installé. N’hésitez pas à nous contacter pour toute assistance lors de l’installation.
Installation Mac
Rendez-vous sur la page téléchargement et suivez les instructions indiquées.
Configuration requise:
- Mac OS
- 4 Go de RAM
- 2 Go de place sur le disque dur
- OpenGL version ≥ 2.1
- Accès à internet (à l’installation uniquement pour la récupération de la licence)
En cas de difficulté, vous pouvez vous reporter à la page FAQ.
Installation Linux
- AlphAI est compilé pour fonctionner avec python 3.9 (idéalement python 3.9.13). Si vous avez un environnement python 3.9, vous pouvez utiliser celui-ci. Dans le cas contraire, vous pouvez télécharger python 3.9.13 à l’adresse suivante :
https://www.python.org/downloads/release/python-3913/.
Dans la suite des instructions, la commande python3 fait référence à cet environnement python 3.9. - Téléchargez une version du logiciel AlphAI : Téléchargez le script d’installation.
- Dé-zippez le dossier téléchargé à l’emplacement où vous souhaitez installer AlphAI.
- Ouvrez un terminal et rendez-vous dans le dossier nouvellement créé, par exemple en utilisant la commande : cd AlphAI-1.8.10.11.
- Dans le terminal, exécutez la commande : python3 -m pip install -r requirements-mac.txt. Ceci doit avoir pour effet d’installer toutes les bibliothèques python nécessaires à l’utilisation du logiciel.
- Finalement, pour lancer le logiciel, entrez la commande : sudo python3 Start_Alphai.pyc, puis entrez votre mot de passe utilisateur. Attention, il faudra ici remplacer python3 par un chemin explicite vers l’interpréteur python, par exemple ./python3 ou ~/Documents/AlphAI/alphaienv/bin/python3, car sinon c’est l’interpréteur par défaut qui va se lancer.
Configuration requise:
- Ubuntu 18
- 4 Go de RAM
- 2 Go de place sur le disque dur
- OpenGL version ≥ 2.1
- Accès à internet (à l’installation uniquement pour la récupération de la licence)
En cas de difficulté, vous pouvez vous reporter à la page FAQ.
Lors du premier lancement du logiciel, vous allez voir apparaître la fenêtre d’activation de licence.
.png)
Assurez-vous de disposer d’une connexion à internet, et choisissez l’une des options suivantes :
Cochez la case Version d’essai
Dans ce cas, vous avez la possibilité d’utiliser le logiciel gratuitement sur cet ordinateur pendant une durée de 60 jours. Attention : cette option ne peut être activée qu’une seule fois par ordinateur !
.png)
Utilisez une clé d’activation
Cela vous permettra d’utiliser le logiciel sans condition de durée. Pour cela, entrez votre clé d’activation dans le champ prévu à cet effet et sélectionnez une période de validité. À la fin de la période de validité, vous devrez réactiver votre licence. Afin de ne pas égarer celle-ci, vous avez la possibilité de sauvegarder votre clé d’activation sur l’ordinateur.
⚠️ Attention : cela rend possible la réactivation de la licence sur cet ordinateur par un simple clic, ne sauvegardez donc pas votre clé d’activation sur un ordinateur qui ne vous appartient pas !
.png)
Réactivez votre licence grâce à une clé enregistrée, en cochant la case utiliser la clé enregistrée. Vous devrez également sélectionner la durée de la nouvelle période de validité.
.png)
La fenêtre suivante vous propose de nous fournir des informations :
.png)
Cette étape n’est pas obligatoire, mais nous vous prions de bien vouloir remplir les différents champs, ces informations nous permettrons de vous fournir une assistance si besoin mais également de vous informer en cas de mise à jour du logiciel.
À propos de la période de validité :
- La période de validité correspond à la durée pendant laquelle vous pouvez utiliser notre logiciel sans connexion à internet.
- À l’expiration de cette période, il vous sera demandé de réactiver votre licence, étape qui requiert une connexion à internet.
- Chaque clé d’activation est délivrée avec une limite sur le nombre d’activations simultanées autorisées (généralement 2 ordinateurs ou 30 ordinateurs).
- Dans le cas d’utilisation du logiciel dans une salle de classe, il est conseillé de choisir une durée d’activation correspondant à la période d’utilisation prévue, par exemple jusqu’à la fin de l’année scolaire. Ainsi, lorsque les licences expireront, il sera possible d’utiliser le logiciel dans une autre salle.
Exemple : Supposons que ma clé d’activation a une limite de 2 postes. Grâce à cette clé, j’active le premier janvier une licence sur un ordinateur A pour une durée de 6 mois (donc jusqu’au 30 juin). Ensuite, le premier février, j’utilise la même clé pour activer une licence sur un ordinateur B pour une durée de 3 mois (donc jusqu’au 30 avril). Sur la période du premier février au 30 avril, le nombre maximal d’activations est atteint, il m’est donc impossible d’utiliser ma clé d’activation sur un troisième ordinateur. En revanche, à partir du premier mai, la licence de l’ordinateur B a expiré, il m’est alors possible d’activer une licence sur un ordinateur C pour une durée de mon choix. De même, à partir du premier juillet, la licence de l’ordinateur A n’est plus valide, rendant possible l’activation sur un autre ordinateur (ou le renouvellement de la licence sur l’ordinateur A).
Durée
Les clés d’activation vendues par Learning Robots sont perpétuelles.
Limite d’appareils
Selon le produit que vous avez choisi, votre licence est valable sur 2 ou 30 appareils.
Spécificités Thymio
Les licences pour robots Thymio ont quelques différences avec les autres types de licences. La première différence est que la fenêtre d’activation de licence ne va pas apparaître au lancement du logiciel, mais seulement lors de la première connexion à un robot Thymio.
Si ce robot est une simulation, alors tout se passe comme décrit précédemment.
.png)
Si ce robot est un Thymio réel, alors la licence sera stockée sur le robot lui-même et non pas sur votre ordinateur. Cela vous permettra ensuite de connecter ce robot à tout ordinateur où le logiciel est installé, même si ce dernier ne dispose pas de licence active. Cependant, vous ne pourrez utiliser votre clé d’activation de cette manière que sur un seul robot Thymio. Si vous souhaitez utiliser AlphAI avec plusieurs robots Thymio, il vous faudra acquérir une licence pour chaque robot.
La période de validité pour les robots Thymio réels est à durée illimitée.
Pour connecter votre Thymio à votre ordinateur, vous pouvez vous reporter à la fiche ressource Thymio.
Lancer le logiciel en cliquant sur le raccourci du bureau (PC) ou en lançant la commande “alphai” dans le terminal puis en entrant votre mot de passe d’ordinateur (Mac).
Lors du lancement du logiciel, si vous êtes connecté à internet, il se peut que le logiciel détecte une mise à jour à effectuer. Elle se lance automatiquement, et cela ne prendra que quelques minutes !
Vous allez alors arriver sur l’écran de connexion.
.png)
Choix du robot
En haut à droite de l’écran d’accueil, vous pouvez choisir le modèle de robot avec lequel vous souhaitez réaliser des activités. Selon la licence achetée, vous pouvez avoir le choix entre :
- le robot AlphAI
- le robot Thymio
- le robot mBot
- le robot Buddy
- le robot Spike (LEGO)
- l’ordinateur (activités sans robot)
.png)
Modes de connexion
Selon le robot choisi, vous pouvez avoir le choix entre plusieurs modes de connexion : par WiFi, par bluetooth (avec une clé ou avec le bluetooth de l’ordinateur), ou un robot simulé.
.png)
Pour le robot AlphAI, nous vous recommandons de toujours privilégier la connexion en WiFi si cela est possible. Si vous choisissez une connexion en Bluetooth, vous trouverez en haut à droite de votre écran un bouton qui permet de désactiver le mode “Bluetooth Low Energy” si votre modèle de robot est ancien.
Simulation
Avec les robots AlphAI et Thymio, il est possible de réaliser de nombreuses activités en simulation. Pour comprendre comment utiliser le mode simulation, merci de vous référer aux pages correspondantes :
Ressources - AlphAI - Connexion au robot
Ressources - Thymio - Connexion au robot
Instructions et aide
En fonction du robot choisi, des boutons en bas de l’écran vous fournissent des instructions et informations pour la connexion au robot et en cas de bugs.Si les instructions ne vous ont pas aidé à résoudre votre problème, vous pouvez vous référer à notre page FAQ.
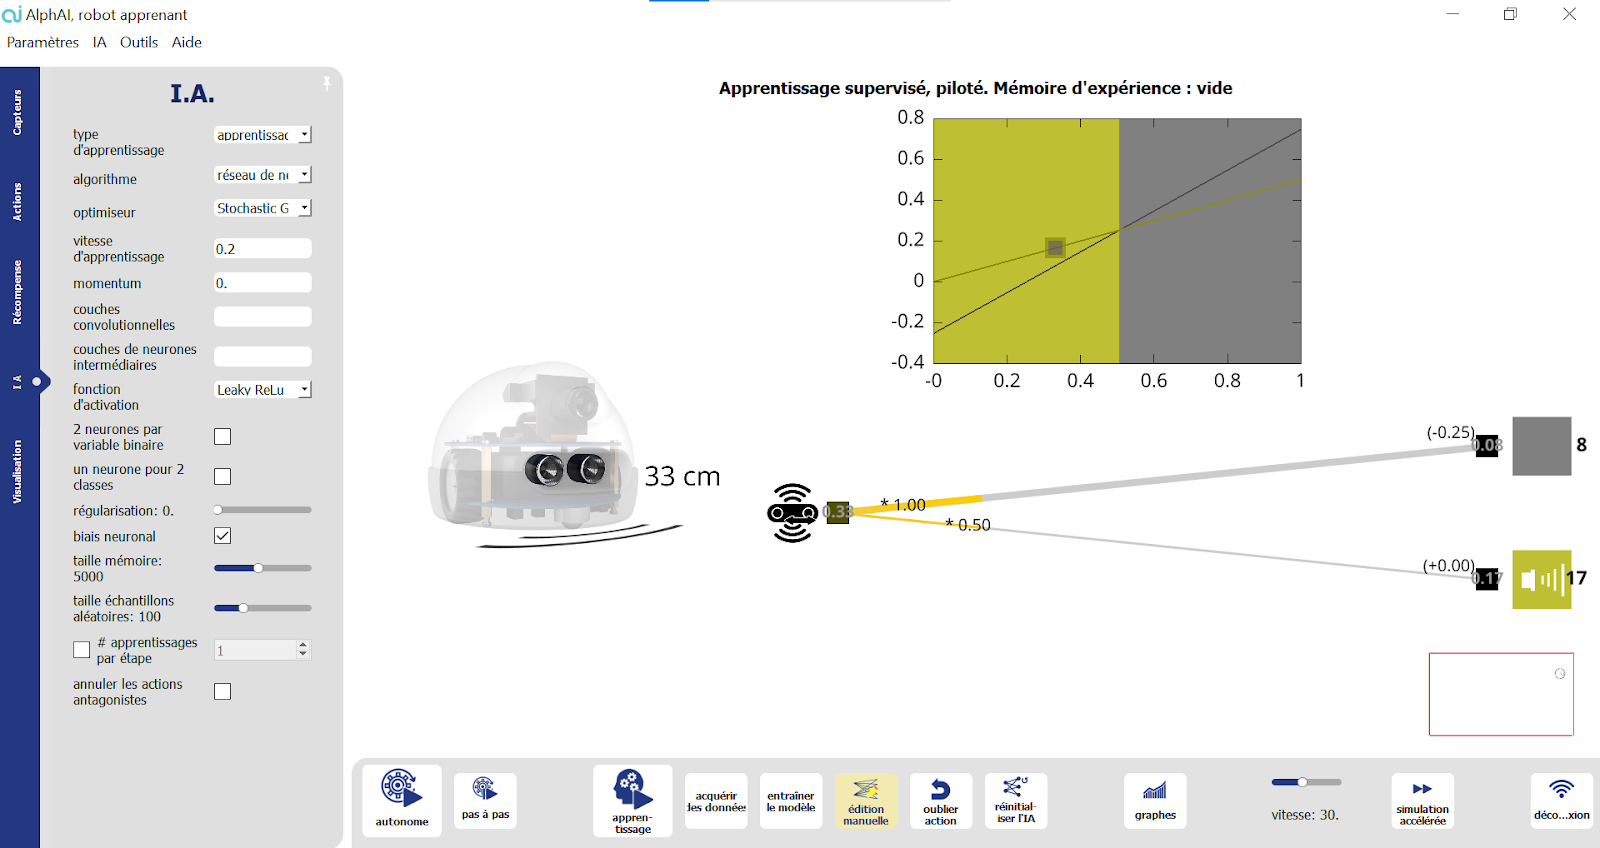
Vous êtes maintenant connecté à votre robot et arrivez sur l’écran principal. Nous vous présentons sur cet page chacun des éléments que vous pouvez voir à l’écran :
.png)
Le titre
En haut de votre écran, un titre vous informe sur les caractéristiques des paramétrages sélectionnés actuellement : le mode d’apprentissage (supervisé, par renforcement, ou aucun apprentissage), le mode de contrôle (piloté/autonome), et le nombre de données enregistrées dans la mémoire d’expérience pendant l’apprentissage.
.png)
Le robot
Vous pouvez voir sur la gauche de votre écran une image du robot que vous êtes en train d’utiliser.
Pour le robot AlphAI, les capteurs utilisés dans l’activité apparaissent en noir.
La couleur des roues vous indique si elles sont bloquées (en rouge) ou non (en vert).
Vous pouvez également voir la couleur de la coque.
.png)
Affichage central
Toute la partie droite de votre écran est occupée par l’affichage central. Il peut contenir :
Un réseau de neurones
Tout à gauche, les neurones d’entrée : ce sont les capteurs du robot utilisés.
Au milieu, les connexions et les couches de neurones intermédiaires.
Tout à droite, les neurones de sorties et les icônes d’action correspondantes : ce sont les actions que peut effectuer le robot.
.png)
Vous pouvez entièrement paramétrer le réseau de neurones (Onglet IA) et modifier sa visualisation (Onglet Visualisation).
Une visualisation de l’espace d’états
Par exemple, dans le cas où l'algorithme choisi est K plus proches voisins, le réseau de neurones sera remplacé par un graphe. Voir l’activité KNN.
.png)
Une visualisation des données d’apprentissage
Une fois que vous avez fourni des données d’exemple au robot, vous pouvez également faire apparaître à l’écran chaque donnée enregistrée : l’information fournie par les capteurs et l’action qui a été associée. Vous pouvez corriger un biais en supprimant une donnée, modifiant une action, …
Une combinaison de ces éléments
Par exemple dans l’activité Détection d’intrus, on peut voir l’espace d’états et le réseau de neurones
.png)
L’écran vidéo
Dans le cas où le capteur caméra est nécessaire pour l’activité choisie, vous pourrez observer en haut à gauche de votre écran un retour de la caméra du robot (même pour un robot simulé !). Si l’activité utilise la webcam de l’ordinateur, c’est ici qu’elle apparaîtra.
.png)
La simulation 2D (pour le robot AlphAI)
Si vous avez choisi le robot AlphAI simulé pour votre activité, en bas à gauche de votre écran apparaîtra une arène en 2D, et le robot simulé qui s’y déplace en direct.
Si vous souhaitez modifier cette arène simulée, ouvrez l’onglet Capteurs et scrollez en bas : vous pourrez alors ajouter/enlever l’îlot central et choisir la couleur des murs intérieurs et extérieurs.
.png)
Le niveau des piles
Si vous êtes connecté à un robot AlphAI, en bas à gauche de votre écran se trouve un indicateur du niveau de batterie du robot. Il y a 2 états :
- soit l'icône pile est verte, dans ce cas rien à signaler
- soit l'icône pile est rouge ou noire, dans ce cas nous vous conseillons de déconnecter le robot du logiciel et de changer ses piles immédiatement
Changer les piles d’un robot AlphAI
Les récompenses et niveau
Si vous avez choisi une activité avec apprentissage par renforcement, en bas de votre écran apparaîtront 2 barres : récompense (les récompenses données au robot en fonction des actions effectuées : en rouge si elles sont négatives et en vert si elles sont positives) et niveau (moyenne des récompenses reçues).
.png)
Une fois entrée sur l'interface principale du logiciel, le menu se situe en haut à gauche de votre écran et se présente comme ci-dessous :
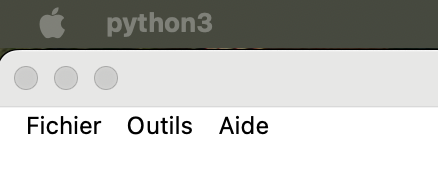
Fichiers
Configurations d’exemple
choisissez une configuration d’exemple parmi toutes celles conçues par Learning Robots ! Vous trouverez le détail du déroulement de chaque activité sur les pages ressources du robot utilisé :
Activités AlphAI
.png)
Activités Thymio
.png)
Activités mBot
.png)
Ouvrir
- Permet de charger des données d’entraînement qui ont été enregistrées sur l’ordinateur (format .zip ou .npz - attention à charger des données qui correspondent à la configuration actuelle)
Sauvegarder
- Enregistrer la configuration : permet d’enregistrer la configuration actuelle sur l’ordinateur (format .json)
- Enregistrer la configuration et les données d'entraînement : permet d’enregistrer la configuration actuelle ainsi que les données issues de l'entrainement que vous venez d'effectuer (format .zip incluant la configuration au format .json)
- Enregistrer le projet complet : permet d'enregistrer la configuration actuelle, les données d'entrainements ainsi que le modèle d'IA utilisé (format .zip)
Language
- Choisissez dans quelle langue vous souhaitez utiliser le logiciel
Affichage des paramètres
Choisissez le niveau d'affichage des paramètres entre les modes standard (plus épuré), avancé et expert (toutes les options).
Nous vous conseillons de choisir le mode standard, à moins d’être familier avec AlphAI et d'avoir de bonnes connaissances en IA.
Raccourcis clavier
Permet d'activer/désactiver tout ou partie des raccourcis clavier du logiciel.
Activer le mode enseignant
- Si vous êtes enseignant, activer ce mode vous permettra d’accéder à de nouvelles fonctionnalités. Vous aurez besoin pour y accéder de votre clé d’activation.
Par exemple, dans le menu aide, vous pouvez cliquer sur “Informations sur les licences” pour connaître la liste d'appareils sur lesquels la licence a été activée.
Autres paramètres du programme...
- Taille des polices : changez la taille des polices sur le logiciel si vous souhaitez avoir une meilleure visibilité, par exemple des poids des connexions du réseau de neurones
- Big Brother : Cette option est utilisée en particulier dans notre activité "Éthique de l'IA". Une fois activée par le professeur en amont de la séance, le programme enregistre à l'insu des élèves les images prises par la caméra dans un sous-dossier du répertoire d'installation du logiciel, nommé "to_upload" expressément pour faire réagir.
Le professeur pourra montrer ce dossier dans un second temps aux élèves pour discuter avec eux des problématiques de collecte de données, avec ou sans consentement.
Les images sauvées sont automatiquement détruites à la fermeture du programme. Le logiciel AlphAI ne collecte ni ne transmet aucune information, et d'ailleurs fonctionne hors-ligne.
Cette option ne peut être utilisée que pour un but éducatif.
Outils
- Changer le dossier de configuration : permet de changer la localisation du dossier de configuration sur votre ordinateur. Ce dossier contient des fichiers de log et les paramètres du programme.
- Modifier l'emplacement des licences
- Télécharger le journal d'événements du robot : permet de télécharger le fichier de log du robot (nécessite une connexion en WiFi).
Utile à nous transmettre en cas de bug ! - Tester le robot : permet de détecter d’éventuelles défaillances matérielles sur le robot
Depuis l’écran de connexion, vous pouvez également trouver : - Mise à jour du robot : forcer la mise à jour du robot si elle n’a pas fonctionné automatiquement
- Diagnostiquer le démarrage du robot : vérifier que le démarrage du robot se passe correctement (Ce test prend environ 20 secondes. Une autre fenêtre s'ouvre lorsque le test est terminé)
Aides
- Documentation logiciel : permet d’accéder à la fiche logiciel des ressources du site Learning Robots. Vous y découvrirez tout ce qu’il y a à savoir sur le logiciel AlphAI.
- Documentation du robot et activités : permet d'accéder aux fiches relatives aux différents robots ainsi qu'aux activités, dans les ressources du site Learning Robots. Vous y découvrirez toutes les instructions et activités à réaliser pour chacun des robots, la FAQ, etc
- Journal des modifications : accédez à la liste des mises à jour
- À propos d’AlphAI : vous renseigne sur la version d’AlphAI que vous utilisez actuellement
- Afficher les raccourcis clavier
- Signaler un bug : Si vous rencontrez un problème que vous n’arrivez pas à résoudre, ce formulaire vous permet de nous transmettre un message qui sera associé au log du logiciel, et ainsi nous aidera à résoudre votre problème (merci de renseigner votre email afin que nous puissions vous recontacter si besoin)
Autonomie
.png)
Contrôlez l’autonomie de votre robot grâce à ces différents boutons :
- Autonome : le robot est en autonomie continue
- Pas à pas : cliquez pour observer votre robot prendre une décision, et une seule ! Le robot ne fera qu’une étape à chaque fois que vous appuierez sur le bouton.
- Exploration : en mode apprentissage par renforcement, ce bouton vous permet de forcer votre robot à tenter de temps en temps une action aléatoire (paramétrable dans l’onglet IA).
Apprentissage
.png)
Contrôlez l’apprentissage de votre robot :
- Apprentissage : si ce bouton est sélectionné, le robot enregistre les données fournies dans sa mémoire d’expérience et change les connexions de son réseau de neurones. Il est en train d’apprendre !
En mode d'affichage expert, on a plus de contrôle :- acquérir des données : si ce bouton est activé, le robot mémorise les actions qu’il effectue.
- entraîner le modèle : si ce bouton est activé, l'algorithme d’apprentissage fait évoluer les valeurs des paramètres du modèle.
- Édition manuelle : dans les activités “Édition manuelle”, cliquez sur ce bouton pour modifier les paramètres du réseau de neurones directement depuis l’interface.
- Oublier l’action : si vous cliquez sur ce bouton, le robot oublie la dernière donnée qu’il a apprise : très pratique si vous vous trompez lors de la phase d’apprentissage !
- Réinitialiser l’IA : si vous cliquez sur ce bouton, les données d'entraînement et le modèle seront réinitialisés : recommencez maintenant l’apprentissage du robot !
En mode affichage expert, on a plus de contrôle :- Réinitialiser les données : efface les données d’apprentissage mémorisées
- Réinitialiser le modèle : les paramètres du modèle sont réinitialisés.
Graphes
.png)
Ce bouton vous permet d'ouvrir une fenêtre pop up qui vous donnera des informations sur l’apprentissage de votre robot, et des graphiques qui présentent ces données visuellement.
.png)
Ce graphe permet de suivre la progression du robot en affichant ses récompenses et l’erreur de ses prédictions au cours du temps. Si le robot progresse bien, le graphe des récompenses doit augmenter et celui des erreurs doit diminuer.
Dans le cas où il y a trop de bruit sur les données, vous pouvez lisser les courbes, par exemple sur 2 minutes, en cliquant sur lissage – 2 minutes
Réglages (pour AlphAI)
Réglez les paramètres de votre robot grâce à ce bouton :
- Vitesse (de 15 à 50) : vous pouvez régler la vitesse du robot, en fonction de l’activité et de la taille de l’arène utilisée
.png)
- Correction de trajectoire : il est possible que le robot ait un petit défaut de trajectoire. Utilisez cet outil pour le corriger (faites le test en utilisant l’action aller tout droit)
.png)
- Simulation accélérée : si vous avez choisi un robot simulé, ce bouton vous permet d'accélérer les prises de décision et actions du robot, au lieu d’imiter la vitesse réelle.
.png)
Déconnexion
Déconnectez-vous du robot grâce à ce bouton, pour changer les piles ou lorsque votre session est terminée !
⚠️ Si vous vous déconnectez du robot, vous reviendrez automatiquement à l’écran d’accueil. Cependant si vous reconnectez le robot et relancez l’activité sans quitter le logiciel, ni la configuration ni vos données d'entraînement ne seront perdues.
.png)
Onglet capteurs
.png)
La fenêtre Capteurs permet de choisir les capteurs du robot qui seront utilisés.
Cliquez sur un capteur pour choisir une des options d’utilisation possible.
Découvrez les différents capteurs utilisés en fonction des robots concernés :
Vous pouvez également choisir le nombre d’instants, et dans le cas d’un robot simulé changer les paramètres de l’arène.
Onglet actions
.png)
La fenêtre Actions permet de choisir les actions que peut effectuer le robot.
Cliquez sur une action pour l’ajouter au réseau de neurones.
⚠️ Ajouter une nouvelle action supprimera la mémoire d’expérience du robot.
Découvrez les différentes actions utilisées en fonction des robots concernés :
Vous pouvez également choisir la vitesse, la durée (de 0.1s à 2s), et si vous souhaitez que le robot effectue une pause entre les actions ou non, et de quelle durée.
Onglet récompenses
.png)
Si vous avez lancé une activité avec apprentissage par renforcement, vous pouvez utiliser l’onglet Récompenses pour choisir le type de récompense et la configuration de celle-ci.
Vitesse et blocage
Récompensez le robot si il va vite, punir s’il s’arrête. Vous pouvez personnaliser la récompense obtenue par le robot quand il effectue une action de virage, et la valeur de la pénalité quand il se bloque ou recule.
Couleur dans l’image
Récompensez le robot si beaucoup de pixels de la caméra sont d’une certaine couleur.
Vous pouvez personnaliser la teinte, la luminance et la saturation.
Couleur et blocage
Récompensez le robot si beaucoup de pixels de la caméra sont d’une certaine couleur, et le punir s'il s’arrête.
Vous pouvez personnaliser la teinte, la luminance et la saturation.
Suivi de ligne
Récompensez le robot s'il détecte du noir juste en dessous de lui. Vous pouvez personnaliser le seuil de détection de blocage.
Code Python
Paramétrez vos propres récompenses en utilisant un fichier de code Python.
Onglet IA
.png)
L’onglet IA permet de choisir de quelle façon le robot est entraîné, notamment pour choisir entre apprentissage supervisé ou apprentissage par renforcement (Deep Q Learning). Elle permet aussi de régler les paramètres des différents algorithmes.
Les paramètres peuvent être différents d'une activité à une autre, d'un type d'apprentissage à un autre et d'un algorithme à un autre. Mais les principaux paramètres sont les suivants :
- Type d’apprentissage
- Apprentissage supervisé
- Apprentissage par renforcement
- Aucun
- Algorithme : Sélectionner l’algorithme d’IA utilisé
- Réseau de neurones
- K plus proches voisins
- Code python
- Vitesse d’apprentissage : Augmenter pour des apprentissages plus rapides... mais diminuer si des erreurs de divergence apparaissent.
- Gamma : Ajuste l’importance donnée aux récompenses immédiates (valeur proche de 0) par rapport aux récompenses plus éloignées dans le temps (valeur proche de 1)
- Exploration : Fréquence des explorations (valeur entre 0 et 1).
- Couches de neurones intermédiaires : Nombre de neurones de chaque couche intermédiaire par exemple : ne rien mettre pour connecter directement les entrées aux sorties, mettre «100 50» pour deux couches intermédiaires de respectivement 100 et 50 neurones.
- Fonction d’activation : choix de la fonction d’activation des couches intermédiaires.
- 2 neurones par variable binaire : Cocher pour que les entrées binaires soient représentées par 2 neurones (dont toujours un et un seul sera activé) ; Décocher pour utiliser seulement 1 neurone.
- Biais neuronal : Cocher pour permettre aux neurones d’ajuster leur seuil d’activation (cela revient à considérer que tous les neurones reçoivent une entrée constante qu’ils peuvent ajuster, non représentée dans l’interface graphique).
- Mémoire d’expérience : Cocher pour que l’IA continue d’apprendre à partir des actions effectuées et récompenses reçues par le passé.
Onglet Visualisation
.png)
L’onglet Visualisation permet de choisir ce qui est affiché ou non sur l’écran principal.
- Type d’affichage : réseau de neurones, espace d’états, ou les deux
- Animation : Animer l’activité dans le réseau (mouvement des entrées vers les sorties)
- Connexions : Afficher les connexions du réseau
- Apprentissages : Afficher les apprentissages
- vert : les connexions s’intensifient
- rouge : les connexions diminuent
- Activité synaptique : Afficher l’activité dans le réseau
- jaune : activités d’excitation
- bleu : activités d’inhibition
- Valeur des entrées/sorties : Afficher les valeurs des neurones d’entrée et de sortie
- Valeur des connexions : Afficher les poids des connexions. Cette option active automatiquement l'affichage des entrées/sorties.
- Espace entre les neurones : fait passer les neurones d’entrée du mode vertical au mode horizontal
Pour le robot AlphAI uniquement : vous pouvez changer la couleur de la coque. Attention : le robot va mémoriser sa nouvelle couleur et apparaîtra ainsi sur l’écran de connexion.
La solution AlphAI dispose de deux méthodes permettant de programmer les robots avec le langage python :
- Avec l'API python, vous avez accès à une interface de bas niveau. Vous disposez d'un accès direct aux valeurs brutes des capteurs du robot, et vous pouvez contrôler directement et séparément les deux moteurs. En revanche, ce mode ne dispose d'aucune option de visualisation. Il est donc plutôt adapté aux activités centrées sur la programmation en elle-même.
- Avec le mode code python accessible depuis le logiciel, vous avez accès à une interface de plus haut niveau. Les capteurs et les actions du robots sont paramétrables depuis la fenêtre graphique. Ce mode dispose de plusieurs options qui permettent de visualiser le programme dans la fenêtre graphique. Il est adapté à la pratique de la programmation, en particulier dans le cas d'utilisation d'algorithmes de machine learning.
Ci-dessous, vous trouverez plus de détails sur ces deux méthodes.
Documentation API AlphAI (robots AlphAI uniquement)
Dans ce document, vous trouverez toutes les informations nécessaires à l'utilisation de l’API AlphAI :
https://drive.google.com/file/d/1C4ovPW_eH5KFz5Y9JvSrzLhtmdOpcp6-/view
Le mode "code python"
Dans l’onglet IA
.png)
Vous pouvez choisir pour le paramètre algorithme “code python”.
Un pop up apparaît, il faut choisir entre créer un nouveau fichier ou ouvrir un fichier existant.
Ce fichier permettra d’écrire du code python qui sera exécuté par le logiciel.
Dans l’onglet Récompense (robots AlphAI uniquement)
.png)
Programmez votre propre fonction de récompense en cliquant sur le bouton “code python”.
Learning Robots travaille continuellement à développer les fonctionnalités du logiciel et à améliorer l’expérience utilisateur.
C’est la raison pour laquelle nous procédons régulièrement à des mises à jour, qui démarrent après approbation au lancement du logiciel si vous êtes connectés en WiFi. Elles ne prennent que quelques minutes !
Nous vous conseillons de mettre à jour tous les postes en même temps, pour être sûr d’avoir la même version du logiciel sur chaque poste.
Si vous avez des questions supplémentaires, vous pouvez rechercher celles-ci dans notre FAQ ou bien nous écrire via notre formulaire de contact.
Pour consulter la liste des modifications réalisées lors de chacune des mises à jour depuis la création du logiciel, veuillez vous reporter sur la page suivante :
Liste des modifications AlphAI
Introduction
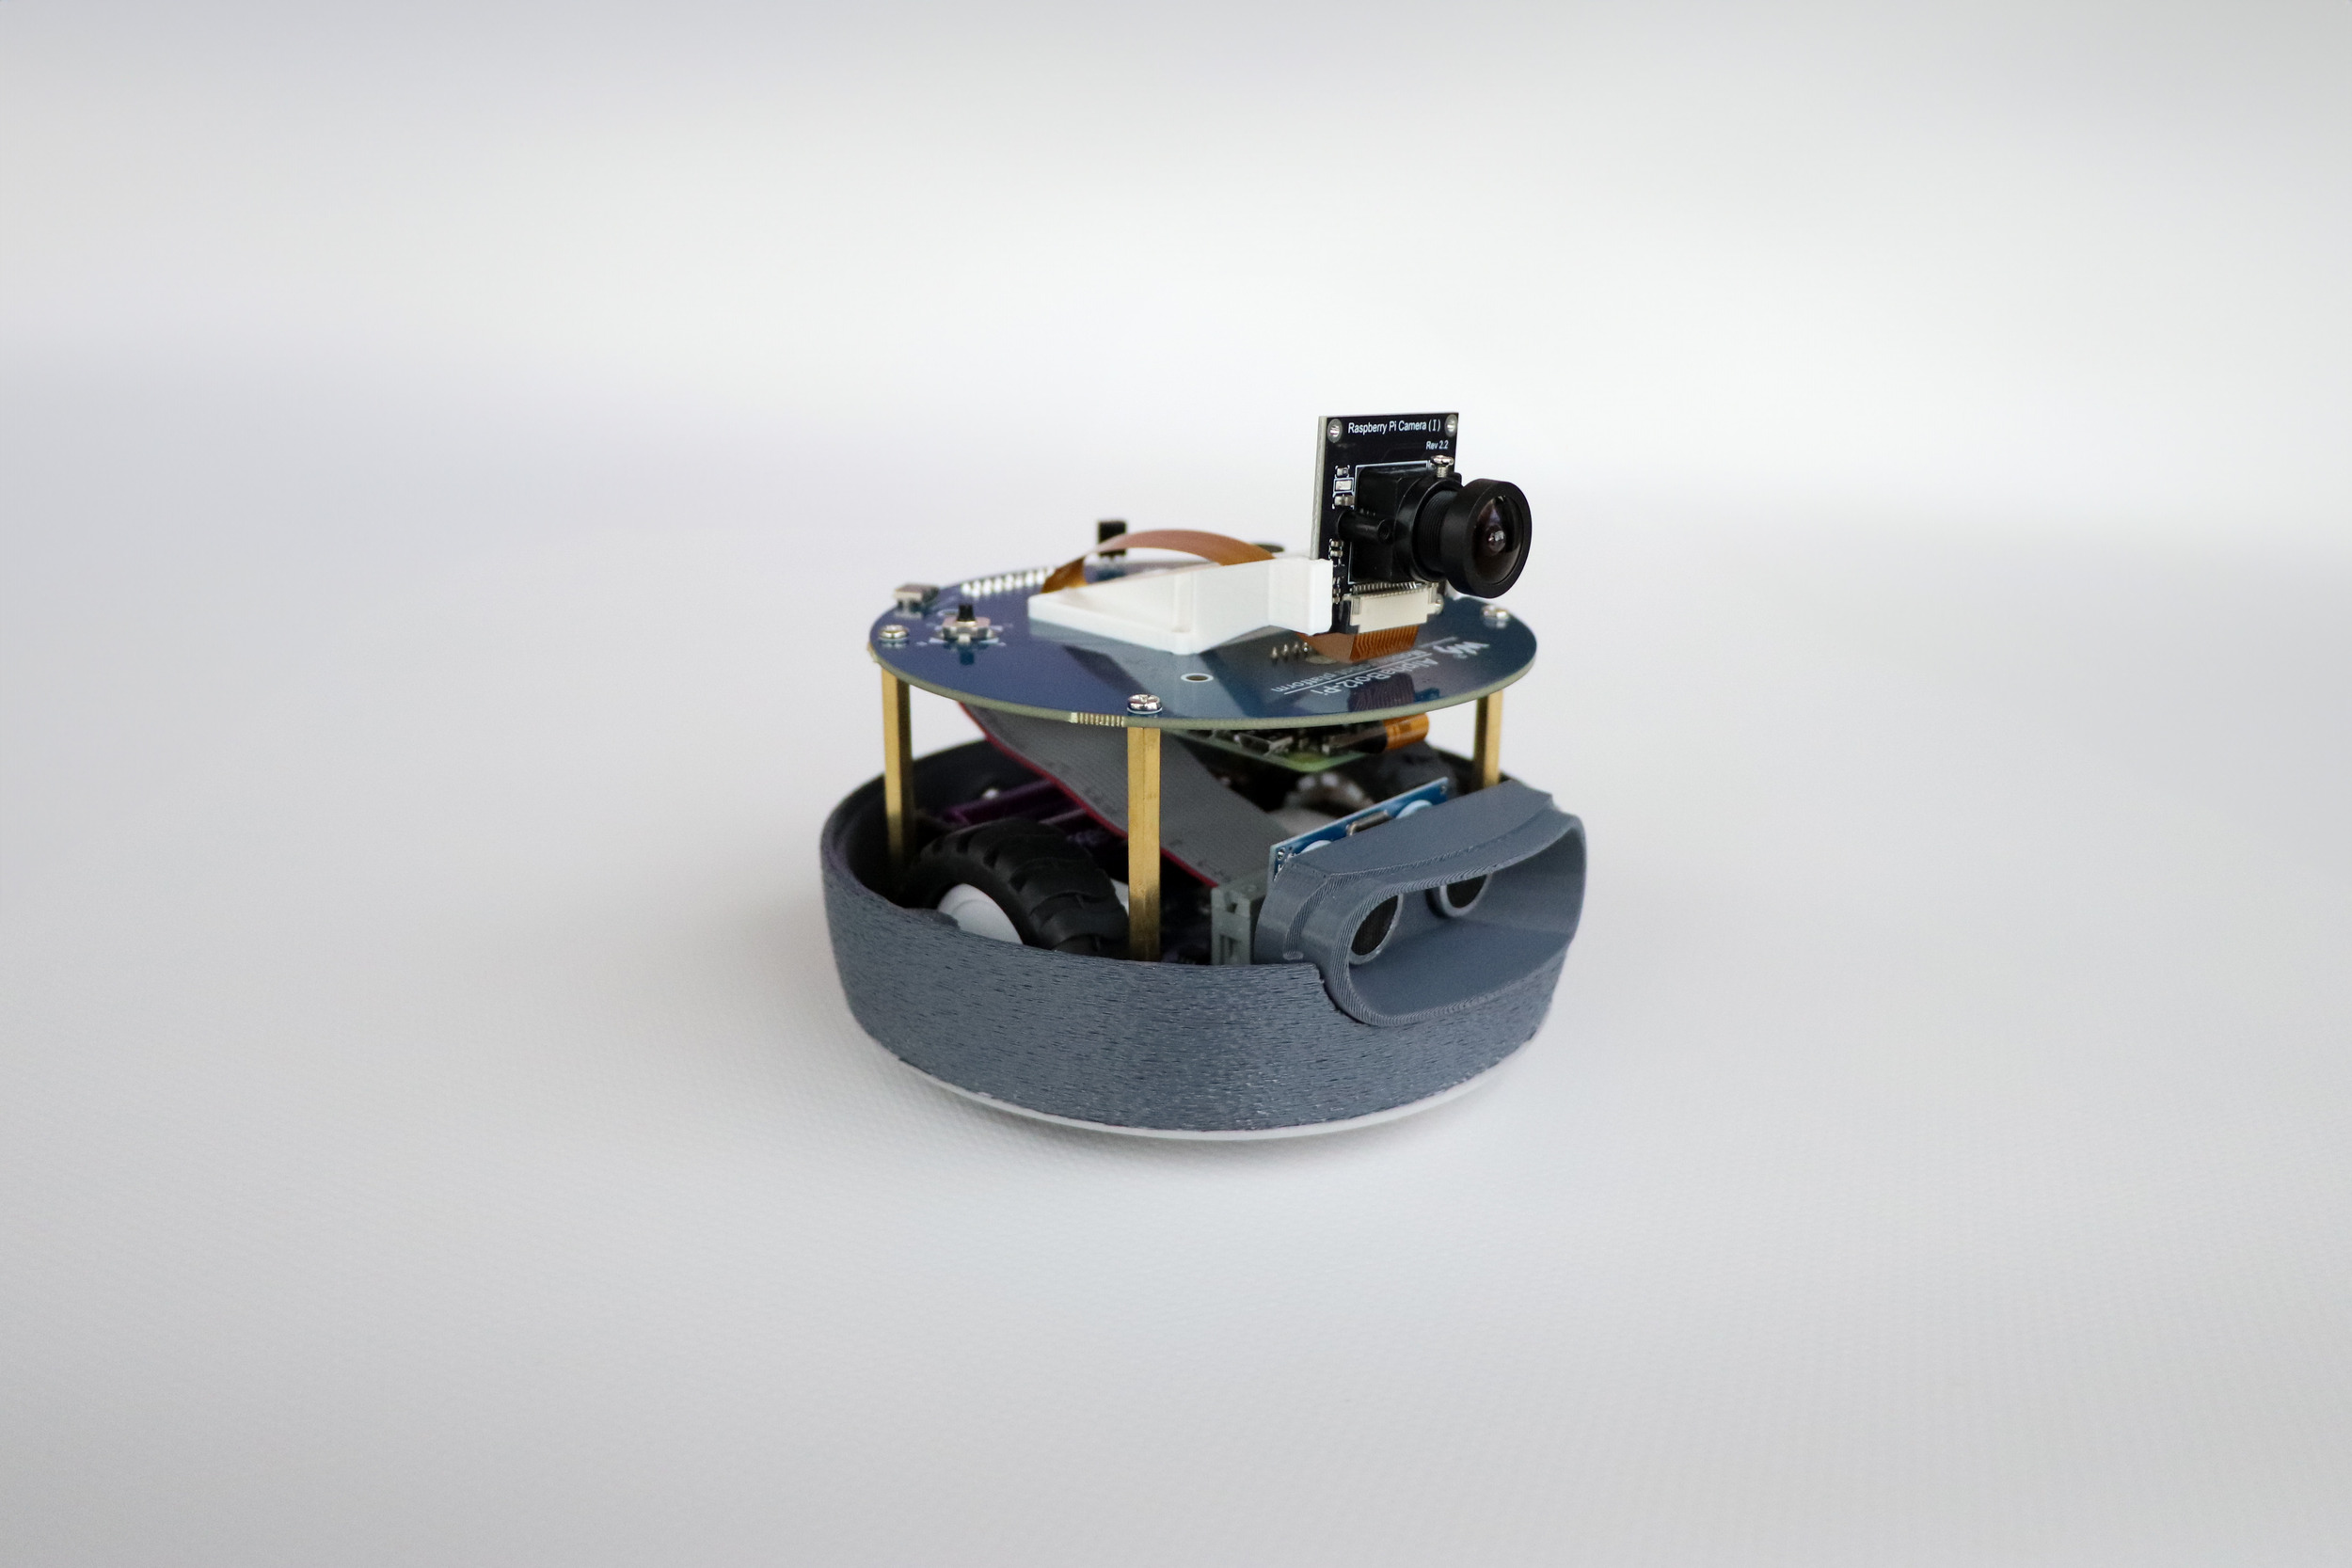
Learning Robots a conçu un petit robot à l’allure sympathique, mais qui en a sous le capot !
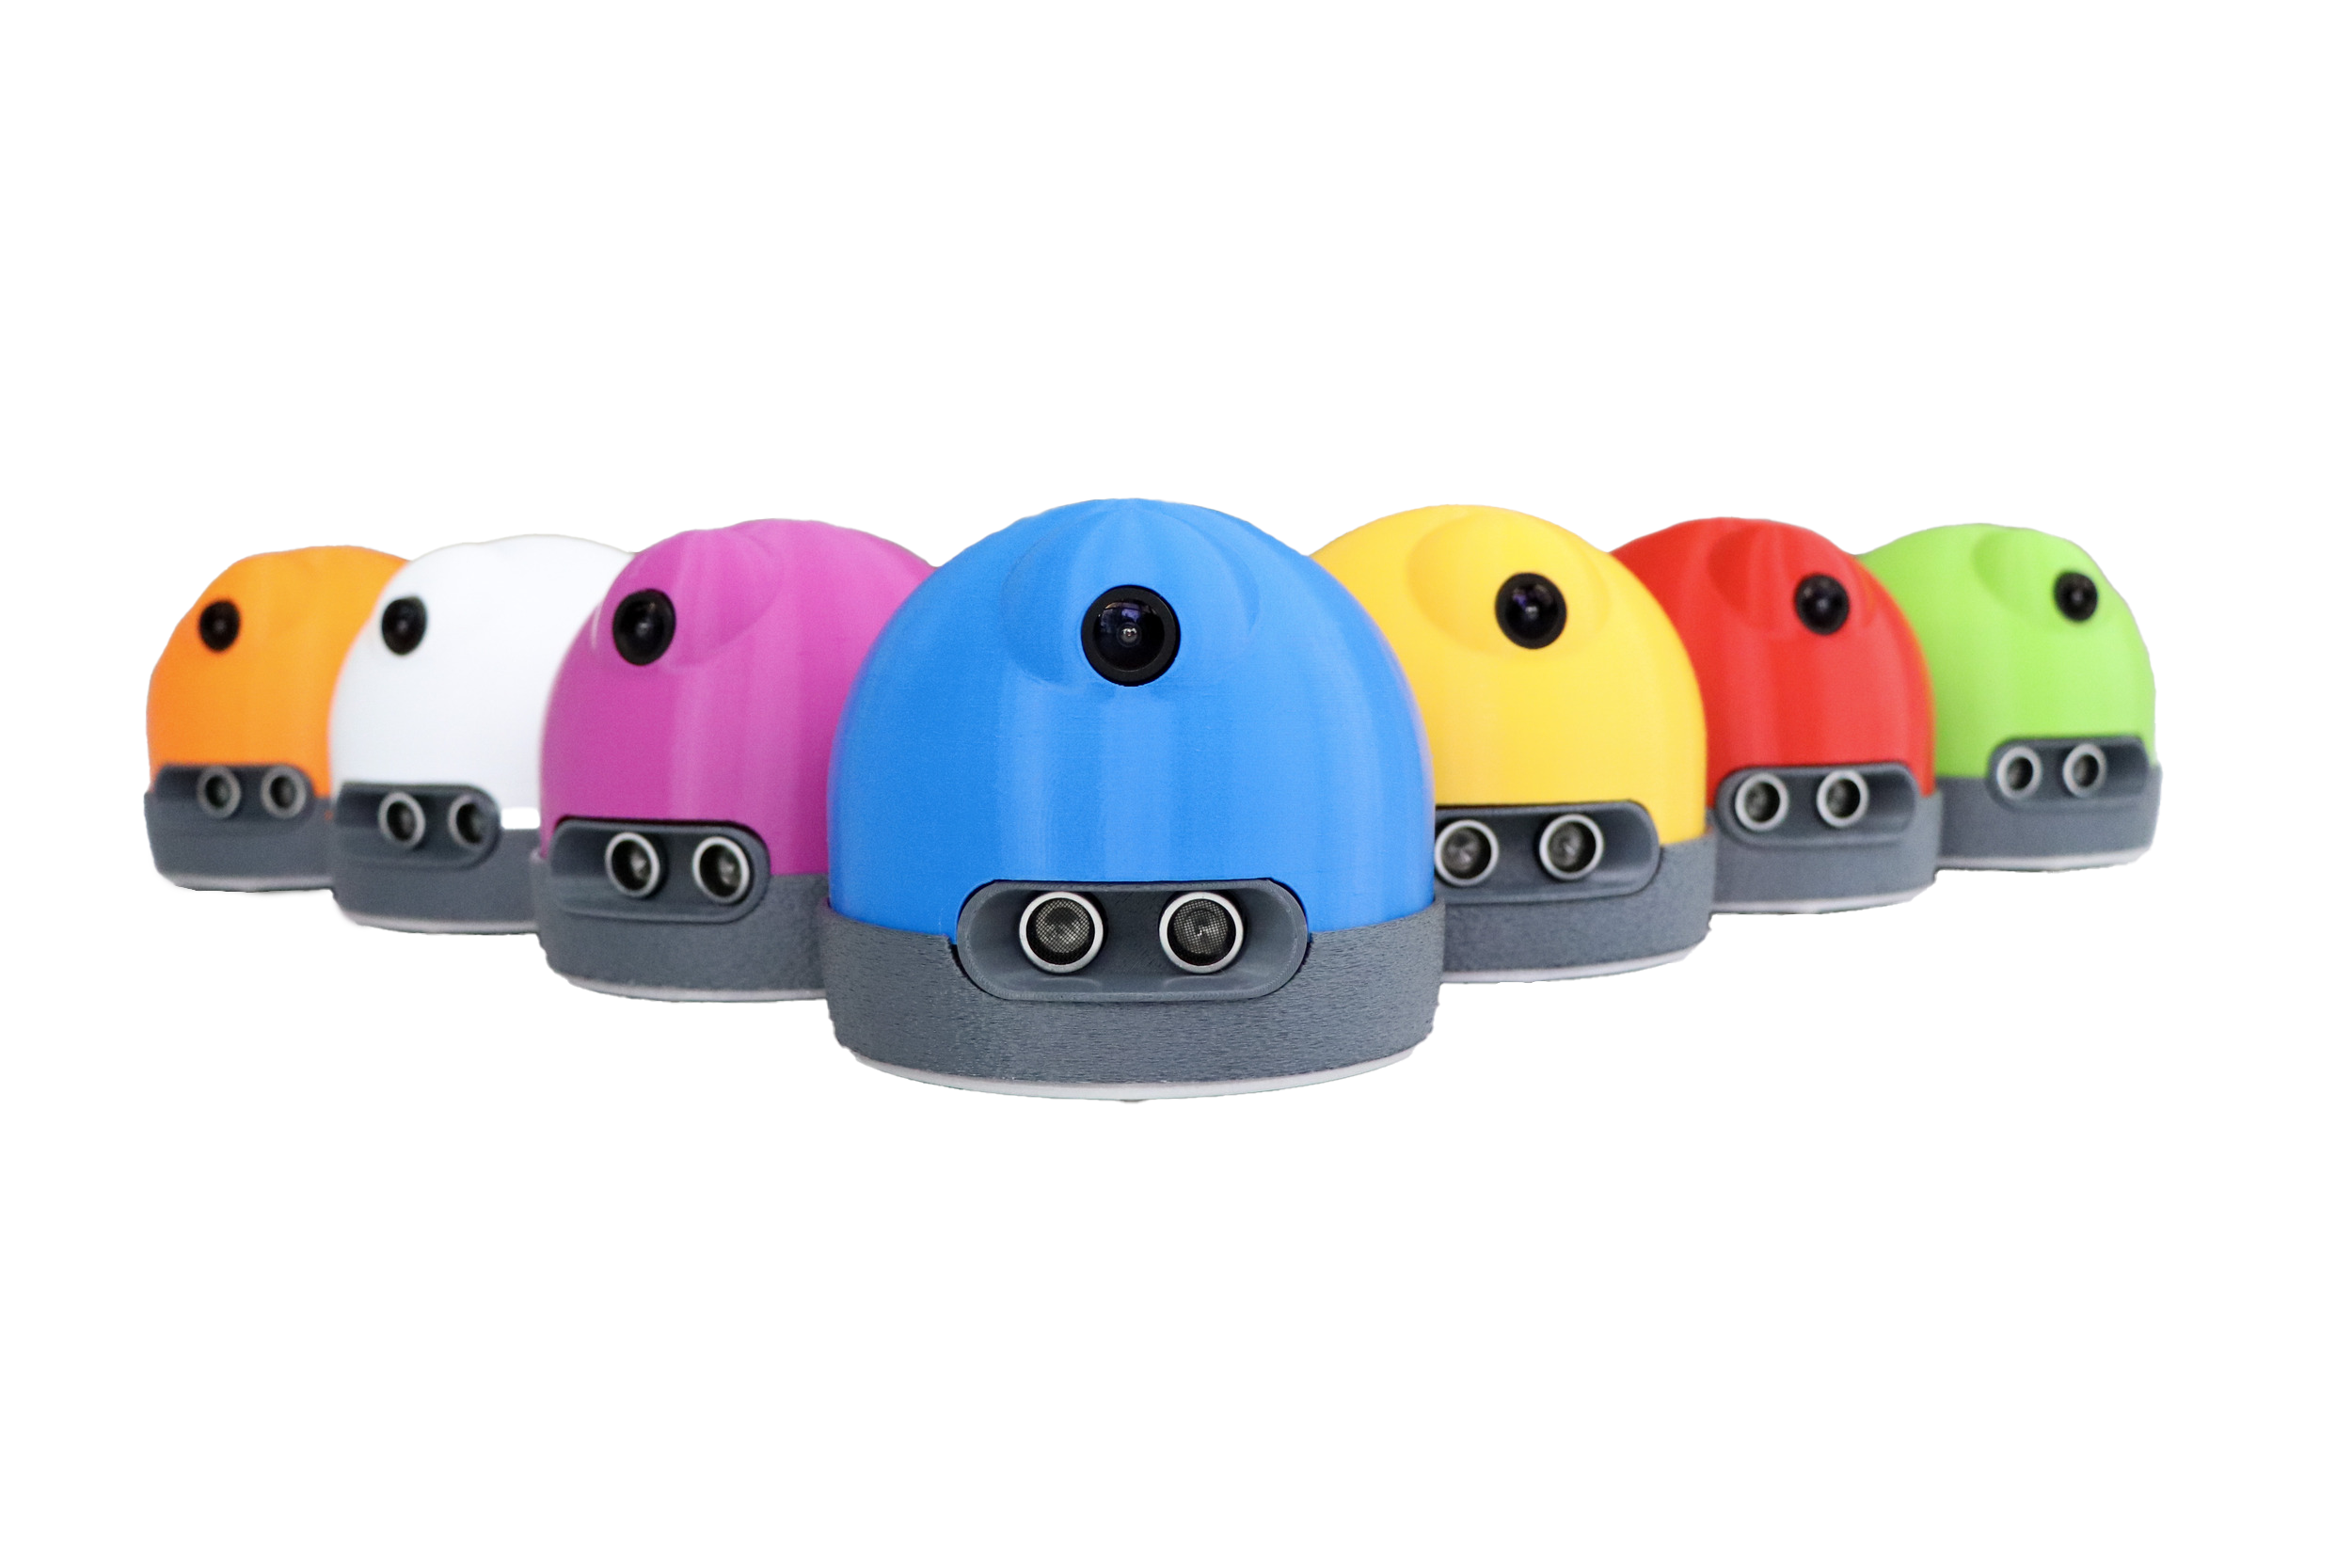
Ce robot a été élaboré spécifiquement pour l’utilisation de la solution AlphAI : son grand nombre de capteurs (notamment la caméra grand angle), sa polyvalence et son format compact permettent de réaliser l’intégralité des activités disponibles sur le logiciel.
Ce robot a été pensé pour être à la fois robuste et démontable à n’importe quel moment.
Les coques et pare-chocs sont imprimés chez nous ce qui nous laisse une grande marge de liberté quant au design du robot. N'hésitez pas à nous demander les fichiers 3D via notre formulaire de contact si vous souhaitez les customiser !
Composition
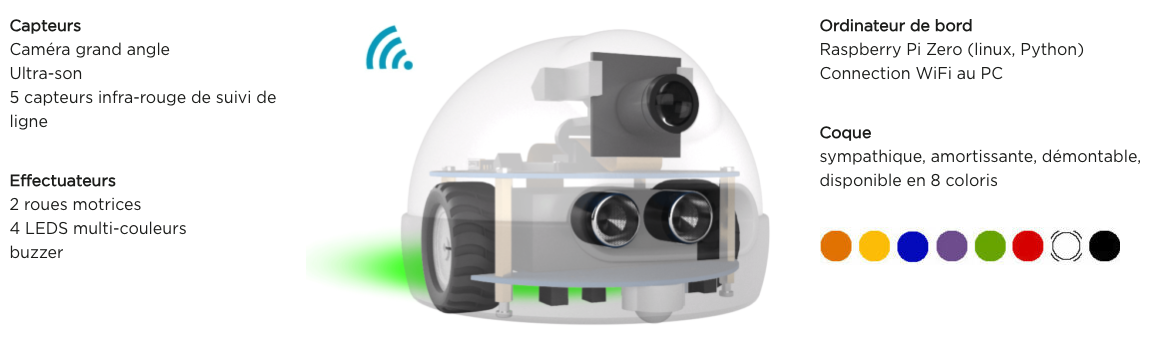
Capteurs
- Caméra grand angle
- Ultra-son
- 5 capteurs infra-rouge de suivi de ligne
Effectuateurs
- 2 roues motrices
- 4 LEDS multi-couleurs
- Buzzer
Ordinateur de bord
- Raspberry Pi Zero (linux, Python)
- Connection WiFi & Bluetooth au PC
Coque
Sympathique, amortissante, démontable, disponible en 8 coloris
Les capteurs
Les capteurs que vous pouvez utiliser sur le logiciel sont :
- La détection d’obstacles (blocage des roues) : permet d’ajouter une entrée binaire (1 si le robot a essayé de bouger mais n’a pas réussi, 0 dans le cas contraire).
En mode expert, vous avez accès à deux paramètres supplémentaires :- seuil de détection de mouvement de la caméra : permet de paramétrer la sensibilité du détecteur d’obstacles. Il faut augmenter la valeur si on a trop de faux positifs (capteur qui détecte un obstacle inexistant), et inversement diminuer la valeur si on a trop de faux négatifs (capteur qui ne détecte pas un obstacle réel).
- hauteur de blocage de la caméra : permet d’ignorer la partie haute de l’image lors de la détection des blocages. Avec une valeur de 1, l’image entière est analysée, avec une valeur de 0.5, seule la moitié inférieure est analysée.
.png)
- Capteurs IR : permet d’utiliser les 5 capteurs infrarouges situés sous le robot. Ils communiquent chacun une valeur entre 0 et 1 en fonction de la luminosité de la surface. Il y a deux modes principaux :
- Détection du noir : la valeur 0 correspond au blanc et la valeur 1 correspond au noir. Recommandé pour suivre une ligne noire sur fond blanc.
- Détection de la réflexion : la valeur 0 correspond au noir et la valeur 1 correspond au blanc.
L'option mode binaire permet d'obtenir uniquement des valeurs entières 0 et 1 au lieu de valeurs décimales entre 0 et 1.
Lorsque le mode binaire est actif, le paramètre seuil IR permet de fixer le seuil de bascule entre les valeurs binaires 0 et 1. Par exemple, lorsque le seuil vaut 0.5 (valeur par défaut), toutes les valeurs entre 0.5 et 1 sont arrondies à 1, et toutes les valeurs entre 0 et 0.5 sont arrondies à 0.
Il y a aussi plusieurs boutons (5 capteurs, capteur central, capteurs intérieurs, capteurs extérieurs) qui permettent de sélectionner quel sous-ensemble des capteurs IR on souhaite activer.
.png)
- Ultra-Sons : permet d’utiliser le capteur à ultra-sons situé à l’avant du robot. Il communique une valeur en fonction de la distance captée. Il y a 3 modes d'utilisation:
- distance obstacle : la valeur renvoyée est la distance de l'obstacle mesurée en mètres.
- proximité obstacle : la valeur renvoyée est inversement proportionnelle à la distance mesurée.
- Absence / présence obstacle : le capteur renvoie 1 si un obstacle est détecté et 0 sinon. La distance de détection des obstacles peut être ajustée grâce au curseur en-dessous.
.png)
- Caméra : permet d’activer la caméra à l’avant du robot. Plusieurs options sont proposées, qui déterminent la résolution de la caméra et l'utilisation ou non du zoom.
Le bouton pré-calcul image caméra permet de modifier les valeurs traitées :
- lorsque le pré-calcul est désactivé, l'image est par défaut en couleurs (système RGB).
- le mode niveaux de gris capture la luminosité de chaque pixel.
- le mode couleur dans l'image détecte les couleurs. Tous les pixels blanc/gris/noirs vont obtenir la valeur 0 et les pixels de couleur la valeur 1.
- le mode canal vert détecte uniquement la présence de vert (valeurs proches de 1) ou son absence (valeurs proches de 0).
- le mode rouge vs vert renvoie pour chaque pixel une valeur entre -1 et 1 qui correspond à la quantité de rouge moins la quantité de vert.
Le bouton prendre une photo permet de prendre une photo avec la caméra du robot et de l'enregistrer sur votre ordinateur.
.png)
.png)
- Le bouton dernières actions permet d'activer la mémoire de la dernière action lorsque le robot doit prendre une décision. Cela peut être utile par exemple pour éviter les situations où le robot effectue une action qui annule l'action précédente (il recule après avoir avancé, ou il pivote à droite après avoir pivoté à gauche).
- En mode robot simulé, le capteur état du robot simulé renvoie des informations sur la position, l'orientation et la vitesse du robot simulé.
Les actions
Les actions que vous pouvez utiliser sur le logiciel sont :
.png)
Vous pouvez également créer une action personnalisée en cliquant sur le bouton :

La fenêtre suivante va alors apparaître :
.png)
Nommez votre action et cochez “action du robot” pour modifier les paramètres : la nouvelle action est désormais disponible.
Pour l'enregistrer et pouvoir la réutiliser dans le futur, cliquez sur Fichier > Sauvegarder > Enregistrer la configuration.
Environnement d’utilisation
Nous vous recommandons d’utiliser le robot dans une arène AlphAI que vous retrouverez dans notre Boutique en ligne.
Pour réaliser l’intégralité des activités sur le logiciel, le robot aura besoin de :
- Une surface très plane et propre, de couleur unie
- Des murs extérieurs et intérieurs de couleurs différentes (et différente du sol), d’une hauteur supérieure au robot
- D’une ou plusieurs lignes au sol d’une couleur très contrastée avec la bâche (utilisez par exemple un scotch noir ; il est fourni avec les arènes.)
Si vous ne disposez pas d’arène ou même de robot, sachez également que de nombreuses activités sont réalisables avec le robot AlphAI simulé en 2D dans le logiciel.
En Wifi (recommandé)
Nous vous conseillons de toujours privilégier une connexion en WiFi si cela est possible, car elle permet de communiquer avec le robot avec un meilleur débit. De plus, elle est obligatoire pour la mise à jour des robots.
- Regardez le numéro inscrit au marqueur sous votre robot, en prenant garde à le tenir par sa base et non sa coque, puis allumez le robot en actionnant l'interrupteur PWR SWITCH sur ON
- Posez le robot dans l’arène et patientez quelques instants, jusqu’à ce que le robot vibre et clignote.
- Ouvrez le panneau de connexion WiFi de votre ordinateur : le robot apparaîtra alors sous le nom “ALPHAI-00XXXX” (XXXX étant le nombre que vous avez relevé sous le robot). Connectez-vous au robot : le mot de passe est la copie exacte du nom du réseau WiFi (ALPHAI-00XXXX).
- Lancez le logiciel AlphAI. Vérifiez en haut à droite de l’écran d’accueil que vous avez choisi le modèle de robot AlphAI
- Le robot avec son numéro et une icône Wifi apparaît alors sur l’écran de connexion : cliquez dessus
- Le robot vibre, ses lumières s’allument en continu et l’interface du logiciel s’ouvre. C’est parti !
⚠️ Avant d’éteindre votre robot ou de changer ses piles, nous vous conseillons d’appuyer sur le bouton “déconnexion” en bas à droite de l’écran dans l’interface.
En Bluetooth
Si vous préférez connecter le robot à votre ordinateur en bluetooth, sachez que le débit de transmission est plus faible qu’avec le WiFi. De plus, quand le robot aura besoin d’être mis à jour, il faudra utiliser la connexion en WiFi.
- Regardez le numéro inscrit au marqueur sous votre robot, en prenant garde à le tenir par sa base et non sa coque, puis allumez le robot en actionnant l'interrupteur PWR SWITCH sur ON
- Posez le robot dans l’arène et patientez quelques instants, jusqu’à ce que le robot vibre et clignote.
- Dans les paramètres de votre ordinateur, vérifiez que le bluetooth est bien activé
- Lancez le logiciel AlphAI. Vérifiez en haut à droite de l’écran d’accueil que vous avez choisi le modèle de robot AlphAI
- Veillez à ce que le bouton “Bluetooth Low Energy” en haut à droite de votre écran soit bien activé (avec un fond jaune).
- Le robot avec son numéro et une icône Bluetooth apparaît alors sur l’écran de connexion : cliquez dessus
- Le robot vibre, ses lumières s’allument en continu et l’interface du logiciel s’ouvre
⚠️ Avant d’éteindre votre robot ou de changer ses piles, nous vous conseillons d’appuyer sur le bouton “déconnexion” en bas à droite de l’écran dans l’interface.
Votre robot n’apparaît pas ? → désactivation BLE
En simulation
Si vous n’avez pas de robot AlphAI, vous pouvez tout de même utiliser notre logiciel grâce au simulateur 2D :
- Lancez le logiciel AlphAI
- Vérifiez en haut de l’écran que vous avez choisi le modèle de robot AlphAI dans le logiciel.
- Cliquez sur “Simulateur 2D”
- Le logiciel s’ouvre : observez en bas à gauche de l’écran un petit robot simulé dans une arène en 2D !
- L’arène virtuelle peut être customisée en changeant les couleurs des murs extérieurs et intérieurs ainsi qu’en supprimant ce mur. Pour y accéder, vous devez activer le mode expert en procédant comme suit : Fichier → Affichage des paramètres → Expert puis en allant dans l'onglet Capteurs (sur la gauche de votre écran), vous trouverez tout en bas l'ensemble des paramètres de l'arène virtuelle.
Remplacement des piles
Le robot utilise des piles rechargeables en lithium-ion qui sont donc très puissantes mais se déchargent rapidement. C’est pourquoi nous vous conseillons de toujours garder les piles de rechange fournies chargées à proximité.
Si les piles du robot sont sur le point d’être à plat, une icône de batterie rouge apparaîtra sur votre écran en bas à gauche. Changez les piles en moins d’une minute :
- Appuyez sur le bouton “déconnexion” en bas à droite de l’écran. Vous allez atterrir sur l’écran d’accueil
- Soulevez le robot en prenant garde à le tenir par sa base et non sa coque, puis éteignez le en mettant l'interrupteur PWR SWITCH sur OFF
- Retirez la coque du robot en exerçant une pression délicate sur sa base, puis en la faisant pivoter vers l’avant pour dégager la caméra
- Les piles se trouvent à l’arrière : glissez le doigt pour les remplacer avec des piles chargées en veillant à bien respecter les signes + et -
- Nous vous conseillons de mettre immédiatement les piles vides à recharger sur le chargeur AC fourni
- Remettre la coque sur le robot en commençant par l’avant ; veillez à bien positionner la caméra dans son emplacement, puis vérifiez que toute la base de la coque est insérée dans le châssis du robot. Appuyer délicatement sur l'arrière de la coque : vous devriez entendre un petit “clic”
- Rallumez le robot, reconnectez-le et reprenez votre activité !
Nous vous conseillons de toujours mettre à charger les piles utilisées pendant les activités en fin de session.
Mises à jour du robot
Learning Robots travaille continuellement à développer le logiciel, le robot AlphAI ainsi qu'à améliorer l’expérience utilisateur. C’est la raison pour laquelle nous procédons régulièrement à des mises à jour, qui seront transmises automatiquement à la Rapsberry Pi du robot lors de la prochaine connexion en WiFi.
Voir FAQ.
Problèmes récurrents
Votre robot ne s’allume plus ? Impossible de vous connecter au logiciel ? Les roues de votre robot sont bloquées ?…
Trouvez la réponse à votre problème sur cette page :
Voir FAQ.
Support & garantie
Les robots AlphAI sont garantis jusqu’à 2 ans après la date d’achat pour tout malfonctionnement.
En cas d'utilisation intensive, il est normal que les moteurs puissent présenter de l'usure : nous proposons des kits de remplacement de moteur, que vous pouvez retrouver dans notre boutique en ligne. N'hésitez pas à nous contacter si vous souhaitez que nous nous chargions du remplacement.
L’équipe de Learning Robots reste à votre disposition. Si vous ne trouvez pas comment résoudre votre problème sur notre page FAQ, n’hésitez pas à nous contacter via notre formulaire de contact.
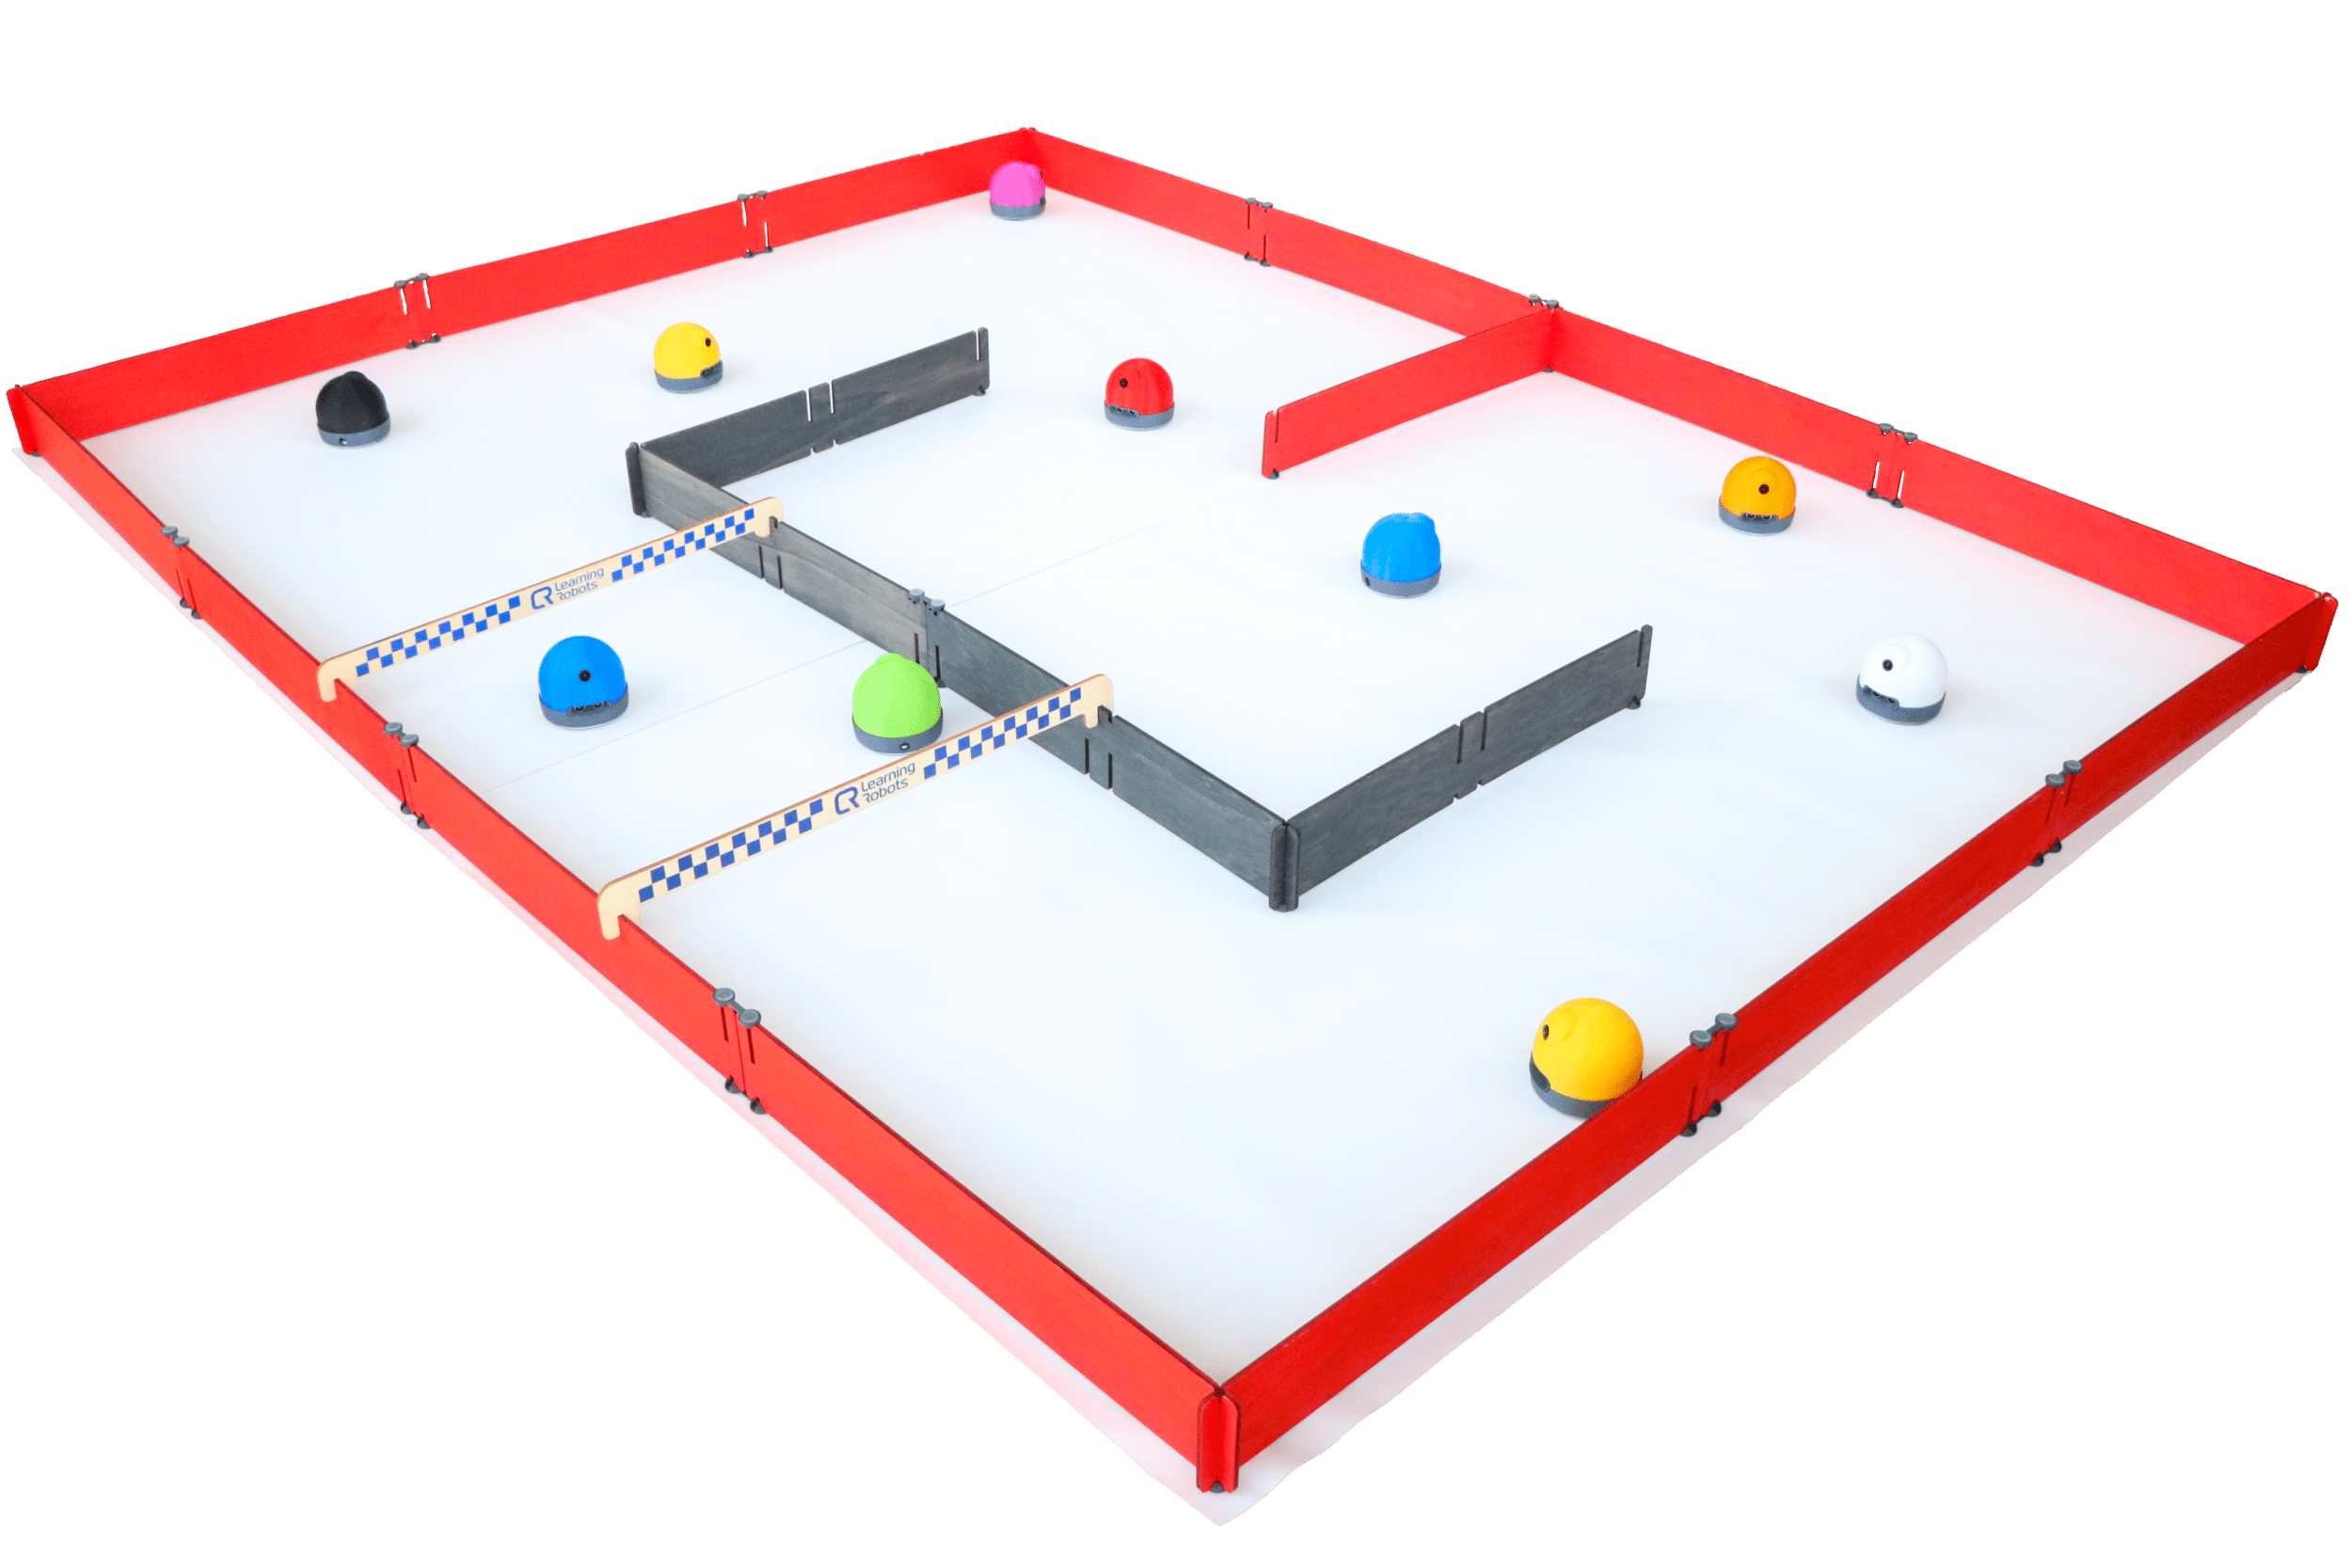
Afin de faire évoluer le robot dans un environnement parfaitement adapté, Learning Robots a conçu un système d’arènes modulaires très facile à assembler et à transporter.
Les arènes sont disponibles dans 4 tailles différentes qui sont combinables selon vos besoins et le nombre de robots.
Elles sont constituées de planches en bois peintes, de bâches et de supports.
Elles sont fabriquées en pin du Jura par Olivier Sauge (https://www.saugeartisansdubois.com) en France.
Composition
- bâche(s) à poser sur le sol, avec design imprimé ou non, sur une surface parfaitement plane. Assemblez les bâches grâce au scotch de peintre (inclus) pour augmenter la surface de l’arène !
- planches rouges, qui constituent les murs extérieurs de l’arène, à assembler grâce à leurs encoches et aux supports
- planches noires, qui constituent les murs intérieurs de l’arène, à assembler grâce à leurs encoches et aux supports. Maintenez les planches noires aux planches rouges grâce aux bannières de course
- bannière(s) de course, qui permettent de joindre les murs intérieurs et extérieurs, tout en créant un départ de course pour vos robots ! Elles sont fournies avec des réhausseurs
- Supports :
- Pieds : à utiliser dans les angles sous les encoches (planches qui s'emboîtent) ou aux extrémités. Il n'est pas nécessaire d'en mettre sur le dessus.
- Connecteurs : à utiliser pour assembler des planches en ligne droite. Il est conseillé d'en mettre à la fois en-dessous et au-dessus des connexions. Ils peuvent être utilisés parallèlement mais aussi perpendiculairement aux planches, en fonction de la disposition souhaitée.
Le montage
- Commencez par poser les bâches au sol, sur une surface très plane, et maintenez-les ensemble grâce au scotch de peintre pour plus de stabilité
- Assemblez les murs extérieurs grâce aux encoches et aux supports (seulement en dessous pour les pieds)
- Positionner le(s) mur(s) intérieur(s) au centre de l’arène avec leurs supports pieds
- Reliez les murs intérieurs et extérieurs grâce à la ou les bannière(s) de course, en veillant à bien surélever celle(s)-ci avec les réhausseurs fournis
Les arènes sont modulables à votre guise ! Voici quelques exemples de dispositions :
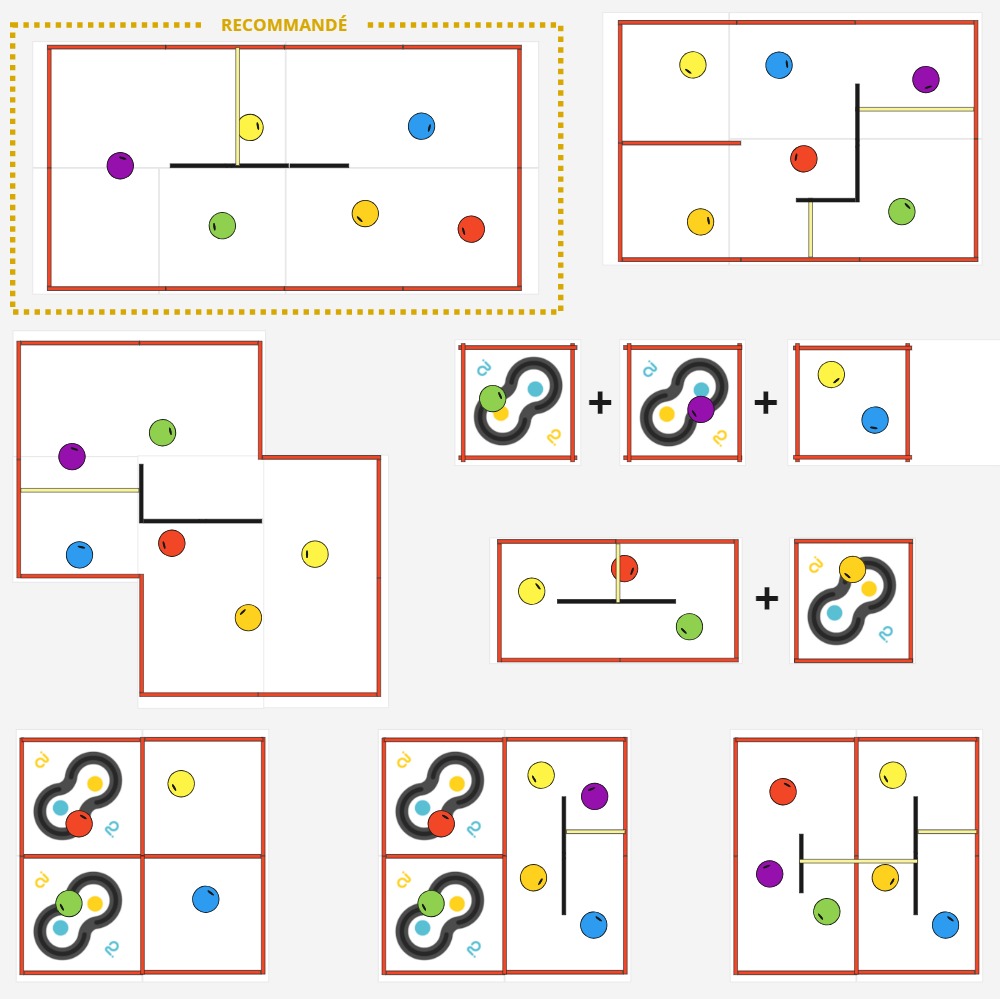
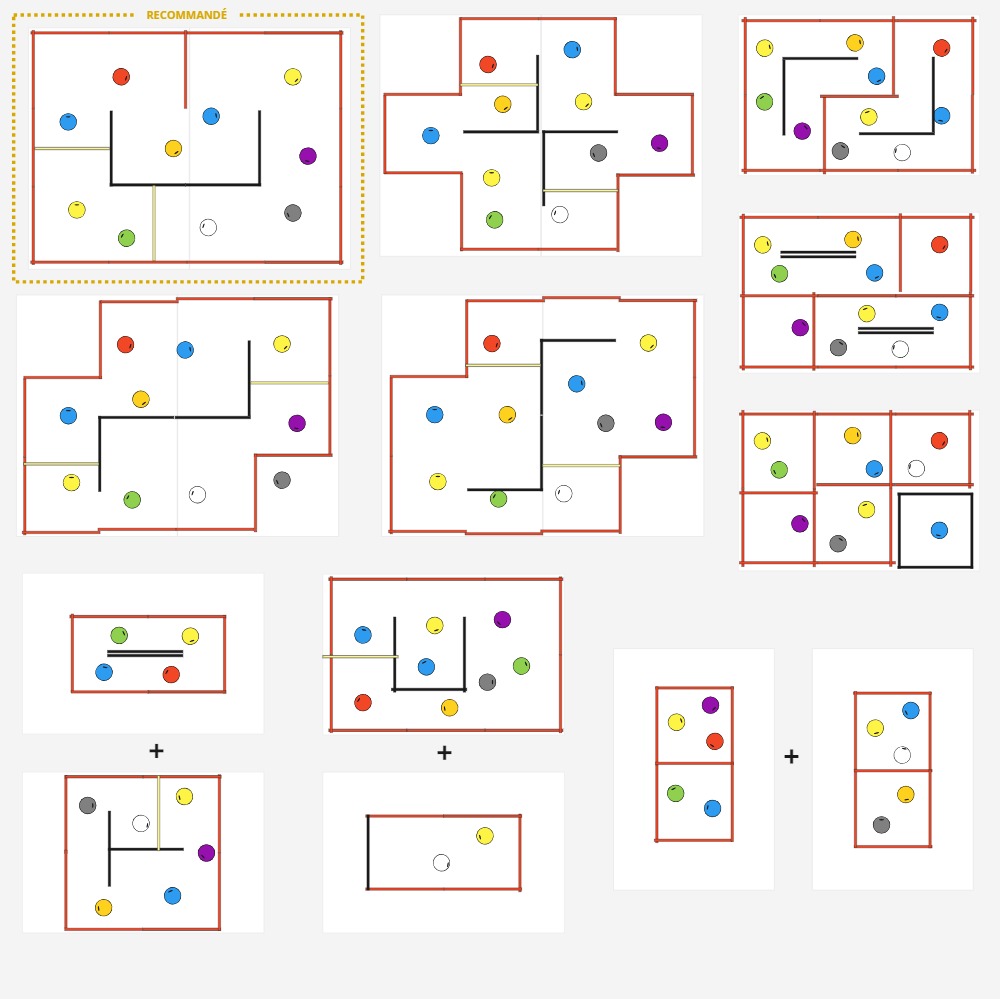
⚠️ Si vous avez une planche noire simple au centre de l'arène (et qui ne peut pas être maintenue aux planches rouges extérieures grâce à la bannière de course), nous vous conseillons de doubler cette planche en utilisant des connecteurs afin d'avoir plus de stabilité.
Utilisation scotch
Grâce au scotch noir fourni avec votre arène, vous pouvez tracer au sol des lignes à suivre par votre robot ! Elles sont très facilement décollables de la bâche à la fin de l’activité. Voir Activité AlphAI Suivi de Ligne
Le tracé le plus courant est une forme de 8, mais n’hésitez pas à faire parler votre imagination ! Préconisez des courbes douces afin de ne pas perturber le robot.
Matériel nécessaire :
- 2 robots minimum
- 1 ordinateur/robot
- Arène de course
Les + de cette activité :
- Ludique
- Appréciée de tous les âges
- Parfaite pour introduire le principe de l’apprentissage supervisé
Durée :
40 à 60 minutes
Age :
+ 8 ans
Configuration logiciel :
Mode "course de robot"
Activité ludique pour une arène avec plusieurs robots : les élèves entraînent les robots à rouler dans un circuit puis une course est organisée. Les élèves apprennent par la manipulation le principe de l'apprentissage supervisé et l'importance de la qualité des données d'entraînement.
La course de robots est l’activité recommandée pour débuter la solution AlphAI.
Introduction
Construisez votre arène de manière à former un circuit. Nous vous recommandons d’utiliser une arène de course conçue par Learning Robots, mais vous pouvez également construire votre propre circuit : veillez dans ce cas à ce qu’il y ait un bon contraste visuel entre le sol et les bords du circuit, que l'éclairage soit uniforme et que le sol soit propre.
Paramétrage
Connectez chaque robot à un ordinateur, puis choisissez le configuration d'exemple “course de robots” ou créez vos propres paramètres.
Veillez à vérifier que tous les robots ont les mêmes paramètres et surtout la même vitesse.
Entraînement
Vérifiez que le bouton « autonome » est bien désactivé, et que le bouton “apprentissage” est bien activé.
C’est à vous de jouer ! Chacun entraîne son robot à se déplacer en cliquant sur les actions à droite de l’écran ou en le contrôlant avec les flèches directionnelles ou AZEQSD du clavier.
Nous vous conseillons de faire des tours d’arène dans le sens des aiguilles d’une montre.
Pendant cette phase d’apprentissage, ce n’est pas la peine de chercher à aller vite : le but est surtout d’apprendre au robot à faire des tours dans le bon sens et sans se cogner aux murs. Prenez le temps de bien choisir l’action adéquate à chaque fois (si vous vous trompez, cliquez sur “Oublier action” à côté du bouton apprentissage). Faites attention à ne pas confondre la gauche et la droite quand le robot est en sens inverse !
Apprenez au robot à rester loin de l’obstacle central pour éviter qu’il s’y coince lorsqu’il sera autonome.
Vous pouvez également déplacer le robot à la main pour le mettre intentionnellement face à des obstacles et lui apprendre quoi faire dans ces situations.
Dans le panneau de contrôle en bas de l’écran, vous pouvez fixer la vitesse de pointe du robot. Nous vous conseillons une vitesse maximale de 30 pour une arène petite course, 35 pour une arène grande course, et 40 pour une arène très grande course.
Plus vous augmentez la vitesse, plus le robot sera rapide, mais plus il sera difficile à contrôler. Choisir une vitesse très élevée n’est pas toujours un avantage !
Test de l’apprentissage et améliorations
Après avoir fait quelques tours de l’arène, vous pouvez activer l’autonomie. Si votre robot est bien entraîné, il se mettra alors à faire des tours par lui-même !
Mais l’apprentissage n’est pas terminé ; même lorsque le robot se pilote lui-même, vous pouvez continuer de le commander en appuyant sur les flèches pendant qu’il se déplace. Par exemple, si le robot se coince contre un mur et ne sait plus quoi faire, vous pouvez le débloquer en lui demandant de faire marche arrière (à condition que l'action "reculer" ait été activée dans l'onglet "actions" sur la gauche de l'interface du logiciel.
La course de robots
Une fois vos robots entraînés, organisez une compétition : placez les robots concurrents sur la ligne de départ. Donnez le top départ et les équipes cliquent alors en même temps sur le bouton « Autonome » (ou appuient sur la barre d’espace du clavier) pour démarrer la course.
Pendant la course, seul le mode autonome est autorisé : les participants ne doivent pas donner d’instruction à leur robot. Un arbitre pourra déplacer les robots qui sont bloqués pendant plus de 5 secondes, pour leur permettre de continuer la course.
Le premier robot qui a effectué 3 tours complets a gagné !
Retours d'expérience et conclusion
Nous avons utilisé ici un algorithme d’apprentissage supervisé. Cet algorithme est basé sur le réseau de neurones artificiels qui est affiché à l’écran (mais il existe d’autres types d’algorithmes qui ne sont pas basés sur des réseaux de neurones, par exemple l’algorithme des K plus proches voisins). Tous les algorithmes d’apprentissage supervisé fonctionnent de la manière suivante :
Dans une première phase appelée entraînement, nous avons fourni des exemples de décisions à l’algorithme, c’est-à-dire à la fois des images de ce que voit la caméra du robot et les actions qu’il faut choisir lorsque la caméra voit ces images. Pendant l’entraînement, le réseau de neurones artificiels a été modifié par l’algorithme d’apprentissage (plus spécifiquement, certaines connexions ont été renforcées, d’autres diminuées, de sorte que le réseau de neurones devienne capable d’imiter les mêmes prises de décision).
Dans un second temps appelé utilisation, l’algorithme est capable de prendre de bonnes décisions sur de nouvelles images.
Nous avons vu que tous les robots n’ont pas appris la même chose, certains se sont mieux comportés pendant la course, d’autres moins bien. Comme tous les participants ont utilisé le même algorithme, nous voyons bien que la qualité des prises de décisions en autonomie dépend de la qualité des données d’entraînement.
Nous pouvons discuter ensemble de ce qui fait la qualité des données d’entraînement :
• Qualité des données d’entraînement = absence d’erreurs dans les prises de décisions
• Quantité des données pas toujours gage de qualité d’autonomie
• Exhaustivité des situations : le robot a plus de risques de faire un mauvais choix lorsqu’il est confronté à une situation inconnue
Pour aller plus loin
Maintenant que les élèves ont compris que pour gagner la course, le plus important est la qualité des données d'entraînement, recommencer l'activité depuis le début !
Vous pouvez également recommencer la course en ajoutant de nouvelles règles :
- Limiter les données d’entraînement (par exemple : 25 points de données maximum), mais en laissant la possibilité aux participants de déplacer leur robot à la main pendant la phase d'entrainement
- Complexifier l’arène
- Avoir une arène différente pour l’entraînement et pour la course
Matériel nécessaire :
- 2 robots minimum
- 1 ordinateur/robot
- Arène de course
Durée :
40 à 60 minutes
Age :
+ 8 ans
Les + de cette activité :
- Ludique
- Appréciée de tous les âges
- Parfaite pour introduire le principe de l’apprentissage supervisé
Configuration logiciel :
Mode "course de robot"
Matériel nécessaire :
- 1 robot minimum
- 1 ordinateur/robot
- Surface plane de couleur claire
- Ruban adhésif noir
Paramètrage logiciel :
“Suivi de ligne” en édition manuelle (créez les connexions directement sur le logiciel) ou en apprentissage supervisé (entraînez le robot sur la piste)
Durée :
20 à 30 minutes
Age :
10 ans et +
Les + de cette activité :
- Peu de matériel nécessaire
- Très simple et rapide à réaliser
- Réseau de neurones très facile à comprendre
Cette activité est réalisée avec chaque robot individuellement. Nous allons apprendre au robot à suivre un tracé au sol, sans qu’il ne se trompe !
Les élèves apprennent que le succès de l'apprentissage supervisé dépend plus de la qualité et de l’exhaustivité des données d’entraînement du robot que de leur quantité. Ils pourront comprendre très facilement le principe du réseau de neurones artificiels, car celui utilisé dans cette activité est très simple et lisible (5 entrées, 5 ou 6 sorties).
[Contenu vidéo à venir]
Introduction
Sur une surface plane de couleur unie et claire, tracez un parcours grâce à un scotch de couleur noire (fourni avec les arènes).
Si vous souhaitez utiliser votre propre matériel, veillez à ce que le robot perçoive bien le contraste entre le sol et la ligne.
La forme classique est un “8”, mais n’hésitez pas à faire parler votre imagination !
Veillez cependant à toujours créer des courbes douces pour ne pas perturber le robot.
Paramétrage (connexion)
Connectez le robot à un ordinateur (voir section connexion au robot si besoin), puis choisissez la configuration d'exemple “suivi de ligne” en édition manuelle ou en apprentissage supervisé, ou bien créez vos propres paramètres.
Veillez à vérifier que le robot a une vitesse inférieure ou égale à 20 à l’aide du curseur au bas de vôtre écran.
Entraînement
Si vous êtes en édition manuelle :
Vérifiez que les boutons « autonome » et “apprentissage” sont désactivés, et que le bouton “édition manuelle” est bien activé.
Cliquez sur les liens entre les neurones d’entrée (capteurs infrarouges) et de sortie (action du robot) pour créer une connexion. Nous vous conseillons de créer les connexions suivantes :
- Capteur IR gauche : pivoter à gauche
- Capteur IR centre gauche : tourner légèrement à gauche
- Capteur IR central : aller tout droit
- Capteur IR centre droit : tourner légèrement à droite
- Capteur IR droite : pivoter à droite
Voici alors à quoi devrait ressembler votre réseau de neurones :
Si vous êtes en apprentissage supervisé :
Vérifiez que le bouton « autonome » est bien décoché, et que le bouton “apprentissage” est bien coché.
Placez le robot sur la ligne tracée sur le sol pour activer les capteurs. A chaque fois qu’un des capteurs est activé, déclenchez l’action correspondante :
- Capteur IR gauche : pivoter à gauche
- Capteur IR centre gauche : tourner légèrement à gauche
- Capteur IR central : aller tout droit
- Capteur IR centre droit : tourner légèrement à droite
- Capteur IR droite : pivoter à droite
- Aucun capteur ne s'active : reculer
Nous vous conseillons de donner plusieurs exemples pour chaque situation.
Test de l’apprentissage
Une fois que le réseau de neurones est configuré, observons si le robot réussit à suivre la ligne !
Placez-le en début de parcours, activez l’autonomie et regardez comme il se débrouille.
Vous pouvez ensuite complexifier la piste en y ajoutant des intersections afin de créer de nouvelles difficultés pour les robots !
Bilan et retours d'expérience
Grâce à un réseau de neurones très simple et très peu de données d’entraînement, le robot a réussi à suivre la ligne.
On peut observer sur le logiciel le poids accordé à chaque connexion, et comprendre la manière dont le robot prend ses décisions : en fonction du capteur qui est activé (ou non), l’algorithme attribue des préférences à chacune des actions à choisir : le robot sélectionne l’action avec la préférence la plus forte.
Votre robot est sorti de piste ou a choisi la mauvaise action ? Essayez de comprendre pourquoi ! Quelques suggestions :
- il y a un biais : vous avez fait une erreur dans l’entraînement du robot
- plusieurs capteurs se sont activés en même temps, par exemple à un croisement : le robot a-t-il été entraîné à réagir à cette situation ?
- l’angle d’une courbe de la ligne au sol est trop abrupt
- la vitesse du robot est trop forte
Matériel nécessaire :
- 1 robot minimum
- 1 ordinateur/robot
- Surface plane de couleur claire
- Ruban adhésif noir
Durée :
20 à 30 minutes
Age :
10 ans et +
Paramètrage logiciel :
“Suivi de ligne” en édition manuelle (créez les connexions directement sur le logiciel) ou en apprentissage supervisé (entraînez le robot sur la piste)
Les + de cette activité :
- Peu de matériel nécessaire
- Très simple et rapide à réaliser
- Réseau de neurones très facile à comprendre
Matériel nécessaire :
- 1 robot minimum
- 1 ordinateur/robot
- Arène facultative
(recommandé si surface en hauteur)
Configuration logiciel :
- configuration d'exemple :
“navigation avec caméra”
Durée :
1 heure
Age :
8 ans et +
Les + de cette activité :
- Ludique et visuelle
- Rapide à mettre en place
- Très adaptée aux enfants les plus jeunes
Les élèves pourront apprendre au robot à suivre leur main ou un objet bien identifiable.
On pourra aller plus loin en laissant place à l'imagination des élèves : réalisation de parcours ou chorégraphies, où le robot réagit à divers signes visuels, comme par exemple des signes de la main.
[Contenu vidéo à venir]
Introduction
Placez le robot sur une table avec assez d’espace pour se déplacer. Vous pouvez utiliser une arène si vous voulez éviter que le robot tombe de la table. Dans ce cas, une petite arène sans obstacle sera suffisante.
Paramétrage
Connectez le robot à l’ordinateur, puis choisissez la configuration d'exemple “navigation avec caméra”.
Nous utiliserons le capteur caméra, et les actions suivantes : avancer, pivoter à droite, pivoter à gauche, et s’arrêter.
Veillez à adapter la vitesse à la taille de la table.
Entraînement et mise en oeuvre (phase d’apprentissage)
L'entraînement se fera à 2, en faisant attention à être bien coordonné.
Un des élèves s’occupera de faire les signes de la main au robot, pendant que l’autre va gérer le logiciel.
L’objectif est d’apprendre au robot à suivre la main de l’élève (ou un objet bien identifiable).
Dans une première phase, un des élèves place sa main dans le champ de vision caméra du robot, pendant que l’autre choisit l’action qui rapprochera le robot au plus près de la main. Donnez plusieurs exemples au robot pour chaque position de la main dans l’image.
Dans une deuxième phase, il faudra apprendre au robot à s’arrêter lorsqu’il ne voit pas de main. De nouveau, le robot a besoin de plusieurs exemples avec des points de vue différents : l’élève en charge du logiciel clique sur l’action “s’arrêter”, pendant que l’autre élève place le robot à différents endroits (en faisant attention à ne rien mettre devant la caméra évidemment !)
Test de l’apprentissage et améliorations
Activez maintenant le mode Autonome.
Vérifiez que le robot a bien appris en observant s'il suit correctement votre main.
Si ce n'est pas le cas, désactivez à nouveau le mode autonome et ré-entraînez le robot.
Des pistes pour aller plus loin
- On inverse les rôles, le robot parvient-il à suivre la main de l’autre élève ou un objet différent ? Si non : poursuivre l’entraînement jusqu’à ce que le robot soit capable de suivre les mains des deux élèves.
- Placez le robot sur un parcours (tracez par exemple 2 lignes parallèles sur le sol), le mettre en mode autonome et le guider à la main sur le parcours. Permet d’évaluer à la fois l’entraînement du robot et le guidage effectué par l’élève.
- Entraînez un robot à en suivre un autre ! Le robot de devant sera piloté, et l’autre devra le suivre en mode autonome. Astuce : pensez à choisir une vitesse un peu plus faible pour le robot suiveur.
- Visualiser les données d’apprentissage et corriger les erreurs qui s’y trouvent. Le comportement du robot s'en trouvera amélioré.
Bilan et retours d'expérience
La mission des élèves était de réaliser l’entraînement (apprentissage supervisé) d’une IA.
Après apprentissage, le robot est capable d'interagir avec un utilisateur en réagissant aux signes de sa main.
En montrant des exemples au robot, il parvient à associer correctement les bonnes actions aux signes de main correspondants ce qui permet de « communiquer » avec lui.
Notions à retenir :
- Ce sont les données d’entraînement qui déterminent le comportement du robot.
- La qualité des données (absence d’erreurs) est très importante.
- Il faut aussi fournir au robot des exemples suffisamment divers si l’on souhaite qu’il soit capable de généraliser le comportement suivi (par exemple suivre un autre objet ou une main différente).
Matériel nécessaire :
- 1 robot minimum
- 1 ordinateur/robot
- Arène facultative
(recommandé si surface en hauteur)
Durée :
1 heure
Age :
8 ans et +
Configuration logiciel :
- configuration d'exemple :
“navigation avec caméra”
Les + de cette activité :
- Ludique et visuelle
- Rapide à mettre en place
- Très adaptée aux enfants les plus jeunes
Matériel nécessaire :
- 1 robot minimum
- 1 ordinateur/robot
- Arène individuelle minimum (sans obstacle)
Configuration logiciel :
- configuration d'exemple : “KNN caméra”
Durée :
30 minutes
Age :
+ 14 ans
Les + de cette activité :
- Algorithme intuitif
- Peut être réalisée avec le simulateur
- Excellente visualisation de la prise de décision du robot
Visualisation et application de l'algorithme des K plus proches voisins (au programme de première NSI) pour apprendre au robot à éviter les obstacles.
Niveau expert : dans l’activité “Algorithme KNN avancé”, les élèves pourront reprogrammer l'algorithme par eux-mêmes et le mettre en œuvre sur le robot.
Introduction
Placez le robot dans une arène sans mur intérieur. Veillez à ce que l’arène soit bien éclairée, afin d’avoir un fort contraste entre le sol et les murs.
Paramétrage
Connectez le robot à l’ordinateur puis choisissez la configuration d'exemple “KNN caméra”.
Veillez à ce que la vitesse du robot soit inférieure ou égale à 30.
Pour cette activité, le robot analyse des images caméra dont la résolution a été réduite à 2 pixels seulement, et sans couleur. On obtient donc un pixel gauche et un pixel droit, qui mesurent des niveaux de gris. L'abscisse (pixel de gauche) et l’ordonnée (pixel de droite) du graphe montrent ces valeurs de niveaux de gris, 0 correspondant au noir et 1 correspondant au blanc.
.png)
Les actions par défaut sont : avancer (en jaune), pivoter à gauche (en rose) et pivoter à droite (en vert).
Il est possible d’ajouter davantage d’actions pour ce scénario, mais veillez à le faire dès le début, car modifier les actions provoque l’effacement de la mémoire d'expérience.
Phase d'entraînement
Vérifiez que le bouton « autonome » est bien décoché, et que le bouton “apprentissage” est bien coché.
Dirigez le robot en cliquant sur les flèches à droite de l’écran, où grâce aux touches « flèches » du clavier.
Tournez quand le robot est proche des murs et allez tout droit sinon. Vous pouvez aussi déplacer le robot à la main pour le mettre dans chaque situation.
Après chaque mouvement, un nouveau point apparaît. La position de chaque point est déterminée par ses coordonnées (x ; y), l’abscisse "x" représentant la luminosité dans la zone de gauche et l’ordonnée "y" représentant la luminosité dans la zone de droite. La couleur autour de chaque point est la couleur associée à l’action choisie (vert pour pivoter à droite, jaune pour en avant et rouge pour pivoter à gauche).
.png)
Ces points sont les données d’entraînement. Cette phase est primordiale pour que l’IA fonctionne correctement. Si les données d’entraînement contiennent trop d’erreurs ou approximations, l’IA ne permettra pas d’avoir un résultat satisfaisant.
Une fois l’entraînement terminé, ouvrez le panneau Visualisation et cochez la case “arrière-plan” la section “Espace d’états”.
.png)
Vous verrez alors apparaître à l’écran les 3 différentes zones de couleurs qui correspondent à l’action que choisira le robot en fonction de la luminosité captée par sa caméra.
Si votre robot a été bien entraîné, le graphe devrait ressembler à :
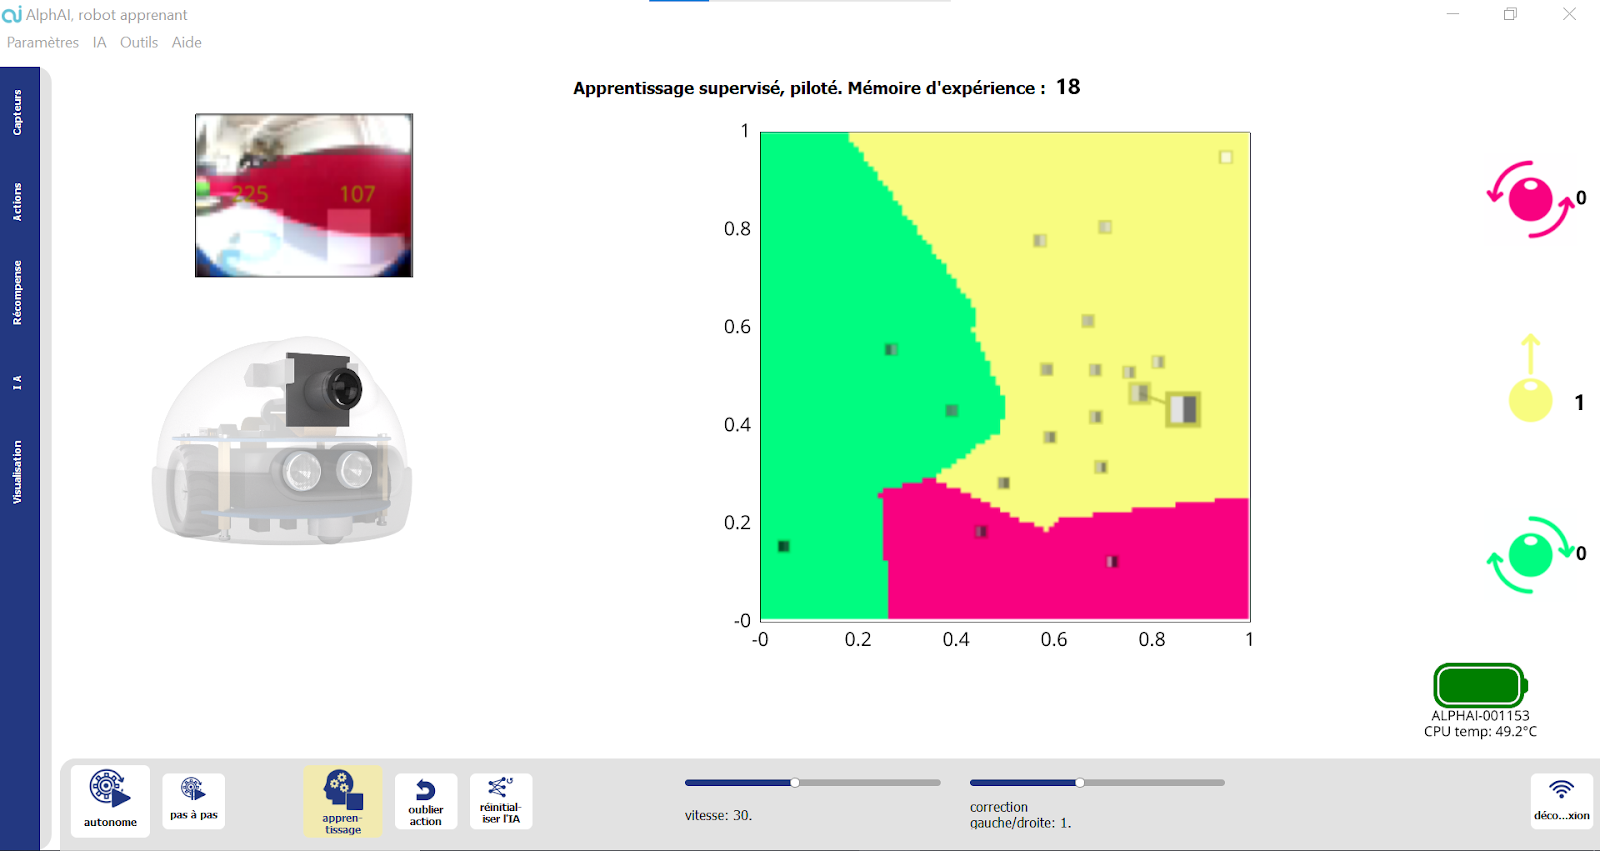
.png)
La luminosité diminue lorsque le robot s’approche des murs. Normalement, si la zone de gauche est la plus sombre, il faut tourner à droite, et inversement.
Lorsque vous aurez trois régions bien claires sur le graphique, arrêtez la phase d’entraînement et activez l’autonomie pour passer à la phase de test.
Test de l’apprentissage et améliorations
Activez l’autonomie en cliquant sur le bouton correspondant à l’écran ou en appuyant sur la barre d’espace.
Comment se comporte le robot ? Évite-t-il les obstacles comme prévu ?
Si le robot est bien entraîné, il saura éviter les bords par lui-même. Si au contraire il est mal entraîné ou la luminosité dans l’arène n’est pas homogène, les zones de couleur sur le graphique auront des contours plus irréguliers et le robot fera plus d’actions inappropriées.
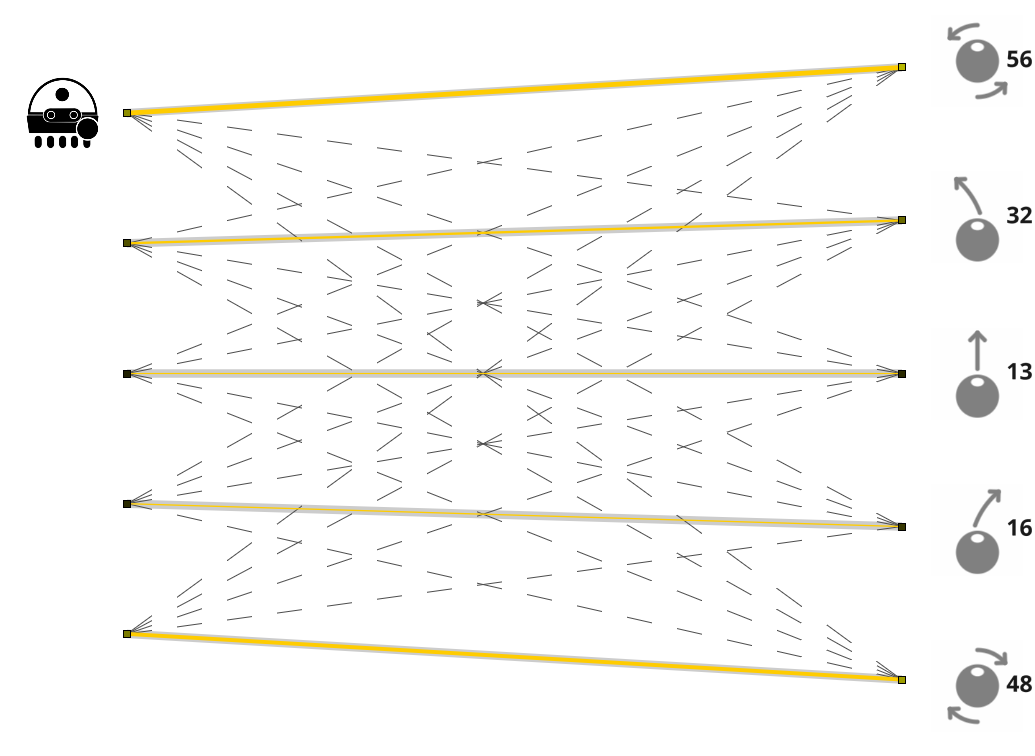
Comprendre la prise de décision de l’algorithme : le point le plus gros est celui capté à cet instant par la caméra : il se lie au point le plus proche dans le graphe, qui a été enregistré lors de la phase d'entraînement : c’est l’action correspondante à son plus proche voisin qu’il va choisir d’effectuer !
Pistes pour aller plus loin
- Dans l’onglet IA, faire varier la valeur de k (le nombre de voisins). Observer l’effet sur la prise de décision et sur la coloration d’arrière-plan du graphe. Quelle valeur de k donne le meilleur comportement ? Pourquoi ?
- Après avoir bien compris le principe de l’apprentissage, refaire un apprentissage avec un plus petit nombre de points (par exemple: défi 5 points d’entraînement seulement).
Bilan et retours d'expérience
Points abordés / Notions à retenir :
- Le principe de l’algorithme des k plus proches voisins : comprendre et savoir expliquer comment sont prises les décisions du robot.
- Quel est l’impact des données d'entraînement sur le résultat ? Comment bien choisir les données d’entraînement ?
- Quel est l’impact du paramètre k ? Comment choisir la meilleure valeur pour ce paramètre ?
Matériel nécessaire :
- 1 robot minimum
- 1 ordinateur/robot
- Arène individuelle minimum (sans obstacle)
Durée :
30 minutes
Age :
+ 14 ans
Configuration logiciel :
- configuration d'exemple : “KNN caméra”
Les + de cette activité :
- Algorithme intuitif
- Peut être réalisée avec le simulateur
- Excellente visualisation de la prise de décision du robot
Matériel nécessaire :
- 1 robot minimum
- 1 ordinateur/robot
- un objet plat (boîte, planche, smartphone…)
Configuration logiciel :
- configuration d'exemple : “détection d’intrus”
Durée :
2 heures
Age :
15 ans et +
Les + de cette activité :
- Idéal à faire en classe
- Peu de matériel nécessaire
- Pluridisciplinaire (maths / informatique)
Compréhension mathématique des réseaux de neurones à travers une activité basée sur le capteur à ultrasons du robot. On y découvre notamment pourquoi on a besoin de couches de neurones intermédiaires.
[Contenu vidéo à venir]
Mise en place
Placez le robot à côté de l’ordinateur, face à un mur (ou une planche d’arène) à environ 50 cm, et munissez-vous d’un objet à côté plat (une boîte, une planche, un smartphone) qui jouera le rôle de l’intrus.
Chargez la configuration "Détection d’intrus" dans la catégorie "Apprentissage supervisé". Ce scénario utilise uniquement le capteur à ultrasons.
Toute l’activité est réalisée en mode "édition manuelle", c'est-à-dire que l’on va choisir soi-même les paramètres du réseau de neurones sans faire appel à un algorithme d’apprentissage.
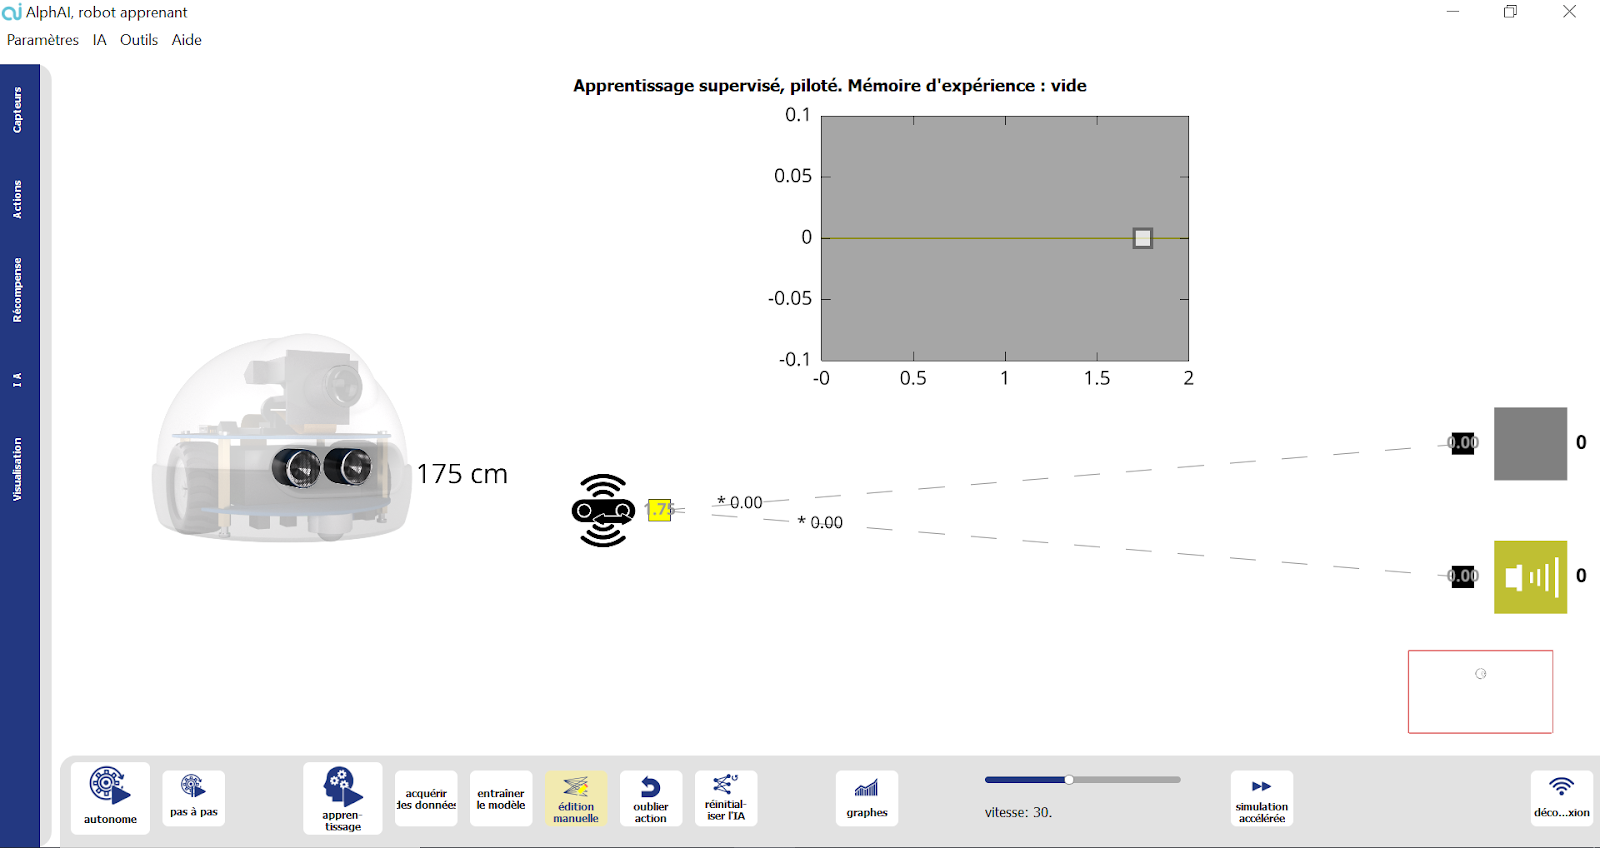
Présentation de l’interface
Dans cette activité, votre écran principal comporte deux visualisations :
- En bas, le réseau de neurones étudié. Au début de l'activité, le mode édition manuelle (dans les boutons en bas de votre interface du logiciel) doit être activé, ce qui permet de modifier soi-même les paramètres du réseau de neurones. Pour modifier la valeur d'une connexion, placez votre souris sur cette connexion (elle devient rouge), puis utilisez votre clavier pour entrer la valeur souhaitée ou la molette de votre souris pour modifier la valeur actuelle. Pour modifier la valeur du biais d'un neurone, placez votre souris sur le neurone lui-même (pas l'affichage de la valeur), puis procédez comme pour les connexions.
- En haut, un graphique représentant l'espace d'états. En abscisse, la distance mesurée par le capteur à ultrasons. En ordonnée, les niveaux d'activation des neurones de sortie. Il y a deux courbes représentées car il y a deux neurones de sortie. La correspondance courbe/neurone est indiquée par un code couleur. La valeur des neurones de sortie est une fonction de la valeur d'entrée (la distance). La couleur de fond du graphique indique quelle courbe est au-dessus de l'autre pour chaque valeur d'entrée, et donc quelle action sera choisie par le robot pour cette valeur d'entrée.
Objectif et problématique
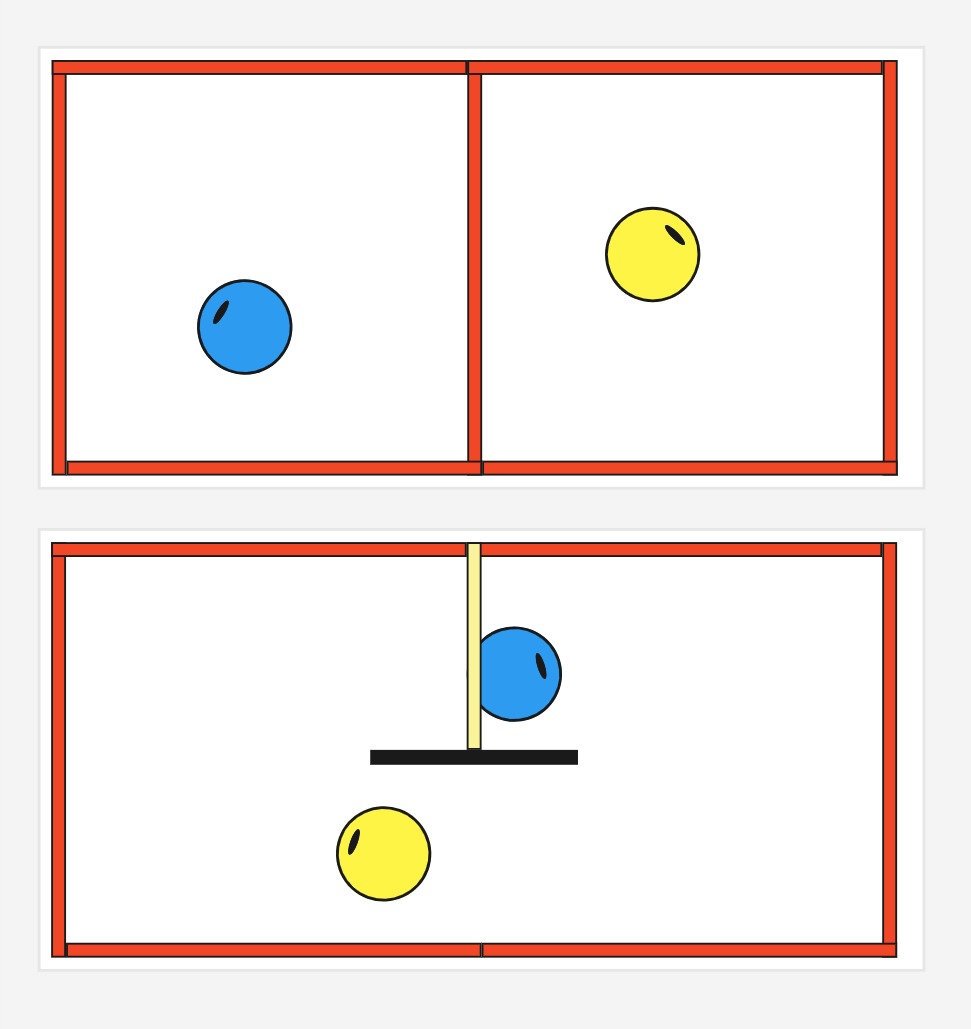
Le robot est face à un mur et doit biper lorsque quelqu’un (un intrus) passe entre lui et le mur.
Il faut configurer le réseau de neurones pour accomplir cette tâche. Puisque le seul capteur utilisé est le capteur à ultrasons, l’objectif est d’obtenir un bip lorsque la distance est faible, et l’action "ne rien faire", lorsque la distance est normale.
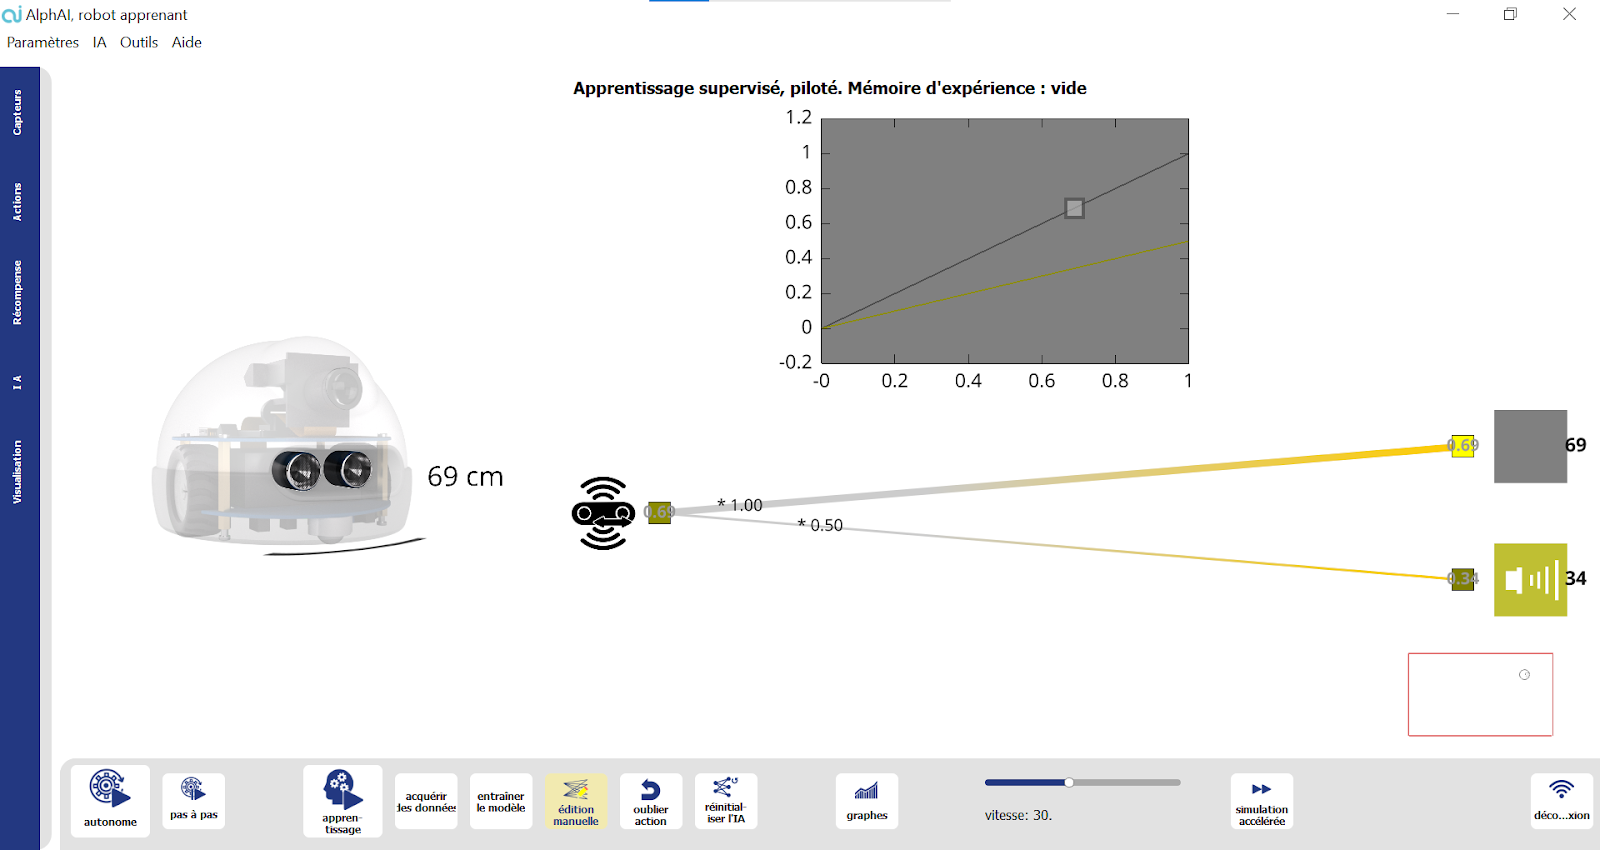
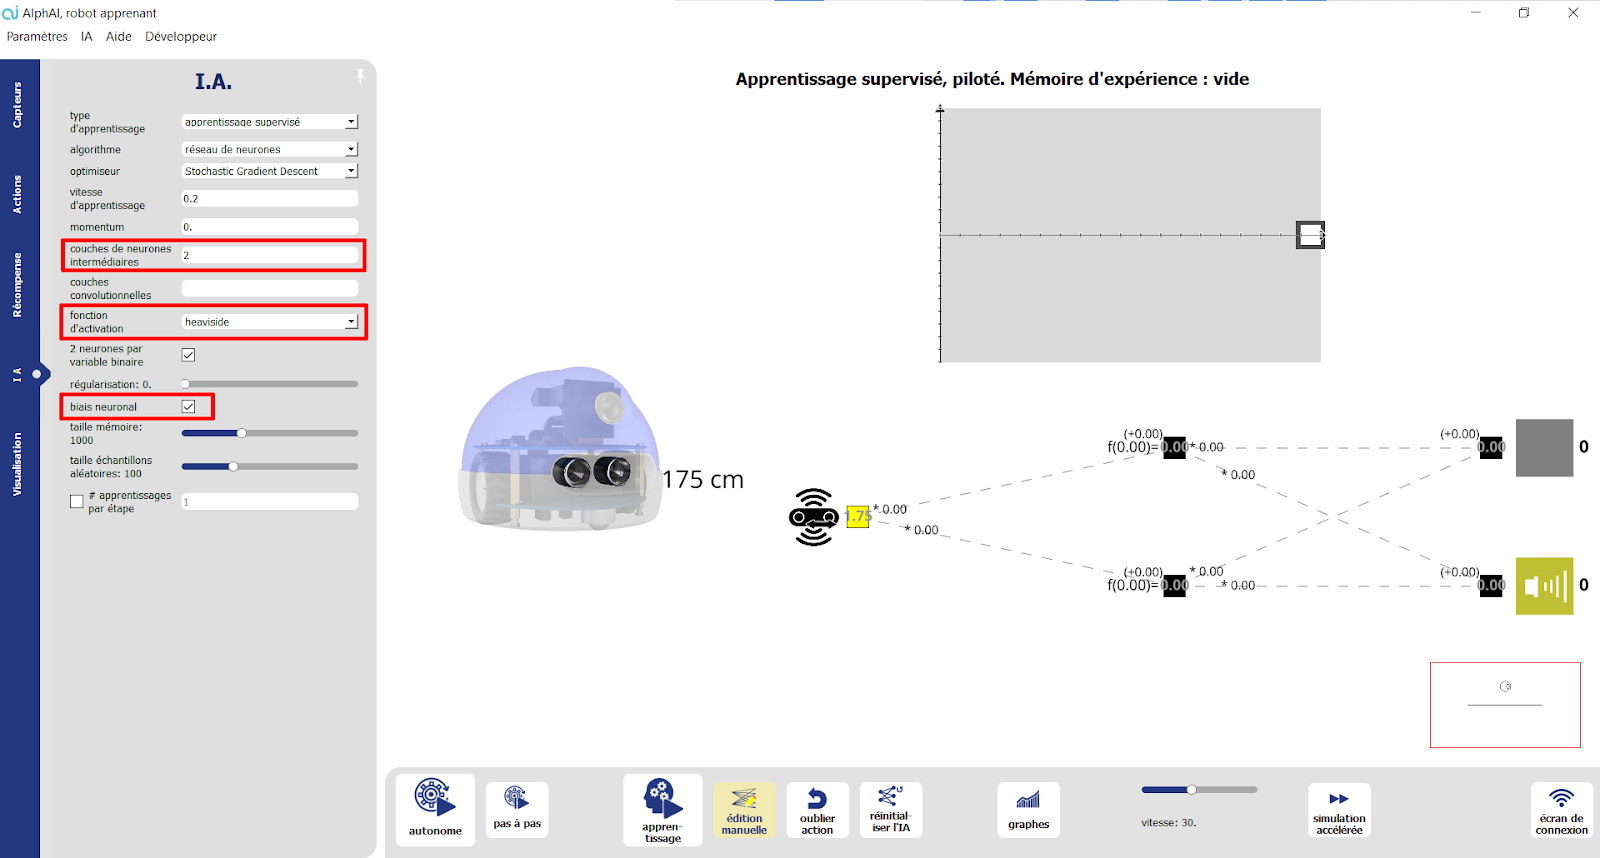
Intégration de biais neuronaux
Les simples paramètres "poids des connexions" sont insuffisants pour accomplir cette tâche. Il faut activer l’option "biais neuronal" (dans l’onglet IA), cela débloque de nouveaux paramètres qui vont nous permettre d’atteindre cet objectif.
Tentative de triche
Problématique
Un intrus tente de tricher en exploitant les caractéristiques du capteur à ultrasons : si le côté plat est placé en diagonale par rapport au capteur, les ondes rebondissent et la distance captée est alors bien supérieure à celle du mur ! Il faut adapter notre réseau de neurones pour détecter également cette tentative de triche.
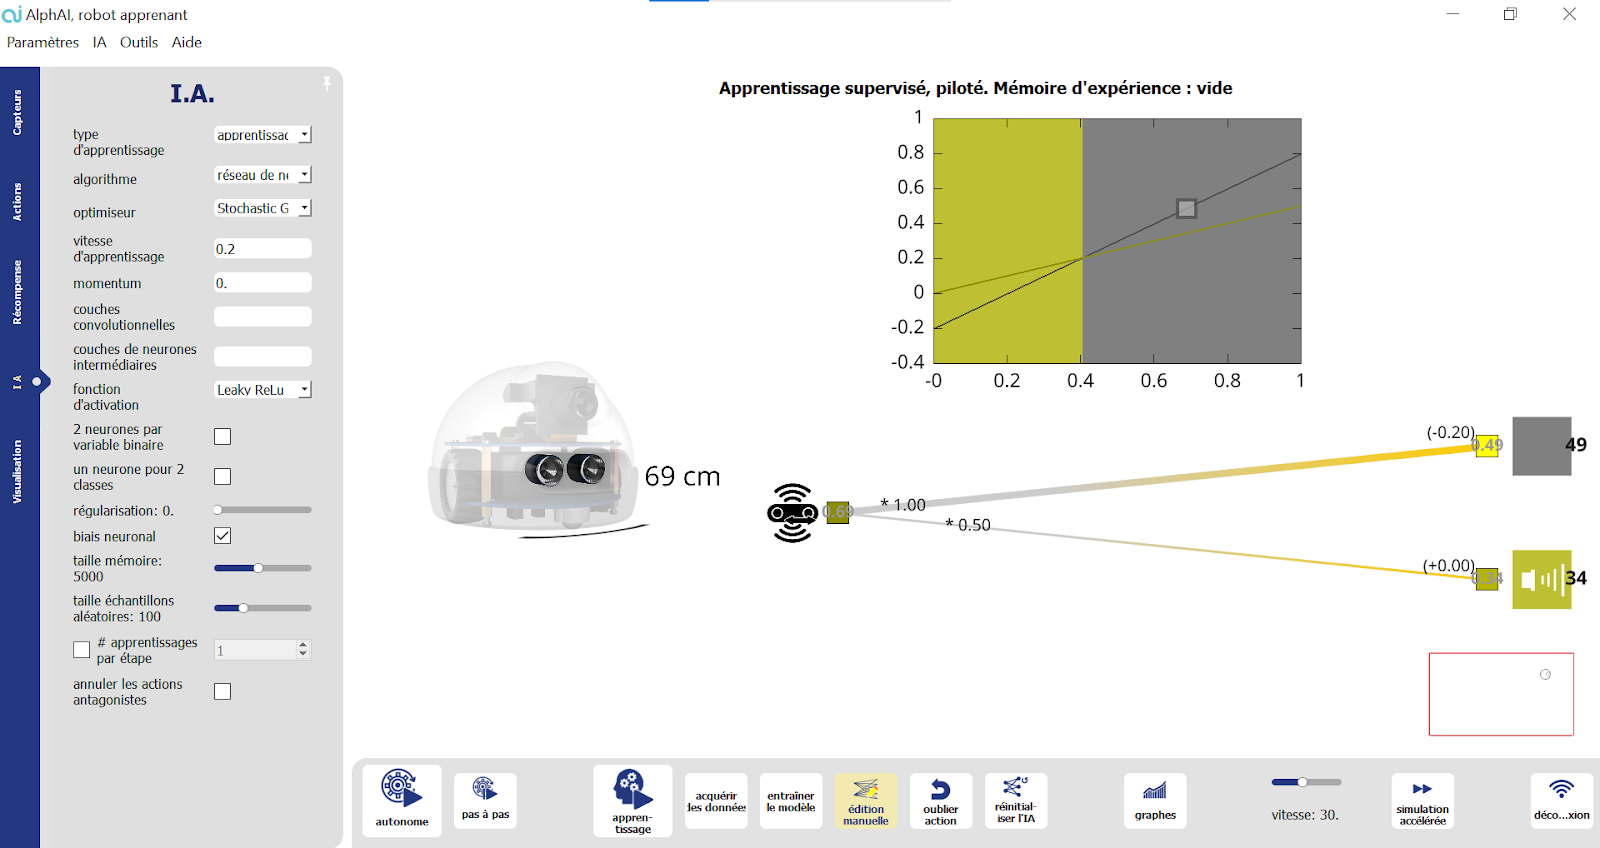
Couches de neurones intermédiaires
Pour cela, nous aurons besoin d’ajouter une couche intermédiaire à notre réseau de neurones (dans l'onglet IA), afin d’obtenir un modèle non-linéaire grâce aux fonctions d’activation.

Bilan et retours d'expérience
Je retiens :
- Un réseau de neurones est un ensemble de neurones organisé par couches. Chaque couche peut comporter un ou plusieurs neurones.
- Les neurones sont des objets abstraits contenant une simple valeur numérique.
- Les neurones sont reliés entre eux par des connexions dont les valeurs sont appelées poids.
- Chaque neurone possède également un biais qui est ajouté à la valeur du neurone.
- Les valeurs de neurones de la couche d’entrée sont déterminées par les valeurs des capteurs.
- Les neurones de la couche de sortie correspondent aux actions du robot. En mode autonome, c’est toujours l’action avec la valeur la plus élevée qui est sélectionnée.
- Les couches intermédiaires permettent au réseau d’accomplir des tâches plus complexes. On voit sur le graphique que les droites des neurones de sortie sont remplacées par des courbes de plus en plus complexes lorsqu’on augmente le nombre de couches intermédiaires.
- Entraîner un réseau de neurones consiste simplement à choisir une valeur pour chacun de ses paramètres : poids des connexions et biais des neurones. Lorsque le nombre de neurones et de connexions devient important, cette tâche complexe est réalisée par un algorithme d’apprentissage !
Matériel nécessaire :
- 1 robot minimum
- 1 ordinateur/robot
- un objet plat (boîte, planche, smartphone…)
Durée :
2 heures
Age :
15 ans et +
Configuration logiciel :
- configuration d'exemple : “détection d’intrus”
Les + de cette activité :
- Idéal à faire en classe
- Peu de matériel nécessaire
- Pluridisciplinaire (maths / informatique)
Matériel nécessaire :
- 1 robot minimum
- 1 ordinateur/robot
- Arène individuelle minimum
Configuration logiciel :
- configuration d'exemple : “Apprentissage par renforcement - évitement d’obstacles”
Durée :
30 minutes
Age :
8 ans et +
Les + de cette activité :
- Introduire l’apprentissage par renforcement
- Comprendre le principe du “Try and learn” = bénéfices pédagogiques
- Peut être réalisée avec le simulateur
Cette activité consiste à observer un robot qui apprend de manière autonome selon le principe de l’apprentissage par renforcement. On peut en tirer des conclusions assez générales sur les conditions nécessaires pour un apprentissage efficace.
[Contenu vidéo à venir]
Introduction
Dans cette activité, on n’entraîne pas le robot : c’est le robot lui-même qui va créer les exemples sur lesquels se baser afin de prendre les bonnes décisions d’actions à effectuer.
Pour que le robot soit capable de distinguer les bonnes des mauvaises décisions, l’algorithme comporte un système de récompenses.
Ici, le robot reçoit en fonction des actions effectuées les récompenses suivantes :
- avancer : 100 points
- tourner : 82 points
- reculer : -50 points
- Le robot reçoit également une pénalité de -50 points lorsqu’il se bloque
Dans la barre “Niveau”, vous pourrez observer la note moyenne de récompenses obtenues par le robot. Son but est de maximiser ce score ; il va donc peu à peu apprendre à choisir les actions qui lui apporteront les récompenses optimales, en prenant en compte ce que ses capteurs lui indiquent
Nous allons donc pouvoir observer les progrès du robot au cours de son apprentissage. Commencez par monter une arène sans obstacle, et placez-y le robot.
Apprentissage du robot en autonomie
Dans le logiciel AlphAI, choisissez la configuration d'exemple : “Apprentissage par renforcement - évitement d’obstacles”.
Dans cette activité, c’est le robot qui apprend tout seul !
Lancez le mode autonome, et observez votre robot. Comment se comporte-t-il ?
Quand le robot a identifié une action qui lui rapporte une récompense (par exemple tourner), il se peut qu’il décide dorénavant d’effectuer uniquement cette action.

Nous allons maintenant activer le bouton “exploration” : de temps en temps, le robot va alors décider d’effectuer une action aléatoire. Il pourra ainsi découvrir que l’action qu’il aurait choisie n’est peut-être pas celle qui correspond à la récompense optimale possible, et ainsi enrichir son apprentissage avec de nouvelles données.
Normalement il apprend successivement à aller tout droit, à se retourner quand il se cogne à un obstacle, puis à reconnaître ces obstacles à l’avance et donc à tourner avant de se cogner dedans ! Cet apprentissage prend à peu près 10 minutes.
N’hésitez pas à désactiver le mode “exploration” lorsque le robot commence à majoritairement choisir les bonnes actions à effectuer.
Bilan et retours d'expérience
Une fois l’apprentissage terminé, arrêtez votre robot et cliquez sur “graphes” dans la barre inférieure (si le bouton n’apparaît pas, changez l’affichage des paramètres en “avancé” ou “expert”). Vous pourrez alors observer dans le graphe du bas l’évolution des erreurs effectuées par le robot : normalement, les valeurs devraient être très hautes en début d’activité, puis peu à peu tendre vers zéro : le robot s’est entraîné tout seul à ne plus faire d’erreurs !
Le fonctionnement de l’apprentissage par renforcement peut être résumé de cette manière :
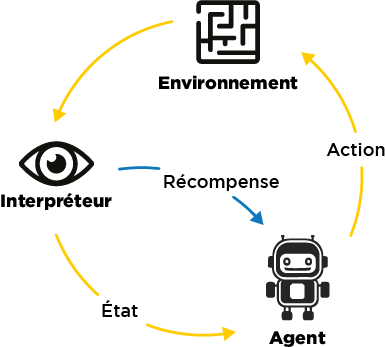
Ce qui est nécessaire à l’apprentissage du robot :
- La répétition d’une même tâche : le robot ne parvient pas tout de suite à trouver la bonne solution, ce n’est qu’à force de répétitions qu’il s’améliore.
- L’exploration : le robot doit parfois tester de nouvelles idées, pour ne pas rester enfermé dans une solution non optimale.
- Les récompenses ou pénalités : le robot a besoin d’une aide extérieure pour évaluer si ses décisions sont optimales ou non.
- La place de l’erreur : le robot apprend de ses erreurs sans se décourager ! Les erreurs lui permettent d’apprendre quelles actions ne pas répéter !
Matériel nécessaire :
- 1 robot minimum
- 1 ordinateur/robot
- Arène individuelle minimum
Durée :
30 minutes
Age :
8 ans et +
Configuration logiciel :
- configuration d'exemple : “Apprentissage par renforcement - évitement d’obstacles”
Les + de cette activité :
- Introduire l’apprentissage par renforcement
- Comprendre le principe du “Try and learn” = bénéfices pédagogiques
- Peut être réalisée avec le simulateur
Matériel nécessaire :
- 1 robot minimum
- 1 ordinateur/robot
- Arène individuelle
Configuration logiciel :
- configuration d'exemple : “Bloqué VS Mouvement” en mode édition manuelle, puis en mode “apprentissage par renforcement”
Durée :
90 minutes
Age :
15 ans et +
Les + de cette activité :
- Comprendre l’algorithme Q-learning
- Pluridisciplinaire (maths/informatique)
- Peut être réalisée avec le simulateur
L’objectif de cette activité est de comprendre le fonctionnement de l’algorithme du Q-learning.
Le Q-learning est un algorithme d’apprentissage par renforcement. Le robot va donc apprendre par essais et erreurs, sur la base de récompenses qui sont déterminées par l’utilisateur (comme dans le scénario “Évitement d’obstacles”).
Grâce à cette méthode, nous allons entraîner un robot AlphAI à se déplacer dans une arène sans rester bloqué contre les parois. Cette tâche simple nous permettra de bien comprendre les mécanismes qui interviennent au niveau du réseau de neurones.
[Contenu vidéo à venir]
Mise en place
Placez le robot dans une petite arène sans obstacle.
Récompense et édition manuelle
Dans une première partie, on découvre le principe des récompenses, et on utilise le mode “édition manuelle” pour trouver le comportement du robot qui maximise les récompenses reçues.
Apprentissage par renforcement
Dans une seconde partie, on observe l’apprentissage du robot pas à pas et l’évolution des poids des connexions dans le réseau. On découvre l’importance de l’exploration dans l’apprentissage.
Q-learning
Ensuite, il s’agit de découvrir l’algorithme du Q-learning à proprement parler. Il consiste principalement en une formule de mise à jour des poids des connexions après chaque essai du robot. Cette formule fait intervenir deux paramètres dont l’utilité est discutée.
On découvre l’impact de la temporalité sur l’apprentissage : il faut apprendre suffisamment vite sans "sauter sur une conclusion". L’algorithme doit également être capable de prendre en compte les récompenses futures et pas seulement la récompense immédiate : il doit développer une vision à plus long terme.
Deep Q-learning
Le deep Q-learning est une évolution de l’algorithme du Q-learning pour l’appliquer à des réseaux de neurones plus complexes (multi-couches). C’est cet algorithme qui est par exemple utilisé dans le scénario “Évitement d’obstacles”.
Matériel nécessaire :
- 1 robot minimum
- 1 ordinateur/robot
- Arène individuelle
Durée :
90 minutes
Age :
15 ans et +
Configuration logiciel :
- configuration d'exemple : “Bloqué VS Mouvement” en mode édition manuelle, puis en mode “apprentissage par renforcement”
Les + de cette activité :
- Comprendre l’algorithme Q-learning
- Pluridisciplinaire (maths/informatique)
- Peut être réalisée avec le simulateur
Matériel nécessaire :
- 1 ordinateur/robot
- 1 robot minimum ou simulation dans le logiciel
- Arène optionnelle pour activités (course de robot)
Configuration logiciel :
- configuration d'exemple : dépend de la mise en situation du code
Durée :
1 à 2 heures
Age :
+ 14 ans
Les + de cette activité :
- Peut être réalisée avec le simulateur
- Très bonne introduction à la programmation
Dans cette activité de programmation Python, les élèves apprennent à envoyer des commandes au robot en fonction des touches enfoncées au clavier, puis à organiser une course de robots.
[Contenu vidéo à venir]
Prise en main du robot
Le module alphai.py permet d’envoyer au robot des instructions écrites en python.
Pour que le module fonctionne, le logiciel « AlphAI » doit être lancé. Vous pouvez vous connecter à un robot AlphAI (ou à sa version simulée).
Dans votre éditeur Python favori, créez un nouveau projet à l’emplacement de votre choix et configurez l’environnement Python pour qu’il contienne le module alphai en tapant dans la console IPython ou un terminal :
pip install alphai-api
Cette commande va télécharger et installer le module et ses dépendances.
Ouvrez un nouveau document python ou redémarrez la console, recopiez-y puis exécutez le code suivant :
from alphai import *
motor(30, -30, 5)
Si la première ligne du programme cause une erreur, c’est que la librairie alphai n’a pas été installée correctement. Si la ligne motor(30, -30, 5) cause une erreur, c’est probablement que le logiciel AlphAI n’a pas été démarré.
S’il n’y a pas d’erreur, vous observez le robot (ou le robot simulé dans le logiciel) tourner sur lui-même pendant 5 secondes.
La commande motor(left, right, duration) envoie les valeurs left et right aux moteurs gauche et droit du robot pendant la durée duration, après quoi il s’arrête. Les valeurs left et right doivent être comprises entre -50 et +50. Si la durée n’est pas précisée, alors le robot continue d’avancer jusqu’au prochain appel motor(0,0).
⚠️ Il est possible et parfois utile d’effectuer la connexion dans votre script python plutôt qu’en cliquant « connexion » dans le logiciel, en utilisant les fonctions connect_bluetooth(n) (en remplaçant n par le numéro de votre robot) ou connect_wifi(), ainsi que disconnect() pour se déconnecter.
Le code dans ce cas-là se présente ainsi :
from alphai import *
connect_bluetooth(n)
motor(30, -30, 5)
disconnect()
Vous trouverez à la droite de cette page, dans les annexes à télécharger, la documentation de la bibliothèque alphai-api qui contient l’ensemble des fonctions incluses dans la librairie alphai. Consultez-la dès maintenant pour en prendre connaissance.
Premier script
Vous allez à présent créer un script Python dans votre environnement de programmation favori.
Créez un nouveau fichier Python et recopiez le code suivant :
from alphai import *
if _ _name_ _ == '_ _main_ _':
connect_bluetooth(n)
motor(30,30,1)
disconnect()
Puis exécutez-le : le robot avance pendant une seconde puis s’arrête.
La commande motor(left, right, duration)envoie les valeurs left et right aux moteurs gauche et droit. Ces valeurs doivent être comprises entre -40 et +40. Naturellement, on arrête le robot avec motor(0, 0).
Vous trouverez à la droite de cette page, dans les annexes à télécharger, la documentation de la bibliothèque alpha-api qui contient l’ensemble des fonctions incluses dans la librairie alphai. Consultez-la dès maintenant pour en prendre connaissance.
Programmation d’une séquence
Pour faciliter la suite de votre codage, définissez les cinq fonctions suivantes. Faites des fonctions très simples : chacune doit seulement réaliser un appel à la fonction motor.
forward()
Fait avancer le robot tout droit.
backward()
Fait reculer le robot.
stop()
Arrête le robot.
left()
Fait pivoter à gauche le robot.
right()
Fait pivoter à droite le robot.
Enfin, créez une fonction walk_around() qui fait faire une séquence d’actions au robot en utilisant ces cinq fonctions. Testez-la en l’appelant dans le bloc main.
Programmation du téléguidage
Lecture des touches pressées
À l’aide de la fonction de l’API wait_for_key (voir les explications en dernière page) et d’une boucle while dans la fonction main, imprimez dans la console avec la fonction print les touches pressées sur le clavier. Pour éviter d’écrire une boucle infinie, prévoyez une touche spéciale qui permet de quitter la boucle, par exemple la touche « échap » (« esc » en anglais) :
keys = []
while "esc" not in keys:
# n’oubliez pas l’indentation
Programmation du téléguidage
Toujours à l’aide de la fonction wait_for_key et d’une boucle while, créez une fonction remote_control()qui réagit aux touches directionnelles de telle sorte que le robot se déplace selon les instructions données au clavier. Pour récupérer la dernière touche enfoncée, sélectionnez le dernier élément dans la liste grâce à l’indice -1. Attention : la liste peut être parfois vide !
Pensez à faire stopper le robot lorsqu’aucune touche n’est pressée. Testez votre code en téléguidant le robot !
Pour aller plus loin
Nous allons pouvoir organiser des courses entre vos robots téléguidés, mais vous aurez aussi intérêt à améliorer votre programme en ajoutant de nouvelles commandes comme proposé ci-dessous… Ces améliorations ne sont que des propositions, n’hésitez pas à créer vos propres améliorations !
Différents virages
Créer deux nouvelles fonctions que vous pourrez utiliser lorsque la fonction wait_for_key renvoie une liste de plusieurs touches :
forward_left()
Fait avancer le robot vers la gauche lorsqu’on appuie simultanément sur les flèches du haut et de gauche. Ainsi on pourra faire faire au robot à la fois des virages serrés avec left() (flèche de gauche seule) et des virages larges avec forward_left() (flèches du haut et de gauche).
forward_right()
De même fait avancer le robot vers la droite lorsqu’on appuie simultanément sur les flèches du haut et de droite.
Freinage et boost
Ajouter des variables d’entrée à toutes vos fonctions pour pouvoir moduler la vitesse du robot, ou la force des virages, en fonction d’autres touchez qui seront pressées.
Par exemple ajoutez une variable d’entrée speed à toutes vos fonctions (par exemple forward(speed)), et appelez les fonctions avec une vitesse plus faible lorsqu’on appuie en même temps sur la barre d’espace (freinage), et plus forte lorsqu’on appuie en même temps sur la touche « x » (« boost »).
Pilotez votre robot et ajustez les paramètres de vitesse pour réussir à rendre le robot le plus maniable et le plus rapide possible. N’oubliez pas de vous exercer également à doubler des concurrents !
Programmation d’une séquence
Sur la touche de votre choix, faire réaliser au robot une petite chorégraphie, par exemple pour célébrer la victoire !
Bilan et retours d'expérience
En programmation, la liste des fonctions accessibles d’un programme s’appelle API, pour Application Programming Interface, Interface de Programmation d’Application. Elle est utilisée par les programmeurs pour savoir comment interagir avec le programme. Vous trouverez l’API du module python alphai en suivant ce lien : https://drive.google.com/file/d/1C4ovPW_eH5KFz5Y9JvSrzLhtmdOpcp6-/view
Matériel nécessaire :
- 1 ordinateur/robot
- 1 robot minimum ou simulation dans le logiciel
- Arène optionnelle pour activités (course de robot)
Durée :
1 à 2 heures
Age :
+ 14 ans
Configuration logiciel :
- configuration d'exemple : dépend de la mise en situation du code
Les + de cette activité :
- Peut être réalisée avec le simulateur
- Très bonne introduction à la programmation
Matériel nécessaire :
- 1 robot minimum ou simulation dans le logiciel
- 1 ordinateur/robot
- Arène de course
Configuration logiciel :
- configuration d'exemple : dépend de la mise en situation du code
Durée :
1 à 2 heures
Age :
+ 15 ans
Les + de cette activité :
- Peut être réalisée avec le simulateur
Programmation Python : prise en main de l'ultrason et de la caméra pour programmer des déplacements autonomes du robot puis organiser une course de robots.
[Contenu vidéo à venir]
Introduction
Le but de ce TP est de programmer AlphAI pour qu’il se déplace de manière autonome et non plus en mode « télécommandé » par l’élève comme dans le TP « AlphAI télécommandé ». Pour cela il faudra utiliser ses capteurs pour qu’il puisse réagir à son environnement, notamment pour détecter des obstacles.
Nous allons voir un exemple rapide avec l’ultrason, puis passerons à la caméra pour organiser des courses de robots autonomes dans un circuit.
Navigation avec l’ultrason
Découverte du capteur ultrason
La fonction get_distance() (détails dans l’API en dernière page) renvoie la distance mesurée par l’ultrason du robot (en centimètres). Attention à bien activer le capteur avec la fonction set_distance(True) ou elle ne renverra pas une distance mais la valeur None.
Testez cette fonction avec le vrai robot avec le code suivant :
set_distance(True) # active le capteur à ultrasons
while True:
d = get_distance() # récupère la valeur des ultrasons du robot
print("distance:", d)
En déplaçant le robot à la main, vérifiez que la distance mesurée diminue lorsque le robot est face à un obstacle. Vous pourrez aussi remarquer que malheureusement si le robot est devant un mur, non pas pile en face de lui, mais en diagonale, ce mur n’est pas détecté (la distance mesurée est beaucoup plus grande car les ultrasons se reflètent sur le mur en diagonale sans revenir directement vers le robot).
Déplacement autonome avec l’ultrason
A l’aide de la fonction get_distance(), définissez puis testez une fonction ultrasound_race() qui fait avancer le robot tant qu’il ne perçoit pas d’obstacle avec son ultrason, et pivote à droite lorsqu’il détecte un obstacle.
Ne cherchez pas à avoir un comportement parfait (ce serait difficile), dès que vous avez un comportement où le robot sait tourner s’il est face à un mur et aller tout droit s’il n’y a pas de mur, passez à la suite.
Navigation avec la caméra
La caméra apporte une information beaucoup plus riche que le capteur de distance ultrason, et permettra de prendre des décisions plus sophistiquées.
Découverte de l’image caméra
Commençons par afficher l’image de la caméra du robot dans le logiciel. Ouvrez l’onglet de paramètres « Capteurs » à gauche, et choisissez le mode de caméra « image 64x48 »

: l’image de ce que voit le robot apparaît.
Une image est une grille de pixels ; dans une image couleur comme c’est le cas ici, chaque pixel contient 3 valeurs : les intensités de rouge, vert et bleu dans ce pixel. Pour voir cela de manière plus précise, choisissez à présent le mode de caméra avec la résolution faible « image 8x6 »

, et dans l’onglet « Visualisation » cochez « Caméra : résolution dégradée »

: une image très grossière apparaît, et les valeurs rouge/vert/bleu de chaque pixels sont affichées (valeurs entre 0 et 255).
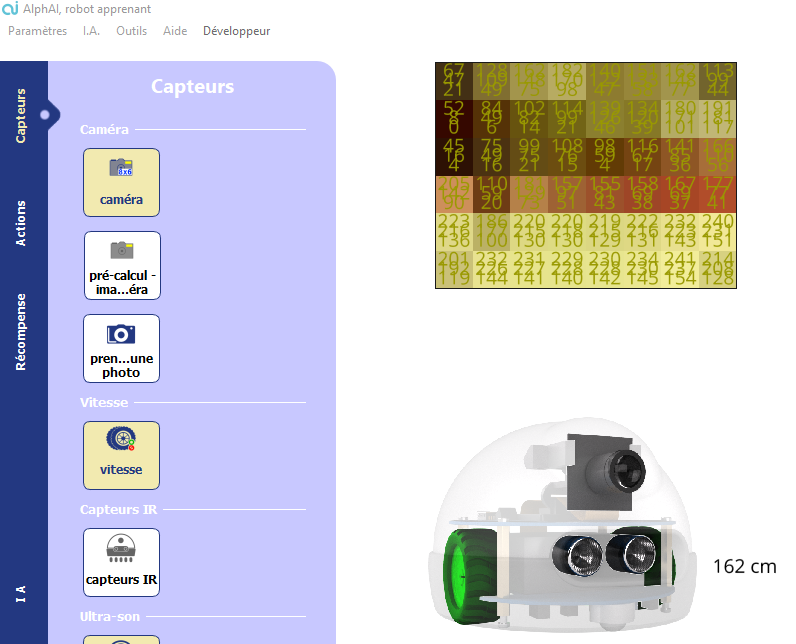
Pour régler la résolution d’image dans le code Python plutôt que dans le logiciel, il faut commencer par initialiser la caméra, par exemple set_camera("8x6"). Ensuite on récupère l’image avec get_camera(). Cette fonction renvoie un tableau de dimension 3 sous la forme d’un objet « List ». La seule chose à savoir pour ce TP à propos de cet objet est comment accéder aux valeurs des pixels : Si on appelle image cet objet renvoyé, on accède à la valeur du pixel de la ligne i, colonne j et dans le canal k (k=0 pour rouge, 1 pour vert, 2 pour bleu) avec image[i][j][k].
Copiez et exécutez le code suivant, et vérifiez que les 3 valeurs affichées correspondent bien aux 3 valeurs rouge/vert/bleu dans le logiciel du pixel à la 5ème ligne en partant du haut (indice 4 quand on commence à compter à zéro) et de la 4ème colonne en partant de la gauche (indice 3).
from alphai import *
from time import sleep
set_camera("8x6") # active la caméra à la bonne resolution
sleep(1) # attend 1s que le logiciel active la caméra
while True:
image = get_camera() # récupère l’image de la caméra
line = image[4]
pixel = line[3]
print('rouge', pixel[0], 'vert', pixel[1], 'bleu', pixel[2])
Premier déplacement autonome avec la caméra
Nous voulons que le robot effectue de manière autonome des tours de circuit. Si vous utilisez une arène fournie avec les robots AlphAI, le sol est blanc, l’enceinte extérieure est rouge, et l’ilôt central est noir. Nous supposerons que c’est le cas, et que vous voulez faire circuler le robot en tournant dans le sens des aiguilles d’une montre.
Commencez par écrire une fonction camera_race() pour prendre les décisions répétitivement, de la manière suivante (qui se base uniquement sur la couleur d’un seul pixel dans la partie basse de l’image) :
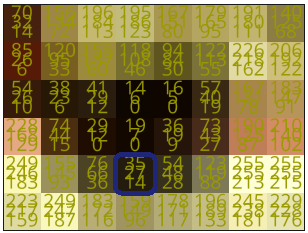
Si image[4][3][0] < 100 (canal rouge sombre 🡪 le pixel est noir), pivoter à gauche à vitesse 25 pendant 0.5 seconde.
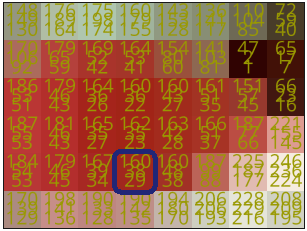
Sinon, si image[4][3][1] < 100 (canal rouge lumineux et canal vert sombre 🡪 le pixel est rouge), pivoter à droite à vitesse 25 pendant 0.5 seconde.
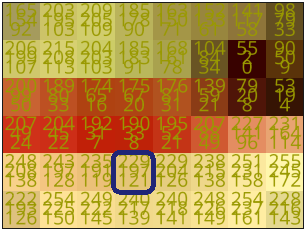
Sinon (canaux rouge et vert lumineux 🡪 le pixel est blanc), aller tout droit à vitesse 40 pendant 0.5 seconde.
Testez ce programme sur la piste.
Pour rappel, la structure si, sinon si, sinon est de la forme suivante en Python :
if condition_1:
action_1()
elif condition_2:
action_2()
else:
action_3()
Compter les pixels de différentes couleurs
Vous avez probablement constaté que prendre des décisions à partir d’un seul pixel n’étaient pas toujours le mieux. Par exemple il peut arriver que le pixel de la 5ème ligne / 4ème colonne soit blanc donc le robot décide d’avancer, alors qu’il y a un mur sur le côté et qu’il devrait plutôt tourner.
Pour améliorer le programme, nous allons considérer tous les pixels de l’image de la caméra. Tout d’abord nous allons compter combien de pixels sont noirs, rouges et blancs. Ensuite la décision sera prise ainsi : si la majorité des pixels sont rouge, tourner à droite ; si la majorité des pixels sont sombres, tourner à gauche ; et sinon aller tout droit.
Pour compter le nombre de pixels d’une certaine couleur, réalisez une suite de boucles for pour chaque composante de l’image : les lignes et les colonnes puis comptez pour chaque pixel quelle est sa couleur à l’aide des valeurs de rouge, de vert et de bleu qui la compose. Vous pouvez vous inspirer des seuils précédemment trouvés afin de déterminer la couleur du pixel. Vous pouvez commencer à partir du code suivant ou trouver votre propre façon de faire, il en existe plusieurs !
def count_pixel_colors(image: list):
# créer dict ici
nombre_pxl_noir = 0
nombre_pxl_rouge = 0
nombre_pxl_blanc = 0
for i in range(len(image)):
ligne = image[i]
for j in range(len(ligne)):
pixel = ligne[j]
canal_rouge = pixel[0]
canal_vert = pixel[1]
canal_bleu = pixel[2]
if ...
nombre_pxl_noir +=1
...
else:
...
return {"noir": nombre_pxl_noir, "rouge": nombre_pxl_rouge, "blanc": nombre_pxl_blanc}
Astuce Syntaxe Python pour les boucles for, au lieu d’utiliser des indices i et j pour accéder aux éléments d’un tableau, vous pouvez changer de syntaxe et écrire tout simplement :
for ligne in image:
for pixel in ligne:
rouge = pixel[0]
vert = pixel[1]
bleu = pixel[2]
…
Course de robots autonomes et poursuite des améliorations
A présent, vous pouvez commencer à organiser des courses entre vos robots.
Celles-ci seront encore plus pimentées si vous continuez de chercher à améliorer votre programme en modifiant par exemple : les vitesses de déplacement, les seuils des couleurs, des actions supplémentaires (en plus du tournant en pivotant sur place, un virage en avançant vers l’avant), etc.
Bilan et retours d'expérience
En programmation, la liste des fonctions accessibles d’un programme s’appelle API, pour Application Programming Interface, Interface de Programmation d’Application. Elle est utilisée par les programmeurs pour savoir comment interagir avec le programme. Vous trouverez l’API du module python alphai en suivant ce lien : https://drive.google.com/file/d/1C4ovPW_eH5KFz5Y9JvSrzLhtmdOpcp6-/view
TP à télécharger (prof et élève)
Matériel nécessaire :
- 1 robot minimum ou simulation dans le logiciel
- 1 ordinateur/robot
- Arène de course
Durée :
1 à 2 heures
Age :
+ 15 ans
Configuration logiciel :
- configuration d'exemple : dépend de la mise en situation du code
Les + de cette activité :
- Peut être réalisée avec le simulateur
Matériel nécessaire :
- 1 robot minimum ou simulation dans le logiciel
- 1 ordinateur/robot
- Petite arène minimum
Configuration logiciel :
- configuration d'exemple : dépend de la mise en situation du code
Durée :
2 heures
Age :
16 ans et +
Les + de cette activité :
- Peut être réalisée avec le simulateur
Activité ludique pour classe avec plusieurs robots : les élèves entraînent les robots à rouler dans un circuit puis une course est organisée. Les élèves apprennent par la manipulation le principe de l'apprentissage supervisé et l'importance de la qualité des données d'entraînement.
[Contenu vidéo à venir]
Introduction
Le Machine Learning est une branche de l’intelligence artificielle qui a pour but de donner la possibilité aux ordinateurs d’apprendre. Un ordinateur n’est pas intelligent, il ne fait qu’exécuter des tâches. On lui décrit sous forme de programmes quoi faire et comment le faire. C’est ce qu’on appelle la programmation.
Le Machine Learning traite des sujets complexes où la programmation traditionnelle trouve ses limites. Construire un programme qui conduit une voiture serait très complexe voire impossible. Cela étant dû aux très nombreux cas possibles à traiter… Le Machine Learning traite cette problématique différemment. Au lieu de décrire quoi faire, le programme apprendra par lui-même comment conduire en “observant” des expérimentations.
Machine Learning : Donner la possibilité à un programme d’apprendre des tâches qui n’ont pas été programmées.
En fonction des données d’expérimentations que prendra l’algorithme d’apprentissage en entrée, il déduira par lui-même une hypothèse de fonctionnement. Il utilisera cette dernière pour de nouveaux cas, et affinera son expérience au fil du temps.
Il existe trois types d‘apprentissages en Machine Learning :
- Apprentissage Supervisé
- Apprentissage Non supervisé
- Apprentissage par Renforcement
L’apprentissage supervisé est le type le plus courant. Il s’agit de fournir aux algorithmes d’apprentissages un jeu de données d’apprentissage (Training Set) sous forme de couples (X, Y) avec X les variables prédictives (ou données d’entrée), et Y le résultat de l’observation (ou décision). En se basant sur le Training Set, l’algorithme va trouver une fonction mathématique qui permet de transformer (au mieux) X vers Y. En d’autres termes l’algorithme va trouver une fonction F tel que Y≈F(X) .
Ainsi, dans une situation X, il saura quelle décision Y doit prendre.
Situation d'étude et training set du robot AlphAI
Il convient désormais de préciser les situations X et les décisions Y attendues.
Le cas d’étude proposé est le déplacement du robot dans une arène rouge. L’objectif est que le robot se déplace tout seul sans jamais toucher les murs.
Pour cela le robot pourra prendre les décisions suivantes :
- Tourner à gauche
- Aller tout droit
- Tourner à droite
Afin de prendre la décision il faut nécessairement un retour d’information afin de disposer de données (data ou training set).
Cela est donné par les capteurs. Le choix effectué ici est d’utiliser la caméra. De la zone d’image de la caméra il est extrait deux zones qui seront appelées super pixels (voir ci-contre). La quantité de rouge de chaque super-pixel augmente lorsque le robot s’approche des murs en raison du contraste entre la piste blanche et les murs rouges.
Activité 1. Indiquer dans le tableau ci-dessous le résultat attendu comme décision en fonction de ce qui est repéré dans les superpixels.
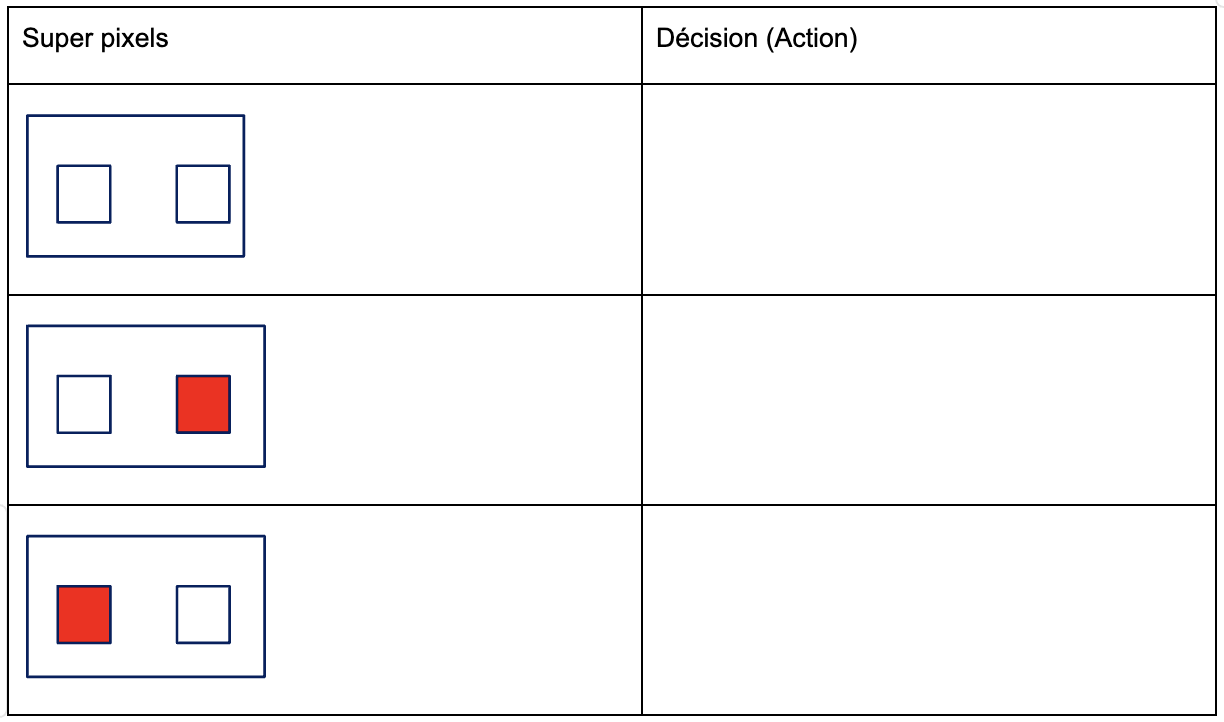
Les cas simplifiés ci-dessus, ne se produisent que très rarement. Pour pouvoir prendre la décision dans tous les cas possibles, il faut obtenir la valeur numérique du niveau de rouge.
L’image issue de la caméra est de taille 48*64 pixels. La position et la géométrie des super-pixels est définie par la figure suivante :
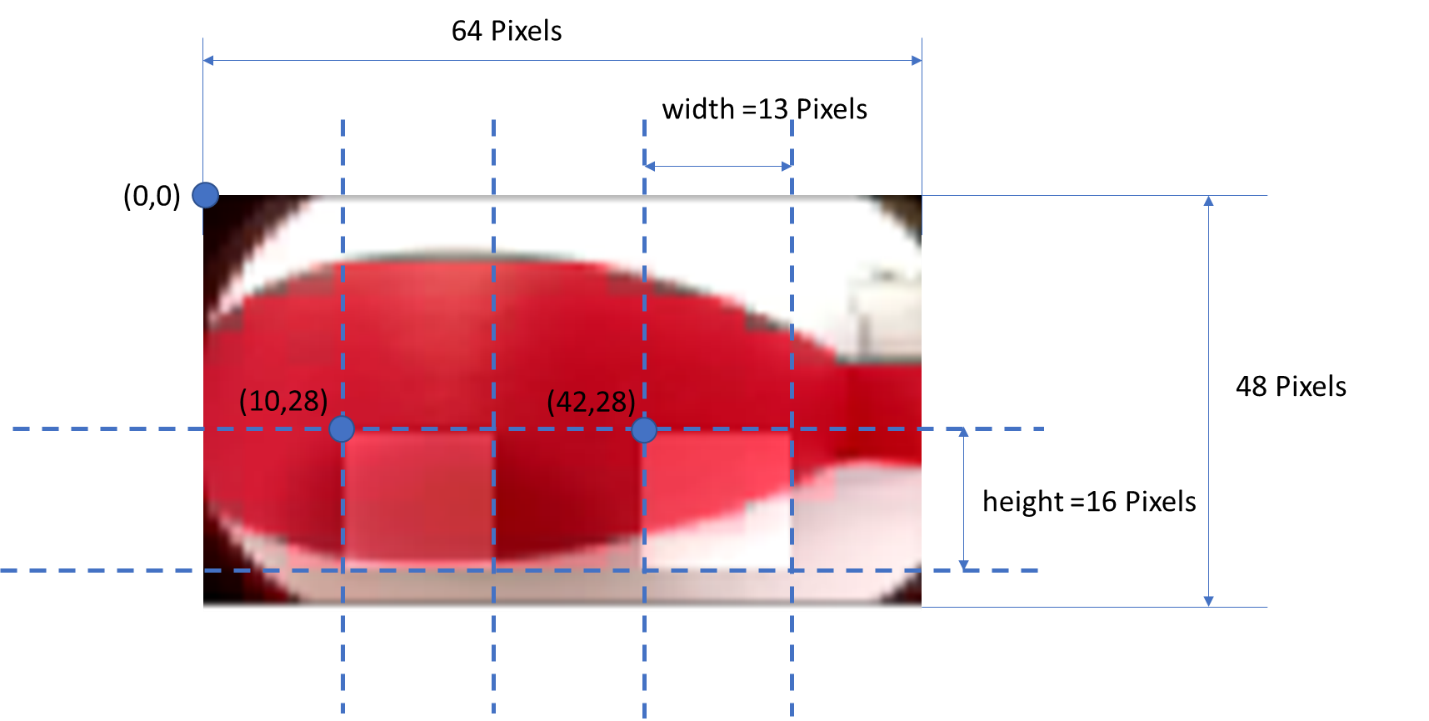
Activité 2. Ouvrir le fichier get_values.py. Indiquer le chemin d’accès de l’image forward_0.jpg et exécuter le code ci-dessous permettant d’afficher l’image dans python.
from PIL import Image
import numpy as np
import matplotlib.pyplot as plt
def read_image(name):
return np.array(Image.open(name, "r"))
img1=read_image("forward_0.jpg") #indiquer le chemin d'accès de l'image
plt.imshow(img1)
plt.show()
Vous devez obtenir une image de la forme ci-dessous d’une taille de 48 pixels par 64 pixels, codée avec les trois couleurs RVB (Rouge Vert Bleu).
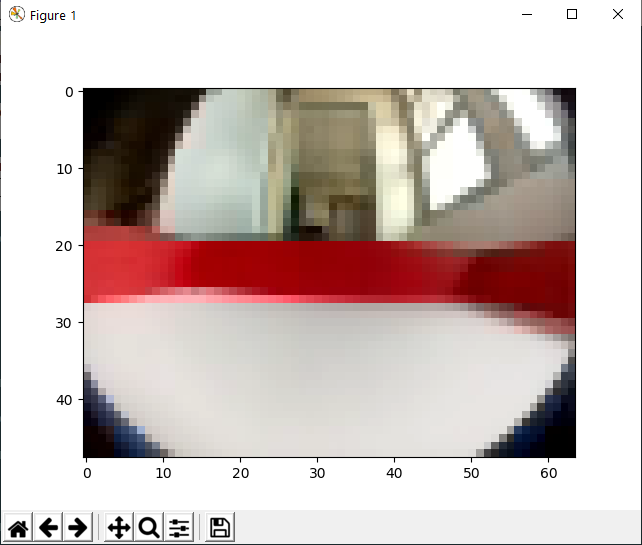
« img1 » est un tableau de pixels de taille 48*64*3
Dans le tableau de pixel on retrouve les 3 niveaux de couleurs Rouge Vert Bleu codés entre 0 et 255.
A partir de cette image, il va falloir extraire les deux super-pixels définis précédemment et déterminer une méthode permettant d’obtenir le niveau de rouge pour chacun.
Nous allons comparer différentes techniques pour obtenir le meilleur contraste entre le rouge et le blanc de chaque super-pixel :
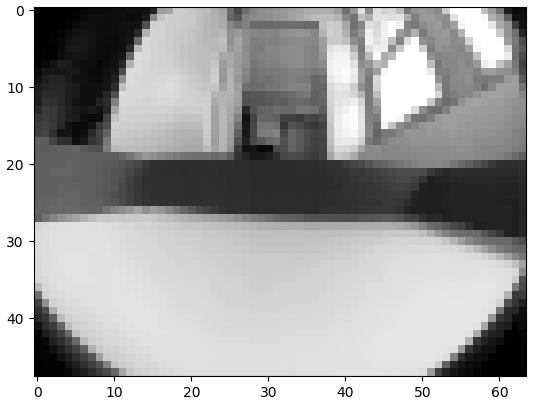
- le niveau de gris moyen de chaque super-pixel
- le niveau de rouge moyen de chaque super-pixel
- le niveau de vert moyen de chaque super-pixel
Dans un premier temps, l’image est transformée en niveau de gris à l’aide de la fonction rgb2gray de la façon suivante :
def rgb2gray(rgb):
return np.dot(rgb[...,:3], [0.299, 0.587, 0.144])
img2=rgb2gray(img1)
plt.imshow(img2, cmap="gray")
plt.show()
« img2 » correspond à l’image en niveau de gris. Ainsi il n’y a qu’une seule valeur numérique entre 0 et 255 pour chaque pixel. 0 correspond à un pixel blanc et 255 un pixel noir. Les super pixels étant dans la zone « basse » de l’image
Activité 3. Ecrire une fonction moyenne(img,x,y,height,width) qui va prendre en argument un tableau de pixels « img » à un niveau de couleur, les coordonnées « x » et « y » du pixel en haut à gauche d’un super-pixel, la hauteur « height » et la largeur « width » d’un super-pixel et qui renvoie la moyenne du niveau de couleur du super-pixel.
Il est ainsi possible de récupérer deux valeurs avec les deux super-pixels définis précédemment à l’aide du code :
def get_two_values(img, x1=10, y1=28, x2=42, y2=28, height=16, width=13):
value1 = moyenne(img, x1, y1, height, width)
value2 = moyenne(img, x2, y2, height, width)
return np.array((value1, value2))
Le niveau de couleur du super-pixel gauche est noté value1, le niveau de couleur du super-pixel droit est noté value2. Il est ainsi possible de définir un point de coordonnées (value1, value2)
Activité 4. Executer le code pour récupérer les valeurs value1 et value2 de l’image en niveau de gris obtenue précédemment.
Le choix effectué dans le logiciel AlphAI est d’utiliser la fonction de python mean qui va calculer la valeur moyenne du tableau.
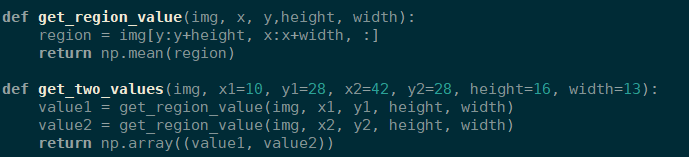
Activité 5. Appliquer la méthode du logiciel AlphAI et celle avec le niveau de gris et compléter avec les valeurs value1 et value2 dans les deux cas.
Fonction mean
Niveau Gris
Forward_0
Forwad_1
Left_0
Left_1
Right_0
Right_1
Right_2
Test_0
Test_1
Activité 6. Placer les points sur le graphique et identifier les zones correspondant aux différentes décisions (tourner à gauche, aller tout droit, tourner à droite). Conclure sur la méthode qui vous semble la plus appropriée pour distinguer les différentes décisions.
Intensité super-pixel droit
Intensité super-pixel gauche
À ce stade, il serait possible de piloter le robot à partir d’actions conditionnelles portant sur ces valeurs de super-pixels. L’approche va être différente dans la suite. Nous allons utiliser une méthode portant le nom d’algorithme des K plus proches voisins.
L’algorithme des k plus proches voisins, KNN
Nous allons étudier de près un algorithme très connu parmi les algorithmes de machine learning : l’algorithme des K plus proches voisins, ou KNN en anglais pour « K Nearest Neighbours ». Cet algorithme a l’avantage d’être très simple, et donc de fournir une bonne base pour comprendre l’apprentissage supervisé.
L'idée est d'utiliser un grand nombre de données afin "d'apprendre à la machine" à résoudre un certain type de problèmes. L’algorithme est particulièrement intuitif quand les données se présentent comme des points dans un espace de dimension 2, qui pourront donc être affichés à l’écran. Nous allons donc choisir une configuration avec seulement 2 entrées capteurs, à savoir 2 « super-pixels » de la caméra afin de permettre au robot de repérer les murs et de circuler dans l’arène sans blocage. Dans un premier temps ce sera à nous d’indiquer au robot l’action associée pour chaque nouvelle donnée (2 « super-pixels »), mais ensuite il sera capable de circuler par lui-même en choisissant l’action majoritaire prise par les K plus proches voisins parmi les données entrées pendant la phase d’entraînement.
Cet algorithme d’apprentissage supervisé permet de classifier des données en fonction de leur proximité avec celles existantes constituant les données d’entraînement. Les nouvelles données considèrent k voisins, les k plus proches, pour choisir quelle classification appliquer. Avec des données discrètes, comme des points dans un plan ou dans l’espace, les plus proches voisins sont sélectionnés en utilisant la distance euclidienne, mais d’autres méthodes peuvent être utilisées dans d’autres situations, comme la distance Manhattan si les données se placent sur un quadrillage ou un échiquier. L’intérêt de cet algorithme réside dans le choix de k : trop petit et l’algorithme devient trop sensible aux erreurs ou aux données manquantes, trop grand et il considère des données qui ne devraient pas être considérées.
On peut schématiser le fonctionnement de k-NN en l’écrivant en pseudo-code suivant :
Début Algorithme
Données en entrée :
- un jeu de données D, correspondant au training set élaboré
- une fonction de calcul de distance entre les deux points considérés de coordonnées [x1,y1] et [x2,y2]. d=x2-x12+y2-y12
- Un nombre entier k, représentant le nombre de voisins à prendre en compte
Pour une nouvelle observation X dont on veut prédire sa décision Y Faire :
- Calculer toutes les distances de cette observation X avec les autres observations du jeu de données D
- Retenir les K observations du jeu de données D les plus proches de X en utilisation la fonction de calcul de distance d
- Prendre les valeurs de Y des k observations retenues. Effectuer une régression et calculer la moyenne (ou la médiane) de Y retenues
- Retourner la valeur calculée dans l’étape 3 comme étant la valeur qui a été prédite par K-NN pour l’observation X.
Fin Algorithme
Il faut donc pouvoir calculer la distance entre deux points. Dans un graphique en deux dimensions comme c’est le cas dans notre exemple, cela correspond simplement à la norme du vecteur entre les deux points.
Activité 1. Ecrire la fonction distance(point1, point2) qui prend en argument deux points (point1=[x1,y1], point2=[x2,y2]) et qui renvoie la distance entre ces deux points.
Activité 2. Compléter le tableau ci-après en déterminant la distance entre les super-pixels des images précédentes (forward_0.jpg, forward_1.jpg,…) et des deux images tests (test_0.jpg et test_1.jpg).
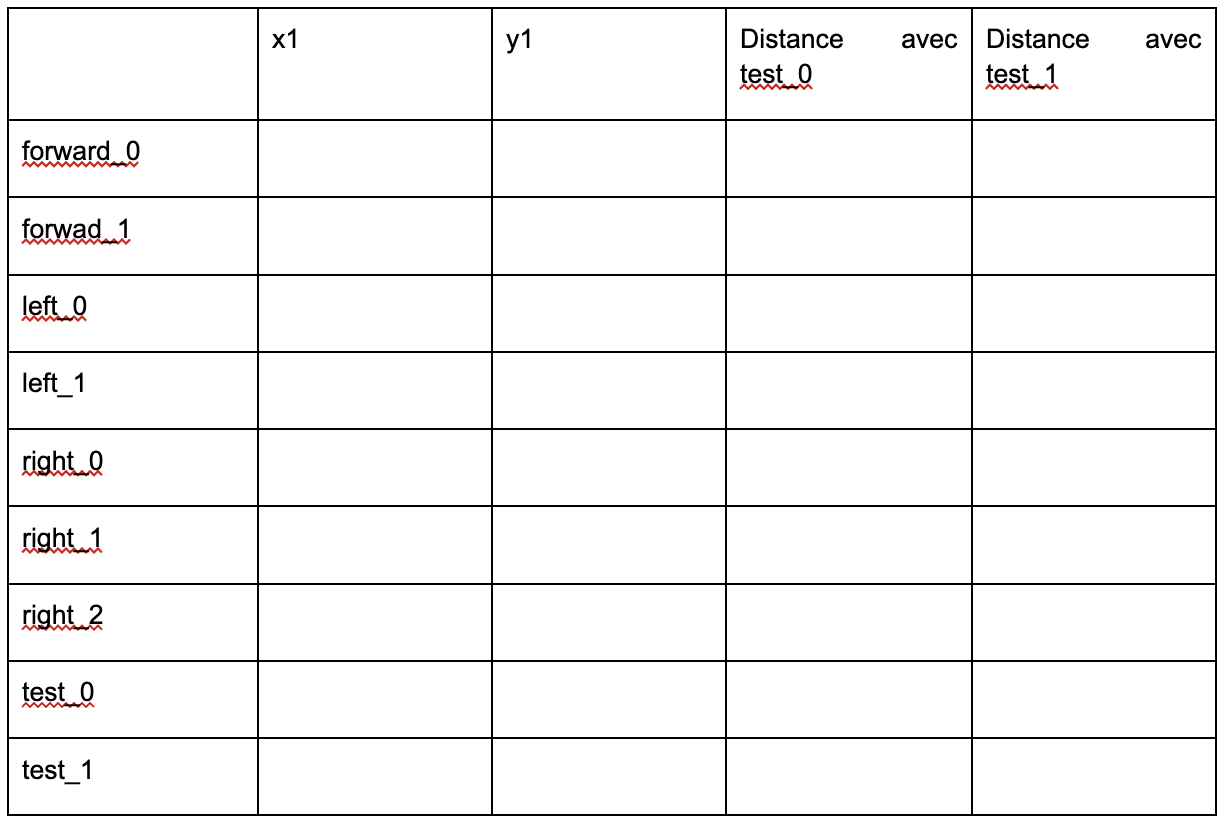
Activité 3. Appliquer les étapes 3 et 4 de l’algorithme K-NN en en prenant K=1,2,3 et 4 et en déduire la décision qui doit être prise (aller tout droit, tourner à gauche, tourner à droite).
Entrainement du robot
Phase de préparation de l’environnement de travail
- Dans le menu Paramètres - > Charger des configurations d'exemples, sélectionner la configuration exemple « apprentissage supervisé - KNN Caméra».

Attention : Pour ce scénario, afin d’obtenir le meilleur contraste possible, mettez une surface blanche au sol, et Assurez-vous d’avoir un éclairage uniforme sur la surface de l’arène.
Phase d’entraînement
Activité 1. Suivre le protocole afin de réaliser la phase d'entraînement
Vous êtes maintenant connecté au robot, et votre écran doit ressembler à l’image ci-dessous. Le niveau de sa batterie doit s’afficher en bas à droite (vérifiez que le robot est bien chargé).
- Tant que le robot a de la place pour avancer, appuyez sur aller tout droit.
- Si le robot s’approche d’un mur, appuyez sur virage sur place à gauche ou à droite.
À chaque instruction envoyée au robot, un nouveau point est ajouté au graphique. L’abscisse de ce point correspond à la valeur du super-pixel de gauche et son ordonnée correspond à la valeur du super-pixel de droite. La couleur de chaque point correspond à l’action choisie : jaune pour aller tout droit, vert pour tourner à droite et rouge pour tourner à gauche. Ces points sont les données d’entraînement. Cette phase d’entraînement est primordiale pour que l’IA puisse apprendre correctement. Si les données d’entraînement contiennent trop d’erreurs ou d’approximations, le comportement de l’IA risque de ne pas être satisfaisant.
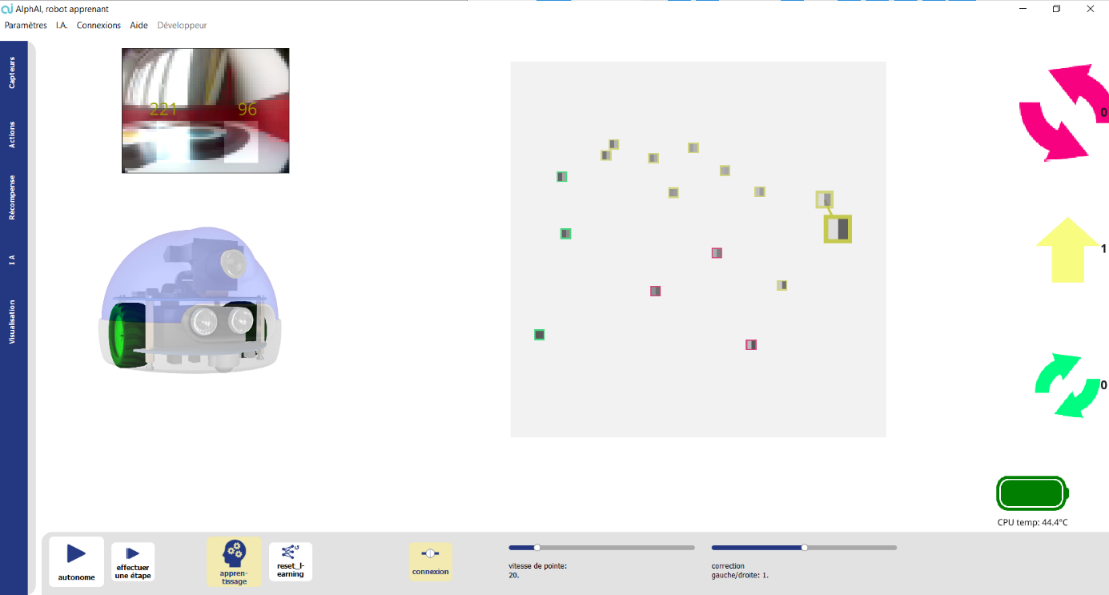
Notez bien :
Les pixels deviennent plus sombres lorsque le robot s’approche des murs. Normalement si le pixel de gauche est le plus sombre, il faut tourner à droite, et si le pixel de droite est le plus sombre, il faut tourner à gauche. Après avoir ajouté quelques points sur le graphique, vous pouvez activer la couleur d’arrière-plan dans l’onglet des paramètres de visualisation. Cette option colore chaque pixel du graphique de la couleur du point de donnée le plus proche.
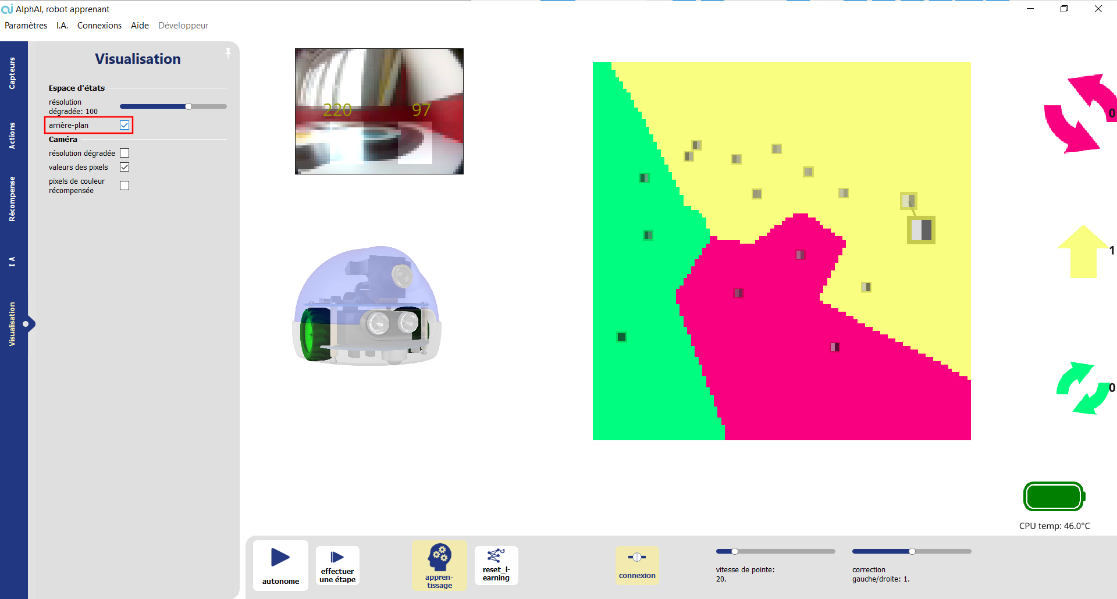
Lorsque vous aurez trois régions bien claires sur le graphique, arrêtez la phase d’entraînement et réactivez l’autonomie pour passer à la phase de test. Ne pas hésiter à bouger le robot à la main, lorsqu’une zone du graphique contient trop peu de points.
Tests
Si le robot est bien entraîné, il saura éviter les bords par lui-même. Si au contraire il est mal entraîné ou la luminosité dans l’arène n’est pas homogène, cela va produire du bruit dans les régions créées et le robot fera plus d’actions inappropriées.
Notez bien :
Afin d’obtenir le meilleur comportement du robot, il faut tester plusieurs valeurs de k. Pour changer cette valeur, allez dans l’onglet « IA » et changer la valeur du paramètre « nombre de voisins ».
Une bonne valeur de k réduit l’effet du bruit et permet au robot de mieux gérer les régions inexplorées.
Une fois que le robot est bien entraîné et que les tests se déroulent bien, vous pouvez passer aux activités.
Activité 1. Comparez le comportement du robot avec k=1, k=3, k=10 et k=30. Ensuite, d’après ce que vous constatez, essayer de déterminer la valeur de k qui minimise l’effet des erreurs et donne le meilleur comportement du robot, c’est-à-dire la plus grande distance parcourue sans heurter un mur. La bonne valeur va dépendre du nombre de points de données, et du nombre d’erreurs dans ces données.
Activité 2. Maintenant que vous avez bien compris l’algorithme, essayez d’entrainer le robot avec le minimum de données possibles qui lui permettent de tourner sans taper contre les murs.
Commencez par faire une version théorique en dessinant les zones que vous voudriez obtenir sur votre graphique. Quels points sont à placer pour la réaliser ? Testez ces points avec le robot après les avoir rentrés dans le logiciel. Votre modèle théorique a-t-il été applicable à la réalité, ou avez-vous dû y faire des modifications ? Quelles sont les limitations de cette méthode pour un robot tel que celui-là ?
Astuce : Vous pouvez déplacer le robot à la main pour choisir les points que vous voulez lui apprendre.
Remarque : Nous avons réussi à apprendre au robot à circuler dans l’arène sans taper les murs avec 3 points seulement.
Pour aller plus loin :
Activité 3. S’il vous reste du temps et que vous voulez expérimenter, changez d’algorithme et regardez quelles différences le robot a dans son comportement par rapport à KNN. Quel autre algorithme proposé à un apprentissage plus rapide ? Et quel autre algorithme permettrait, selon vous, l’apprentissage de tâches plus complexes, comme taper dans un ballon vert ou reconnaître des ordres communiqués avec des signes de la main ?
Programmer l’algorithme des K plus proches voisins
1. Stoppez le robot et réactivez le bouton « Autonome ».

2. Dans l’onglet IA, sélectionnez Algorithme : code élève , cela ouvrira une nouvelle fenêtre vous demandant de nommer le fichier.
3. Après lui avoir donné un nom, le fichier apparaît dans l’explorateur Windows : ouvrez-le dans votre éditeur de code préféré (Spyder, par exemple).
Ce code présente 3 fonctions déjà existantes : init, learn et take_decision. Ces fonctions seront appelées par le logiciel principal. Seule la fonction take_decision est importante pour ce TP.
4. Remarquez que quand vous vous déconnectez, un mini-robot simulé apparaît en bas à droite. Si vous le voulez, vous pouvez faire les questions ci-dessous avec ce mini-robot et revenir au vrai robot à la fin du TP ; mais vous pouvez aussi faire tout le TP en restant connecté au vrai robot : comme vous préférez !
PROGRAMMER LE ROBOT DIRECTEMENT
Avant de programmer une intelligence artificielle, commençons par comprendre le principe de la fonction take_decision. Vous allez pouvoir modifier cette fonction pour changer le comportement du robot : après chaque modification, sauvegardez votre code et cliquez sur le bouton « Réinitialiser l’IA ». Cette étape est à répéter pour chaque modification du code : sauver puis recharger le code.
La fonction a le prototype suivant :
take_decisionsensors:listint
L’entrée sensors est l’état des capteurs du robot, c’est-à-dire dans notre cas une liste de deux valeurs sensors[0] et sensors[1] qui sont l’intensité de ce que voit le robot à sa gauche et à sa droite. Sa sortie est le numéro de l’action choisie.
- Ajoutez l’instruction print(sensors) à l’intérieur de la fonction. Sauvegardez, cliquez « Réinitialiser l’IA » dans le logiciel, et démarrez le robot. La valeur de sensors s’affiche maintenant dans la console (cliquer dans la barre des tâches sur l’icône pour afficher la console). Quelle est à peu près la valeur de sensors quand le robot est face à un mur ? quand il n’est pas face à un mur ? quand il y a un mur à sa gauche ou à sa droite ?

- Pour l’instant la fonction renvoie 0. Quelle valeur faut-il renvoyer pour que le robot aille tout droit ? (Faites l’essai)
- Utilisez la variable x pour programmer un comportement cohérent du robot : « s’il n’y a pas de mur, je vais tout droit ; s’il y a un mur, je me tourne. »
PROGRAMMATION DE L’ALGORITHME
Calcul de distance
Si vous ne l’avez pas déjà fait lors de l’activité précédente, programmez une nouvelle fonction distance qui prend comme arguments deux points a et b qui sont deux tableaux de deux éléments chacun contenant leurs coordonnées et qui renvoie la distance euclidienne de ces deux points. Le prototype de la fonction est le suivant :
distancea:list, b:listfloat
Avec a=x1, y1 et b=x2, y2
Pour rappel, la distance euclidienne entre ces deux points est : d=x2-x12+y2-y12.
La racine carrée peut être utilisée en Python en important la bibliothèque math (ou numpy) en haut du fichier :
import math
et s’écrit ainsi :
y = math.sqrt(x)
L’opérateur carré peut être fait de la façon suivante :
y = x**2
- Programmez la nouvelle fonction distance. Puis pour la tester, écrivez en bas du fichier :
# compute distance
a = [0, 0]
b = [1, 2]
print("distance", distance(a, b))
Sauvez, chargez le code avec « Réinitialiser l’IA » et notez ci-dessous le résultat qui s’affiche dans la console :
Calcul de toutes les distances
Maintenant que vous avez une méthode pour calculer une distance, écrivez une nouvelle fonction all_distances qui calcule toutes les distances d’un point par rapport à la variable train_sensors qui sont les données d’entrée d’entrainement. Cette fonction prendra comme argument un nouveau point x qui est une liste de deux éléments comme précédemment, et renverra un tableau contenant toutes ces distances. Son prototype est :
all_distances(a:list[float], train_sensors:list[list[float]])→list[float]
Avec a=x0, y0 et train_sensors=x1, y1, x2, y2, …, xn, yn Le tableau train_sensors étant de longueur n.
- Programmez all_distances, puis testez avec le code suivant en bas du fichier :
# compute all distances
a = [0.4, 0.6]
train_sensors = [[0, 0], [0, 1], [1, 0]]
distance_list = all_distances(a, train_sensors)
print('distances to data', distance_list)
Rechargez le code et recopiez votre résultat :
Trouver le plus petit element d’un tableau
Créez une fonction s’appelant find_minimum prenant comme unique argument un tableau et renvoyant l’indice du premier plus petit élément. Son prototype est :
find_minimum(dlist:listfloat)→int
- Programmez et testez find_minimum avec le code suivant :
# minimum in a list
idx_min = find_minimum(distance_list)
print('index of minimum', idx_min)
Notez le résultat :
Le plus proche voisin
Maintenant que nous avons toutes les fonctions nécessaires, nous allons pouvoir créer la fonction nearest_neighbor_decision qui prend comme argument les données d’entrainement et l’entrée de la caméra actuelle, et qui renvoie la commande à envoyer au robot. Son prototype est :
nearest_neighbor_decision(train_sensors:list[listfloat],train_decisions:list[int],a:list[float])→int
Comme précédemment, a=x0, y0 et train_sensors=x1, y1, x2, y2, …, xn, yn et train_decisions = d1,…,dn où chaque di est la décision prise pour le point xi, yi dans le tableau train_sensors.
Pour réaliser la fonction, calculez les distances, trouvez la plus courte et renvoyez la commande associée en utilisant train_decisions.
- Programmez et testez nearest_neighbors_decision avec le code suivant :
# KNN
a = [0.4, 0.6]
train_sensors = [[0, 0], [0, 1], [1, 0]]
train_decisions = [1, 2, 0]
decision = nearest_neighbor_decision(train_sensors, train_decisions, a)
print('KNN', decision)
Recopiez le résultat :
UTILISATION DE VOTRE ALGORITHME AVEC LE ROBOT
Félicitations, vous avez programmé vous-mêmes l’algorithme des K plus proches voisins dans le cas K=1. Il ne vous reste plus qu’à l’utiliser dans le programme pour entraîner le robot.
Pour cela, recopiez les lignes ci-dessous pour programmer la fonction take_decision pour prendre les bonnes décisions, mais également learn pour se rappeler des données d’entraînement train_sensors et train_decisions qui seront créées au fur et à mesure dans le programme principal :
train_sensors = train_decisions = None
def learn(X_train, y_train):
global train_sensors, train_decisions
train_sensors, train_decisions = X_train, y_train
loss = 0
return loss
def take_decision(sensors):
if train_sensors is None:
return 0
return nearest_neigbor_decision(train_sensors, train_decisions, sensors)
Et à présent, vous pouvez entraîner votre robot !
- Rechargez votre code

- Désactivez l’autonomie du robot en cliquant sur l’icône


- ,
- Dirigez le robot en cliquant sur les flèches à droite de l’écran. Tournez quand le robot est proche des murs et allez tout droit sinon.
Les tableaux train_sensors et train_decisions sont remplis automatiquement par le logiciel à chaque fois que vous cliquez une flèche.
- Après un court apprentissage, réactivez l’autonomie
- Le robot navigue seul dans l’arène. Évite-t-il les murs par lui-même ?
Pour aller plus loin
L’algorithme que vous avez écrit utilise le plus proche voisin pour prendre sa décision. Modifiez votre code pour qu’il prenne en compte la majorité des décisions prises entre un nombre k>1, k∈N. La difficulté réside dans la modification de la fonction trouvant le minimum. Il faut maintenant qu’elle en trouve k et non juste 1.
Bilan et retours d'expérience
En programmation, la liste des fonctions accessibles d’un programme s’appelle API, pour Application Programming Interface, Interface de Programmation d’Application. Elle est utilisée par les programmeurs pour savoir comment interagir avec le programme. Vous trouverez l’API du module python alphai en suivant ce lien : https://drive.google.com/file/d/1C4ovPW_eH5KFz5Y9JvSrzLhtmdOpcp6-/view
Matériel nécessaire :
- 1 robot minimum ou simulation dans le logiciel
- 1 ordinateur/robot
- Petite arène minimum
Durée :
2 heures
Age :
16 ans et +
Configuration logiciel :
- configuration d'exemple : dépend de la mise en situation du code
Les + de cette activité :
- Peut être réalisée avec le simulateur
Matériel nécessaire :
- 1 robot minimum ou simulation dans le logiciel
- 1 ordinateur/robot
- Petite arène minimum
Configuration logiciel :
- configuration d'exemple : édition manuelle: “bloqué vs mouvement”
Durée :
2 à 3 heures
Age :
+ 15 ans
Les + de cette activité :
- Peut être réalisée (en partie) avec le simulateur.
Programmation de la fonction de récompense que reçoit le robot pour réaliser un apprentissage original : suivre une ligne avec la caméra, … ou autre chose !
Programmation du réseau de neurones
Travaillez au début avec le robot simulé, ce sera plus simple, vous pourrez revenir aux vrais robots à la fin. Éteignez le robot pour économiser ses batteries.
Dans l’onglet IA, choisissez algorithme : « code élève », puis répondez « Nouveau » à la question qui vous est posée et choisissez le nom du fichier où sauver votre code.
Vous allez éditer le code de 3 fonctions « init », « learn » et « take_decision » pour coder votre propre réseau de neurones.
Compréhension des 3 fonctions
- Ajouter des print dans chacune des 3 fonctions et constatez que
- init est appelée lorsqu’on appuie sur « Réinitialiser l’IA »
- learn est appelée le plus souvent possible (mais seulement si le bouton « Apprentissage » est activé et qu’il y a des données d’apprentissage dans la mémoire d’expérience)
- take_decision est appelée à chaque fois que le programme veut connaître une décision (il est appelé en fait 2 fois par étape : 1 fois pour l’affichage des valeurs à l’écran, 1 fois pour faire prendre la décision au robot
- Modifiez la valeur renvoyée par la fonction take_decision : elle détermine l’action que choisit le robot en mode autonome
Coder un premier réseau « en-dehors » du logiciel
Voici un code qui construit un réseau de neurones avec 1 entrée, 2 sorties (correspondant à 2 catégories), et une couche intermédiaire de 100 neurones.
Il l’entraîne sur un jeu de 3 données (x=-2 🡪 catégorie 1), (x=0 🡪 catégorie 0), (x=2 🡪 catégorie 1) et vérifie que l’erreur est faible au terme de l’apprentissage.
import torch as th
from torch import nn
import numpy as np
ninput = 1
noutput = 2
# Example data set
data = [[-2], [0], [2]]
classes = [1, 0, 1]
data = th.Tensor(data)
classes = th.LongTensor(classes)
# Init neural network
network = nn.Sequential(
nn.Linear(ninput, 100),
nn.LeakyReLU(),
nn.Linear(100, noutput),
)
print("first layer: weights = ", network[0].weight)
print("first layer: bias = ", network[0].bias)
# Test network output before learning
sensors = th.Tensor([[0], [1], [2]])
output = network(sensors)
print(output)
# Init loss function
lossfn = nn.CrossEntropyLoss()
pred = network(data)
print("loss:", lossfn(pred, classes))
# Init optimizer
optimizer = th.optim.SGD(network.parameters(), lr=1e-1)
# Learning
nrepeat = 2000
for i in range(nrepeat):
optimizer.zero_grad()
pred = network(data)
loss = lossfn(pred, classes)
print("loss:", lossfn(pred, classes))
loss.backward() # this computes the gradient, i.e. the derivatives
optimizer.step()
# Test network output after learning
pred = network(data)
print("loss after", nrepeat, "learning steps:", lossfn(pred, classes))
print("first layer: weights = ", network[0].weight)
print("first layer: bias = ", network[0].bias)
- Recopiez le code suivant à la fin du fichier Python et testez-le en appuyant sur le bouton « Réinitialiser l’IA » (vous pouvez voir les affichages des print dans la console).
- Maintenant vous allez remplir les 3 fonctions init, learn et take_decision :
En haut du fichier définissez les variables suivantes qui seront accessibles dans les différentes fonctions
network = lossfn = optimizer = None
A l’intérieur de chacune des 3 fonctions rendez ces variables accessibles avec la ligne :
global network, lossfn, optimizer
Déplacez la partie « initialisation du réseau » dans la fonction init
Déplacez la partie « apprentissage » dans la fonction learn (mais supprimez la boucle for : ne mettez qu’une seule étape de l’apprentissage, sachant que la fonction sera appelée un grand nombre de fois)
Ecrivez la fonction take_decision, qui doit renvoyer le numéro de catégorie correspondant à l’entrée « sensors », c’est-à-dire 0 ou 1
- Testez votre programme dans le logiciel, avec le robot simulé, puis avec le vrai robot !
Bilan et retours d'expérience
Nous espérons que cette séance vous a aidé à redécouvrir les réseaux de neurones de manière concrète !!
En programmation, la liste des fonctions accessibles d’un programme s’appelle API, pour Application Programming Interface, Interface de Programmation d’Application. Elle est utilisée par les programmeurs pour savoir comment interagir avec le programme. Vous trouverez l’API du module python alphai en suivant ce lien : https://drive.google.com/file/d/1C4ovPW_eH5KFz5Y9JvSrzLhtmdOpcp6-/view
Matériel nécessaire :
- 1 robot minimum ou simulation dans le logiciel
- 1 ordinateur/robot
- Petite arène minimum
Durée :
2 à 3 heures
Age :
+ 15 ans
Configuration logiciel :
- configuration d'exemple : édition manuelle: “bloqué vs mouvement”
Les + de cette activité :
- Peut être réalisée (en partie) avec le simulateur.
[Page ressource en préparation, vous retrouverez l'activité complète dans les fichiers PDF ci-joint sur votre droite]
Le logiciel AlphAI vous permet de complètement créer des configurations personnalisées selon vos envies et objectifs.
Choisissez un niveau d’autonomie, un algorithme, les capteurs et les actions que vous souhaitez utiliser, … et inventez votre propre activité !
Vous pouvez également partir d'une configuration d'exemple puis la personnaliser.
Une fois que vous êtes satisfait de la configuration choisie, vous pouvez les enregistrer sur votre ordinateur afin de la réutiliser plus tard !
Pour tout comprendre à la configuration du logiciel, suivez ce lien :
lien vers Page ressources - logiciel > Présentation du logiciel > Panneau fenêtre
Vous avez inventé une activité intéressante, ludique et pédagogique ?
Nous aimerions beaucoup l’essayer, et pourquoi pas la proposer à tous les utilisateurs du logiciel !
Merci de nous contacter via notre formulaire de contact en nous indiquant les informations suivantes :
- Votre nom et prénom
- Votre fonction
- Titre de l’activité
- Objectif de l’activité
- Age minimum requis pour participer
- Temps nécessaire estimé
- Taille et disposition d’arène
- Type de robot utilisé
- Nombre de robots utilisés
- Description du déroulement de l’activité
- Fichier de paramètres (.json)
Élémentaire
Cursus “découvrir l’IA”
Objectifs : Se familiariser avec l’IA et les apprentissages
Temps nécessaire : environ 4h
Activités :
- Course de robots - introduction à l’apprentissage supervisé
- Suivi de ligne (apprentissage supervisé uniquement)
- Robot suiveur
- Apprentissage par renforcement - Évitement d’obstacles
Collège
Cursus “introduction complète à l’IA”
Objectifs : Comprendre le fonctionnement de base de l’IA et des apprentissages
Temps nécessaire : environ 6h
Activités :
- Introduction à l’IA
- Course de robots - introduction à l’apprentissage supervisé
- Suivi de ligne (édition manuelle + apprentissage supervisé)
- Robot suiveur
- Apprentissage par renforcement - Évitement d’obstacles
- Éthique de l’IA
Cursus “introduction rapide à l’IA”
Objectifs : Comprendre le fonctionnement de base de l’IA et des apprentissages
Temps nécessaire : environ 3h
Activités :
- Course de robots - introduction à l’apprentissage supervisé
- Suivi de ligne (édition manuelle + apprentissage supervisé)
- Robot suiveur
- Apprentissage par renforcement - Évitement d’obstacles
Lycée
Cursus “introduction à l’IA”
Objectifs : Comprendre le fonctionnement de base de l’IA et des apprentissages
Temps nécessaire : environ 5h
Activités :
- Introduction à l’IA
- Course de robots - introduction à l’apprentissage supervisé
- Suivi de ligne (édition manuelle + apprentissage supervisé)
- Apprentissage par renforcement - Évitement d’obstacles
- Éthique de l’IA
Cursus “IA & Mathématiques”
Objectifs : Comprendre le fonctionnement de l’IA et des apprentissages, et que tout est régit par des maths !
Temps nécessaire : environ 8h
Activités :
- Course de robots - introduction à l’apprentissage supervisé
- Suivi de ligne (édition manuelle + apprentissage supervisé)
- Algorithme KNN
- Détection d’intrus (mathématiques des réseaux de neurones)
- Apprentissage par renforcement - Évitement d’obstacles
- Apprentissage par renforcement - Bloqué VS Mouvement
Cursus “IA & Programmation python” simple
Objectifs : Comprendre le fonctionnement de l’IA et des apprentissages, et programmer les algorithmes en python
Temps nécessaire : environ 9h
Activités :
- Course de robots - introduction à l’apprentissage supervisé
- Suivi de ligne (édition manuelle + apprentissage supervisé)
- AlphAI télécommandé (programmation python)
- Algorithme KNN
- Algorithme KNN avancé (programmation)
- Apprentissage par renforcement - Évitement d’obstacles
- Apprentissage par renforcement - Bloqué VS Mouvement
Cursus “IA & Programmation python” avancé
Objectifs : Comprendre le fonctionnement de l’IA et des apprentissages, et programmer les algorithmes en python
Temps nécessaire : environ 14h
Activités :
- Course de robots - introduction à l’apprentissage supervisé
- Suivi de ligne (édition manuelle + apprentissage supervisé)
- AlphAI télécommandé (programmation python)
- Programmation caméra
- Algorithme KNN
- Algorithme KNN avancé (programmation)
- Détection d’intrus (mathématiques des réseaux de neurones)
- Apprentissage par renforcement - Évitement d’obstacles
- Apprentissage par renforcement - Bloqué VS Mouvement
- Apprentissage par renforcement - Q-learning (programmation)
Cursus “Programmation python”
Objectifs : Savoir programmer des algorithmes simples en python
Temps nécessaire : environ 4h
Activités :
- AlphAI télécommandé (programmation python)
- Programmation caméra
Supérieur
Cursus “IA & Programmation python”
Objectifs : Comprendre le fonctionnement de l’IA et des apprentissages, et programmer les algorithmes en python
Temps nécessaire : environ 16h
Activités :
- Course de robots - introduction à l’apprentissage supervisé
- Suivi de ligne (édition manuelle + apprentissage supervisé)
- AlphAI télécommandé (programmation python)
- Programmation caméra
- Algorithme KNN
- Algorithme KNN avancé (programmation)
- Détection d’intrus (mathématiques des réseaux de neurones)
- Programmation réseaux de neurones avec Scikit-learn
- Apprentissage par renforcement - Évitement d’obstacles
- Apprentissage par renforcement - Bloqué VS Mouvement
- Apprentissage par renforcement - Q-learning (programmation)
Ce cours a été donné par Learning robots à Paris Saclay. Vous pouvez le retrouver ici.
Cursus “IA”
Objectifs : Comprendre le fonctionnement de l’IA et des apprentissages
Temps nécessaire : environ 8h
Activités :
- Course de robots - introduction à l’apprentissage supervisé
- Suivi de ligne (édition manuelle + apprentissage supervisé)
- Algorithme KNN
- Détection d’intrus (mathématiques des réseaux de neurones)
- Apprentissage par renforcement - Évitement d’obstacles
- Apprentissage par renforcement - Bloqué VS Mouvement
Cursus “Introduction à l’IA”
Objectifs : Comprendre les bases de l’IA et des apprentissages
Temps nécessaire : environ 4h
Activités :
- Course de robots - introduction à l’apprentissage supervisé
- Suivi de ligne (édition manuelle + apprentissage supervisé)
- Apprentissage par renforcement - Évitement d’obstacles
- Apprentissage par renforcement - Bloqué VS Mouvement
Cursus “Programmation python”
Objectifs : Savoir programmer des algorithmes simples en python
Temps nécessaire : environ 4h
Activités :
- AlphAI télécommandé (programmation python)
- Programmation caméra
Introduction
Thymio est un robot éducatif conçu par des chercheurs de l’EPFL, en collaboration avec l’ECAL, et est très populaire dans les collèges pour enseigner la programmation avec Scratch.
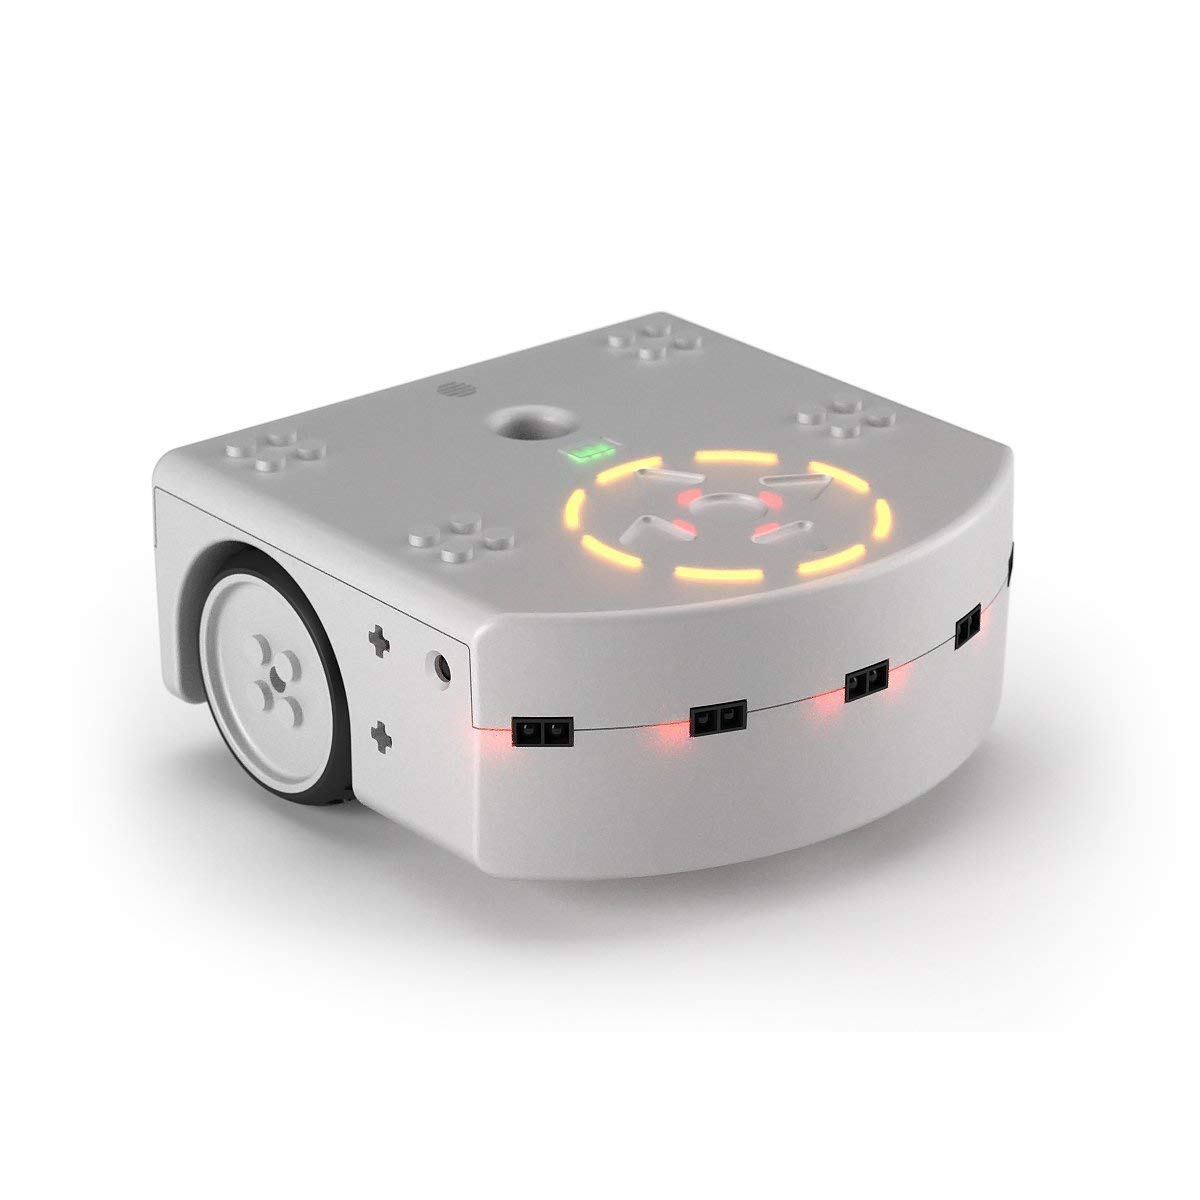
Grâce à notre logiciel AlphAI, les enseignants peuvent maintenant faire découvrir et comprendre l’IA à leurs élèves.
Dans nos activités, vous aurez l’occasion d’entraîner des modèles d’IA en apprentissage supervisé ou par renforcement, afin de réaliser des tâches plus complexes avec le robot Thymio.
Composition

Les capteurs
Les capteurs que vous pouvez utiliser sur le logiciel sont :
IR de proximité
Permet d’utiliser les 5 capteurs infrarouges à l’avant et les 2 capteurs infrarouges à l’arrière du robot.some text
- Un premier bouton vous permet de sélectionner quels capteurs vous souhaitez activer : tous, aucun, capteurs avants, capteurs arrière, capteur central, capteurs latéraux.
- L'option mode binaire permet d'obtenir des valeurs entières 0 ou 1 au lieu de valeurs décimales entre 0 et 1.
- Lorsque le mode binaire est actif, le paramètre seuil IR permet de fixer le seuil de bascule entre les valeurs binaires 0 et 1. Par exemple, lorsque le seuil vaut 0.5 (valeur par défaut), toutes les valeurs entre 0.5 et 1 sont arrondies à 1, et toutes les valeurs entre 0 et 0.5 sont arrondies à 0.
.png)
Suivi de ligne IR
- permet d’utiliser les 2 capteurs infrarouges de suivi de ligne, situés sous le robot. Ils communiquent une valeur entre 0 et 1 en fonction de la luminosité de la surface. Il y a deux modes principaux :some text
- Détection du noir : la valeur 0 correspond au blanc et la valeur 1 correspond au noir. Recommandé pour suivre une ligne noire sur fond blanc.
- Détection de la réflexion : la valeur 0 correspond au noir et la valeur 1 correspond au blanc
L'option mode binaire permet d'obtenir uniquement des valeurs entières 0 et 1 au lieu de valeurs décimales entre 0 et 1.
- Lorsque le mode binaire est actif, le paramètre seuil IR permet de fixer le seuil de bascule entre les valeurs binaires 0 et 1. Par exemple, lorsque le seuil vaut 0.5 (valeur par défaut), toutes les valeurs entre 0.5 et 1 sont arrondies à 1, et toutes les valeurs entre 0 et 0.5 sont arrondies à 0.
.png)
L'accéléromètre
- Permet d’utiliser le gyroscope du robot. Il communique une valeur pour chaque axe x (derrière - devant), y (gauche - droite) et z (en bas - en haut). Vous pouvez choisir un seul des axes, ou une combinaison.
.png)
la caméra de l’ordinateur
- permet d’utiliser la webcam de l’ordinateur en tant que capteur. Plusieurs options sont proposées, qui déterminent la résolution de la caméra et l'utilisation ou non du zoom.
Le bouton pré-calcul image caméra permet de modifier les valeurs traitées :
- lorsque le pré-calcul est désactivé, l'image est par défaut en couleurs (système RGB).
- le mode niveaux de gris capture la luminosité de chaque pixel.
- le mode couleur dans l'image détecte les couleurs. Tous les pixels blanc/gris/noirs vont obtenir la valeur 0 et les pixels de couleur la valeur 1.
- le mode canal vert détecte uniquement la présence de vert (valeurs proches de 1) ou son absence (valeurs proches de 0).
- le mode rouge vs vert renvoie pour chaque pixel une valeur entre -1 et 1 qui correspond à la quantité de rouge moins la quantité de vert.
- Le bouton prendre une photo permet de prendre une photo avec la webcam et de l'enregistrer sur votre ordinateur.
- L'option effet miroir effectue ou non un retournement de l'image (symétrie axiale gauche-droite).
- L'option indice de la caméra permet de sélectionner quelle webcam utiliser lorsque votre appareil en possède plusieurs.
.png)
.png)
Les actions
Les actions que vous pouvez utiliser sur le logiciel sont :
- Mouvement :

- Pivotement :

- Lumières :
Vous pouvez également créer une action personnalisée en cliquant sur le bouton :

La fenêtre suivante va alors apparaître :

Nommez votre action et cochez “action du robot” pour modifier les paramètres : la nouvelle action est désormais disponible.
Pour l'enregistrer et pouvoir la réutiliser dans le futur, cliquez sur Fichier > Sauvegarder > Enregistrer la configuration.
Environnement d’utilisation
Nous vous recommandons d’utiliser Thymio dans une arène AlphAI.
MOBSYA propose également des pistes robotiques dans lesquelles faire évoluer Thymio. Cependant, l’absence de murs limite les activités que vous pourrez réaliser.
Vous pouvez également faire simplement évoluer Thymio sur une surface plane.
Pour réaliser l’intégralité des activités sur le logiciel, Thymio aura besoin de :
- Une surface très plane, idéalement bâchée
- Des murs d’une hauteur supérieure au robot
- D’une ou plusieurs lignes au sol d’une couleur très contrastée avec la bâche (on peut utiliser du scotch noir)
Sachez également que toutes les activités sont réalisables avec le robot simulé de Thymio Suite.
Par clé Wireless avec Thymio Suite
- Ouvrir Thymio Suite
- Connectez le robot à votre ordinateur en branchant la clé Wireless (Dongle USB)
- Allumez votre robot Thymio
(il suffit d'appuyer et de maintenir le doigt sur le rond qui se trouve au centre des flèches jusqu'à ce que le robot émette un son et devienne vert. Cela prend quelques secondes.)
Lorsque le robot est connecté à la clé sur l’ordinateur, il se met à clignoter ! - Lancez le logiciel AlphAI
- Sélectionnez le robot dans l’écran d’accueil du logiciel
- L’écran principal s'ouvre, vous pouvez commencer les activités !
⚠️ Lors de votre première connexion au robot, il vous sera demandé le numéro de clé d’activation logiciel fourni avec le robot.
En simulation avec Thymio Suite
- Ouvrir Thymio Suite
- Cliquez sur “Lancer un simulateur” depuis la barre d’outils. Sélectionnez l’arène de votre choix.
- Lancez le logiciel AlphAI
- Sélectionnez le robot simulé qui apparaît sur l’écran d’accueil du logiciel
⚠️ Vous devrez idéalement disposer d’un deuxième écran afin de pouvoir avoir les fenêtres du logiciel Thymio Suite et du logiciel AlphAI ouvertes simultanément.
Recharge de la batterie (USB type A)
Pour recharger Thymio, il suffit de le brancher à un ordinateur avec le câble micro-USB fourni.
Si votre Thymio ne s'allume plus même en le branchant à un ordinateur, le brancher à un chargeur mural.
Lorsque Thymio est en charge, une lumière rouge s'allume près du port USB). S'il est allumé, les LED d'indication du niveau de batterie clignoteront.
Problèmes récurrents
Un bouton d’aide se trouve sur Thymio suite et vous redirige vers la page internet du centre d’assistance de Thymio : FAQ Thymio
Mise à jour du robot
- Téléchargez et installez la dernière version de Thymio Suite.
- Connectez Thymio à votre ordinateur à l’aide du câble USB.
- Lancez Thymio Suite.
- Lancez VPL ou n’importe quel langage de programmation.
- Si une mise à jour est disponible, une icône de mise à jour apparaît sur le robot. Cliquez avec le bouton droit de la souris sur le robot que vous souhaitez mettre à jour et sélectionnez « mettre à jour le firmware (update firmware) » ou cliquez simplement sur l’icône de mise à jour.
- Attendez que la barre bleue soit remplie. Une fois qu’elle est remplie, la mise à jour est terminée.
Support / garantie
Pour valider la garantie de votre robot, il faut l’enregistrer sur le site Thymio. Pour tout problème avec votre robot, vous pouvez contactez le centre d’assistance Thymio
Si vous possédez une arène AlphAI, veuillez vous référer à cette page pour comprendre comment l’assembler et les différentes dispositions possibles :
Notre partenaire MOBSYA propose de nombreuses pistes à dérouler sur le sol, à acheter ou à imprimer chez soi : https://www.thymio.org/fr/ressources/ressource-dactivites/
Dans chacune des activités présentées sur cette page de ressources, nous avons ajouté un lien de téléchargement de la piste à imprimer quand cela est possible.
Matériel :
- 1 robot minimum
- 1 ordinateur/robot
- Environnement plat
Notions apprises :
- Visualiser l'activation des capteurs
- Se familiariser avec l'entraînement d'une IA dans le logiciel
Age :
8 ans et +
Durée :
1h30 (2*45 min)
Paramètres d'exemple :
- Thymio le craintif
Possibilité d'enrichir les capteurs et les actions
.webp)
Thymio le craintif
Recommandé pour découvrir en manipulant.
Apprenez à votre robot à réagir en fonction de situations précises ! Cette activité vous permettra d'apprendre comment paramétrer le logiciel AlphaAI et son réseau de neurones pour faire fonctionner Thymio dans un environnement simple.
Cette activité a été conçue avec notre partenaire MOBYSIA, constructeur du robot Thymio.
Objectifs
Au cours de cette activité, nous allons apprendre à Thymio à réagir si quelque chose s'approche trop près de lui. Plus précisément, si ses capteurs horizontaux avant et arrière détectent un objet, il tente de s'éloigner avec ses roues. De plus, dans le cas où il est entouré de toute part et qu’il ne peut pas s'échapper, il tourne sur lui-même.
Mise en place du matériel
Connectez votre robot à Thymio suite puis à AlphaAI. Posez le robot sur une surface plane, idéalement avec une bâche, dans un espace de 80 cm² minimum. Choisissez les paramètres correspondants à cette activité dans le logiciel AlphaAI
Première phase : observation
Allumez le bouton "autonome" et éteignez le bouton "apprentissage". Déplacez votre main devant les capteurs de proximité, avant et arrière. Que pouvons-nous constater ? Le comportement aléatoire du robot est normal : il n'a pas encore appris à réagir à la stimulation de ses capteurs.
Deuxième phase : apprentissage
Éteignez le bouton "autonome" et allumez le bouton "apprentissage".
À partir de maintenant, nos actions seront enregistrées pour réaliser l'entraînement de Thymio :
1. Approchez Thymio à un récepteur il y a quelque chose devant lui :
Placez un doigt devant le capteur central de devant et cliquez sur l’icône d’action flèche vers le bas.
2. Apprenez à Thymio à ne pas bouger si il n'y a rien :
En s’assurant que tous les capteurs infrarouges de Thymio soient à zéro, cliquer sur l’icône s’arrêter.
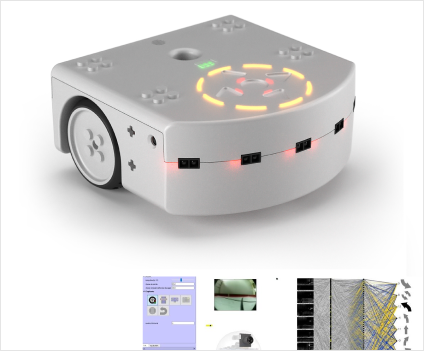
Troisième phase : autonomie
Maintenant, on peut tester si Thymio a bien appris !
Allumez le bouton “autonome” et éteignez le bouton “apprentissage”.
Placez votre doigt devant ses capteurs : est-ce que Thymio se comporte comme prévu ?
Quatrième phase : apprentissage plus complet
Complexifions maintenant les réactions de Thymio en utilisant tous les capteurs disponibles.
Commencez par ajouter de nouvelles actions : reculer à droite, reculer à gauche, tourner à droite, tourner à gauche, avancer, et pivoter à 180°.
⚠️ Ajouter une nouvelle action supprimera la mémoire d’expérience du robot.
Éteignez le bouton “autonome” et allumez le bouton “apprentissage”.
Associez la stimulation de chaque capteur à une action spécifique, par exemple en suivant les instructions de ce tableau :
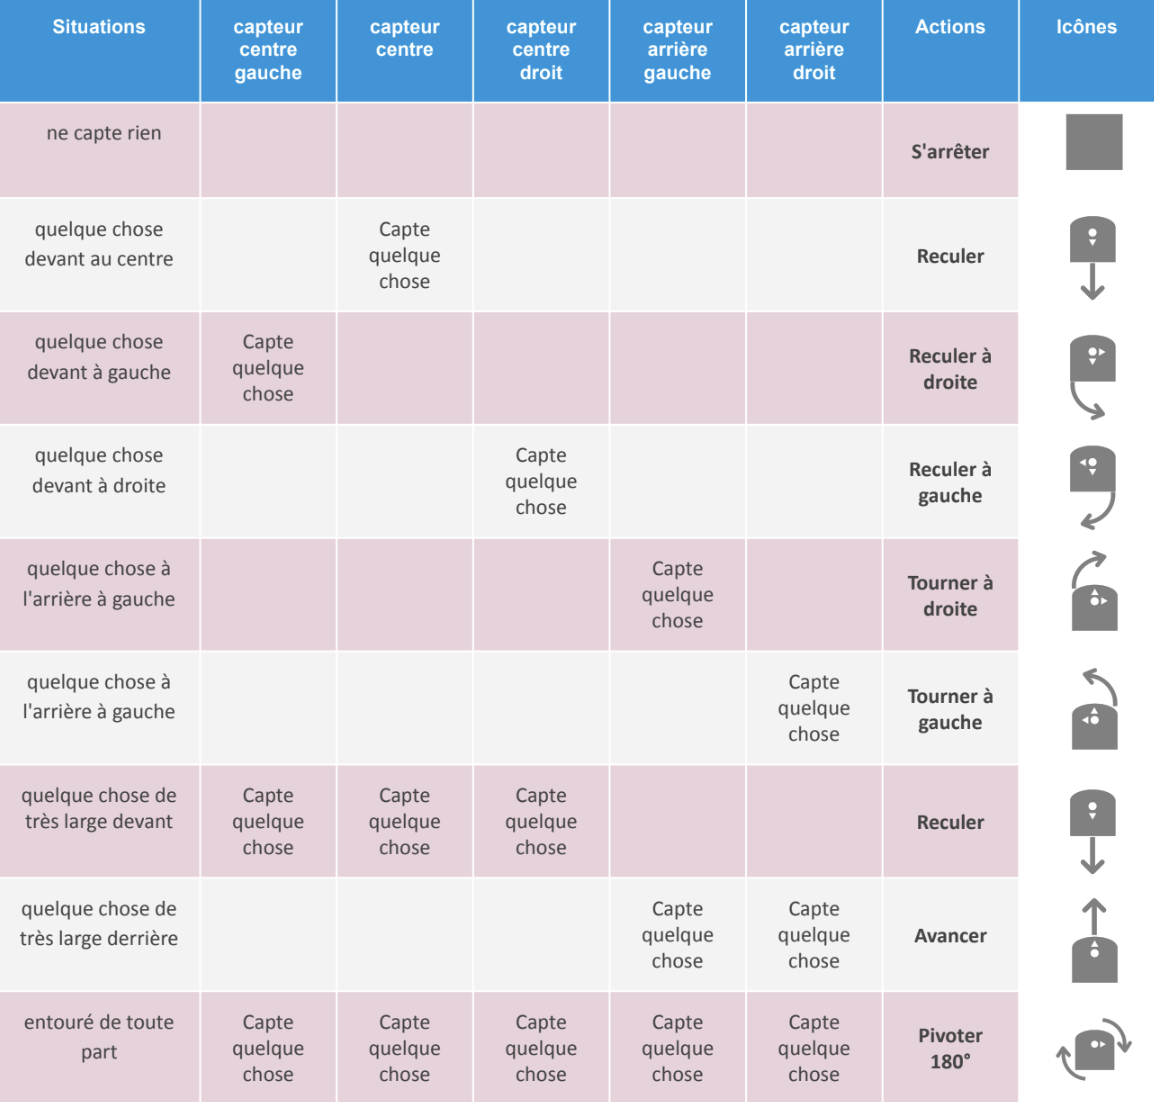
Une fois que toutes les réactions sont apprises à Thymio en fonction de chaque situation, allumez le bouton “autonome” et éteignez le bouton “apprentissage”.
Est-ce que Thymio se comporte comme prévu ?
Matériel :
- 1 robot minimum
- 1 ordinateur/robot
- Environnement plat
Age :
8 ans et +
Durée :
1h30 (2*45 min)
Notions apprises :
- Visualiser l'activation des capteurs
- Se familiariser avec l'entraînement d'une IA dans le logiciel
Paramètres d'exemple :
- Thymio le craintif
Possibilité d'enrichir les capteurs et les actions
Matériel :
- 2 robots
- 1 ordinateur/robot
- Circuit à télécharger fourni dans le sujet
Paramétrage :
- configuration d'exemple : “apprentissage supervisé - suivi de ligne”
Durée :
1 heure
Age :
8 ans et +
Garder la piste
Au cours de cette activité, nous allons apprendre à Thymio à suivre une ligne dessinée sur le sol, son but est d’effectuer le plus d’aller-retour dans un temps imparti (2 à 3 minutes).
Mise en place du matériel
Connectez votre robot à Thymio suite puis à AlphAI.
Posez le robot sur une surface plane, idéalement avec une bâche et y ajouter une piste d’une longueur de 60 cm. Créez la piste sur un support de couleur claire.
Une piste est également proposée au format A2 dans l’annexe, à droite de cette page.
○ ligne-noire-2xA3.pdf qui peut s'imprimer sur 2 feuilles A3 qui seront assemblées avec un ruban adhésif.
○ ligne-noire-4xA4.pdf qui peut s'imprimer sur 4 feuilles A4 qui seront assemblées de la même manière.
Choisissez la configuration d’exemple “apprentissage supervisé - suivi de ligne” dans le logiciel AlphAI
Règlement
Plusieurs équipes de 2 ou 3 élèves s'affrontent, chacune d'entre elles choisissant un nom pour l'équipe et le robot.
Une équipe place son robot au début de la piste. Au démarrage du chronomètre, le robot débute son parcours. A la fin du temps imparti, on additionne les nombres d'aller et de retours parcourus, on note le résultat dans un tableau.
Si la main d'un participant aide le robot, une pénalité de 10 secondes est retirée au temps total du parcours.
Par exemple, une aide réduira le temps de 2min à 2 min -10 sec = 1 min 50 sec.
Si le robot quitte la piste sans y revenir tout seul, l'aller ou le retour en cours n'est pas pris en compte. L'équipe peut remettre le robot au début de la section parcourue mais une pénalité de 10 secondes est appliquée.
Si le robot fait demi-tour et reprend la piste à l'envers avant d'être à l'une des extrémités, le laisser poursuivre, mais le parcours (aller ou retour) en cours ne sera pas comptabilisé.
Il peut y avoir plusieurs manches.
L'équipe vainqueur est celle dont le robot a effectué le plus grand nombre d'aller-retours sur l'ensemble des manches.
Réglages AlphAI
- Onglet Capteurs
On utilise les capteurs IR au sol en mode valeurs en décochant la case “binary_mode” si ce n’est pas déjà fait.
Capture ecran - thymio - activites 1
- Onglet Actions
L'équipe choisira librement les actions à utiliser. Elle fixera également les paramètres durée, pause et vitesse maximale comme elle le désire (il est conseillé de faire des essais). Ces 3 paramètres peuvent être modifiés sans être obligé de refaire l'apprentissage.
- Onglet AI
⚠️Laisser les choix par défaut apprentissage supervisé et réseau de neurones. Ne pas modifier la vitesse d'apprentissage. Éventuellement la diminuer si le robot se trompe souvent.
Choisir la combinaison 10 20, soit 2 couches de neurones, une de 10 et la suivante de 20.
.png)
À vous de mener l'apprentissage. Attachez vous à envisager tous les cas possibles, ils ne sont pas très nombreux. Vous pouvez si vous le désirez enregistrer vos paramètres dans le menu Paramètres > Sauver les paramètres ...
Solutions (->Aide)
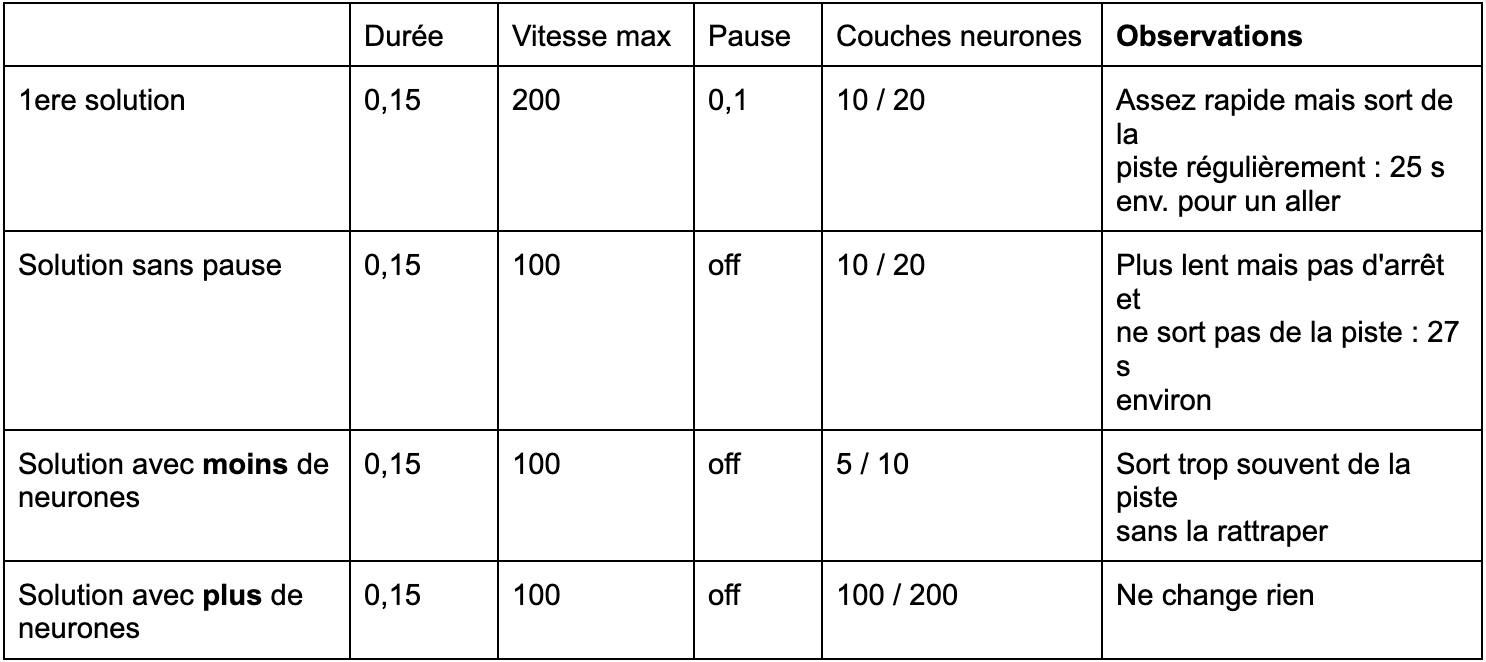
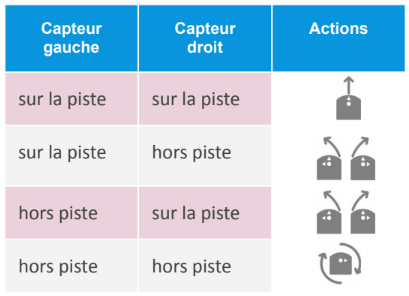
A vos marques !
Matériel :
- 2 robots
- 1 ordinateur/robot
- Circuit à télécharger fourni dans le sujet
Durée :
1 heure
Age :
8 ans et +
Paramétrage :
- configuration d'exemple : “apprentissage supervisé - suivi de ligne”
Matériel :
- 1 robot minimum
- 1 ordinateur/robot
- Petite arène avec obstacles
Paramétrage :
- Configuration d'exemple : “apprentissage supervisé”
Durée :
1 heure
Age :
8 ans et +
Mise en place du matériel
Réaliser un cercle de diamètre de 60cm sur la bâche avec le scotch noir, ne pas hésiter à doubler l’épaisseur du cercle à 4-5 cm. Disposer à l'intérieur du cercle le robot Thymio ainsi que 4 ou 5 petits objets. Caractéristiques des objets : Ces objets doivent être assez légers pour être déplacés par Thymio. Ils peuvent être de forme quelconque mais avoir une couleur claire pour renvoyer les rayons infrarouges des capteurs. Leur largeur doit être comprise entre 2 et 9 cm environ. Exemple : des gobelets, des éléments lego, de petits cubes de bois …
Objectif
Non, nous n'allons pas transformer Thymio en robot aspirateur ! Thymio sera simplement chargé de repousser hors du cercle tous les objets se trouvant dedans, comme le montre la figure ci-dessous :
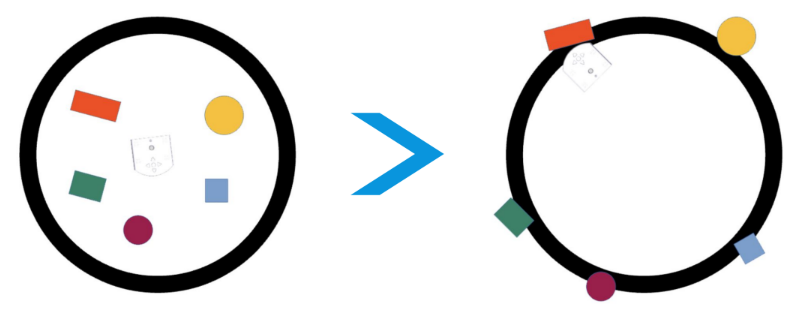
Que doit faire Thymio
Nous allons apprendre à Thymio comment faire en utilisant la méthode découverte dans l'activité précédente, “Thymio le craintif”, la méthode apprentissage supervisé.On rappelle que dans l'apprentissage supervisé, nous avons regardé les valeurs de ses capteurs, puis nous avons dit à Thymio l'action à effectuer.Nous avions étudié seulement quelques situations importantes. Grâce au réseau de neurones, Thymio avait appris quoi faire dans les situations qu’il n’avait encore jamais rencontrées.
Une première simulation à la main
À l'intérieur du cercle noir, disposer quelques objets au hasard et placer également Thymio. Il faut simuler à la main ce que doit faire le robot pour pousser les objets hors du cercle. Mais attention, il faudra respecter quelques consignes. Sinon nos idées ne pourront pas être utilisées dans le programme. Vérifier que les actions imaginées sont bien présentes dans l'onglet Actions du logiciel Alphai. L'action à exécuter dépendra toujours des valeurs des capteurs. Il faudra donc bien imaginer ce que captent les capteurs. En particulier, pour un état des capteurs, ne pas proposer plusieurs actions différentes.
Par exemple, mettons que si le capteur central capte quelque chose, vous lui demandez d'avancer : ne pas lui proposer plus tard de tourner à droite si à nouveau le capteur central capte quelque chose. Prendre le robot à la main. Le premier mouvement sera d'avancer le robot tout droit sur un petite distance, 3 ou 4 cm. Puis pousser un objet hors du cercle. Vous pouvez prendre la situation décrite dans la figure précédente où Thymio va toucher l'objet mauve par le côté. Déterminer les actions à effectuer en fonction des informations des capteurs. Une fois la situation bien analysée, vous pouvez éventuellement tenter de la reproduire avec Alphai, en ajoutant des actions si nécessaire.
Bien s’organiser
Pour bien retenir quelle action faire, en regardant l'état des capteurs, il est pratique d'utiliser un tableau. On s'aidera donc du tableau donné en Annexe 2 en le remplissant de la manière suivante : Dans la première colonne, indiquer ce qu'il y a autour ou dessous Thymio. Dans les colonnes capteurs.
- si le capteur capte quelque chose, mettre une croix
- s'il ne capte rien, mettre un tiret
- si ce qu'il capte n'a pas d'importance, mettre un point d'interrogation
Dans la colonne actions, mettre l'action correcte. Une fois que vous avez trouvé comment faire pour pousser un objet hors du cercle, trouvez comment utiliser le cercle noir pour renvoyer Thymio à l'intérieur du cercle. Puis poursuivre la simulation à la main jusqu'à avoir poussé tous les objets [1]. Remarque : pour compléter le tableau, il y a plusieurs solutions possibles [2] et vous n'êtes pas obligés d'utiliser toutes les lignes. Enfin, réaliser l'apprentissage complet, passer en mode autonome et contempler Thymio en train de pousser tous les objets hors du cercle ! Réglage final des actions et solutions possibles en annexe 3.
[1] Il peut être intéressant de filmer le 'nettoyage' fait à la main avec une webcam et le visionner ensuite pour que le groupe puisse vérifier si le robot pourra vraiment effectuer tous les mouvements faits par la main.
[2] Une solution qui voudrait envisager tous les cas possibles avec 7 capteurs (5 horizontaux et 2 dessous) devrait étudier au minimum 128 situations différentes !
Rappel pour connecter Thymio*Annexe et Appendix (solution->Aide)
Annexe et Appendix (solution->Aide)
Premiers réglages des onglets
Onglet capteurs
Choisir les capteur IR de proximité, et les capteur IR de suivi de ligne en valeurs.
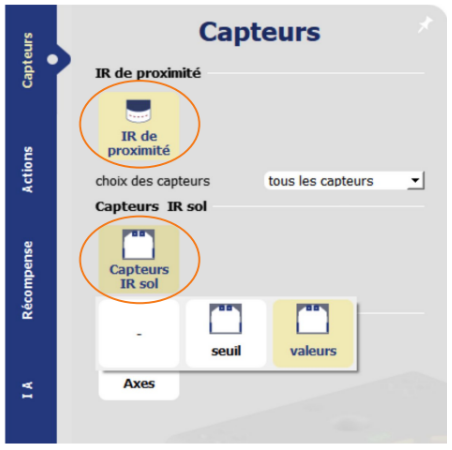
Onglet Actions
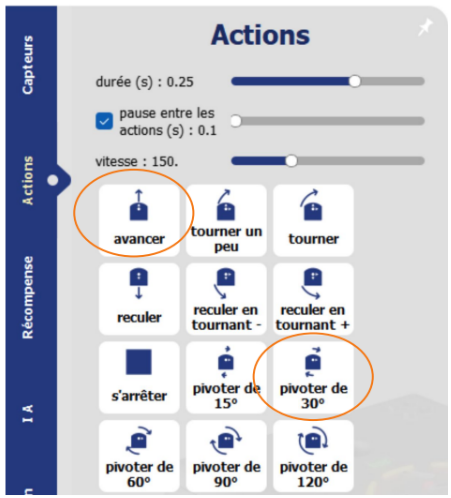
Onglet AI
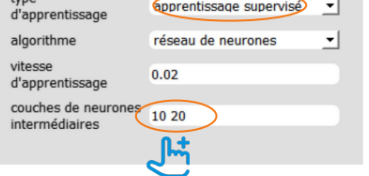
Solutions possibles
Seul l'onglet Actions a besoin de subir des modifications.
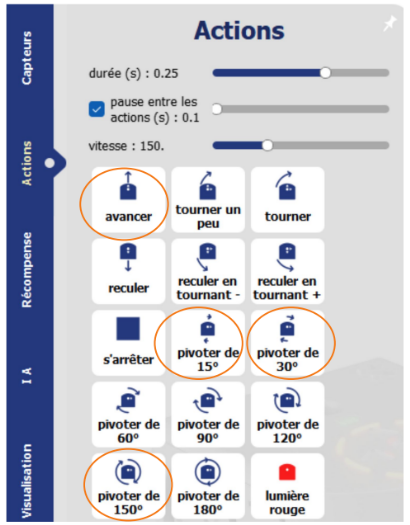
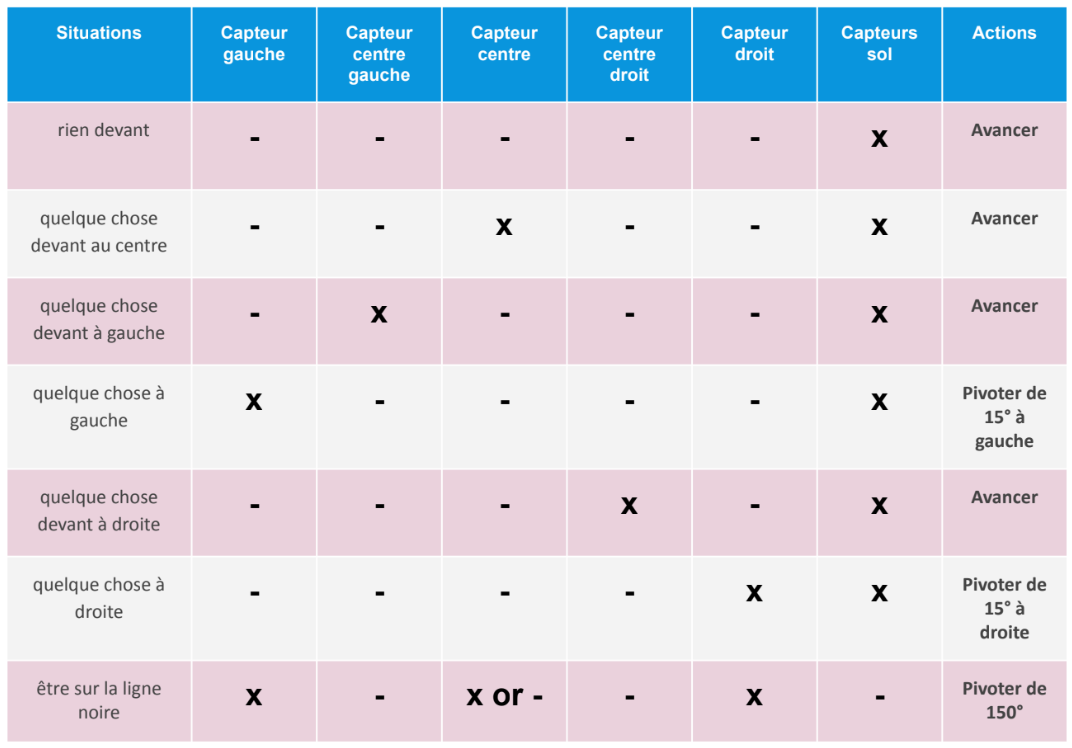
10 actions au total.
Légende:
X : quelque chose devant
- : rien en vue
On notera que les capteurs arrière gauche et droit ne sont pas du tout sollicités. On peut donc tout simplement ne pas les utiliser : pour cela, dans l’onglet Capteurs choisir IR de proximité / choix des capteurs : capteurs avant.
Matériel :
- 1 robot minimum
- 1 ordinateur/robot
- Petite arène avec obstacles
Durée :
1 heure
Age :
8 ans et +
Paramétrage :
- Configuration d'exemple : “apprentissage supervisé”
Matériel :
- 1 robot minimum
- 1 ordinateur/robot
- Petite arène avec obstacles
Paramétrage :
- configuration d'exemple : “apprentissage supervisé”
Durée :
60 à 90 minutes
Age :
8 ans et +
La voiture autonome
Recommandé pour approfondir l’apprentissage supervisé
Apprenez à votre robot à effectuer des tâches précises grâce à l’apprentissage supervisé. Cette dernière activité permet de réunir tout ce qui a été vu au cours des dernières activités d’apprentissage supervisé. Elle réunit les détections d’obstacles, demi-tours et suivi de ligne.
Mise en place du matériel
Un parcours d'exemple est donné en Annexe 1. Les murs sont aux dimensions d'une feuille A4 pliée en 4 sur la longueur.
On peut réaliser des murs à peu de frais avec des feuilles A4 et un rouleau de ruban adhésif.
Mur long : plier une feuille A4 3 fois dans le sens de la longueur. L’aplatir et coller les 2 côtés opposés avec un morceau d’adhésif, puis lui redonner son volume en 3D (forme de barreau). La dimension est donc de 297 x 52 x 52 mm.
Si la section d'un mur ne se maintient pas carrée, on peut la renforcer en glissant un autre mur plié en équerre (angle droit).
Mur court : Il suffit de couper un mur long quand il est aplati.Dimension : 145 x 52 x 52.
La disposition proposée utilise 9 feuilles : mur long et 3 feuilles de mur court.
Évitez un sol trop rugueux ou bosselé.
Le défi
Dans cette activité, Thymio doit endosser le rôle d'une voiture autonome parcourant une rue.
La rue est simulée par une série de murs parallèles, dessinant un parcours sinueux. A la fin de la rue, on place une ligne noire perpendiculaire aux murs des extrémités.
Le robot doit parcourir la rue sans toucher les murs. Une fois arrivé à la fin de la rue, il fait demi-tour et parcourt la rue en sens inverse.
Enrichissements possibles : Simulation d'un piéton. On place au moment de son choix un obstacle, de largeur maximum de 6 cm environ, au milieu de la rue pour simuler le piéton. Thymio doit s'arrêter devant. On retire le piéton, Thymio redémarre et poursuit son parcours.
On peut reprendre les règles du jeu présentées dans l' activité : “ Garder la piste”. Si cette dernière activité a déjà été faite sous forme de jeu , on peut combiner les scores des deux activités.
Ajout du piéton avec ou sans pause
- 1ère stratégie
Si les 3 capteurs centraux captent, arrêt. Si le capteur central seul capte, arrêt également.
Ça marche bien avec un piéton mais s'arrête devant un mur en face.
- 2ème stratégie
Si le capteur au centre capte, arrêt.
Ça marche bien avec un piéton étroit bien placé, c'est mieux avec un mur en face mais se trompe parfois.
Réglages AlphAI
Onglet Capteurs:
Les capteurs de proximité et les capteurs IR sol seront utilisés.
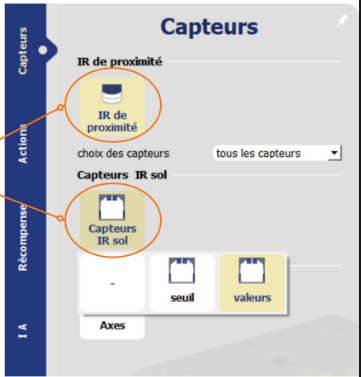
Onglet Actions:
L'équipe choisira librement les actions à utiliser. Elle fixera également les paramètres durée, pause et vitesse maximale comme elle le désire (il est conseillé de faire des essais). Ces 3 paramètres peuvent être modifiés sans être obligé de refaire l'apprentissage.
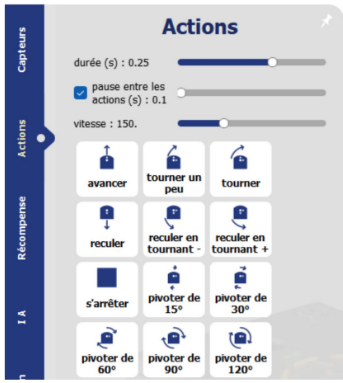
Onglet AI :
Laisser les choix par défaut apprentissage supervisé et réseau de neurones. Ne pas modifier la vitesse d'apprentissage. Éventuellement la diminuer si le robot se trompe souvent. Choisir la combinaison 10 20, soit 2 couches de neurones, une de 10 et la suivante de 20. À vous de mener l'apprentissage. Attachez vous à envisager tous les cas possibles, ils ne sont pas très nombreux. Vous pouvez enregistrer vos paramètres dans le menu Paramètres > Sauver les paramètres ...

Annexes
Apprentissage
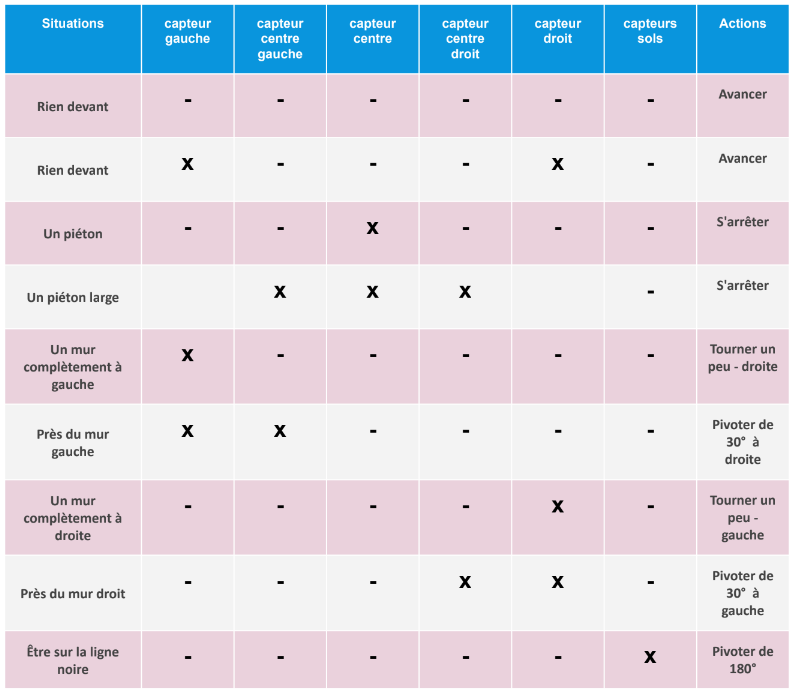
Solutions
Matériel :
- 1 robot minimum
- 1 ordinateur/robot
- Petite arène avec obstacles
Durée :
60 à 90 minutes
Age :
8 ans et +
Paramétrage :
- configuration d'exemple : “apprentissage supervisé”
Configuration & sauvegarde
Le logiciel AlphAI vous permet de complètement créer des configurations personnalisées selon vos envies et objectifs.
Choisissez un niveau d’autonomie, un algorithme, les capteurs et les actions que vous souhaitez utiliser, … et inventez votre propre activité !
Vous pouvez également partir d'une configuration d'exemple puis la personnaliser.
Une fois que vous êtes satisfait de la configuration choisie, vous pouvez les enregistrer sur votre ordinateur afin de la réutiliser plus tard !
Pour tout comprendre au paramétrage du logiciel, suivez ce lien :
lien vers Page ressources > Présentation du logiciel > Panneau fenêtre
Vous avez inventé une activité intéressante, ludique et pédagogique ? Nous aimerions beaucoup l’essayer, et pourquoi pas la proposer à tous les utilisateurs du logiciel !
Envoyez nous un message via notre formulaire de contact, nous prendrons le temps d'échanger avec vous au sujet de l'activité que vous avez créé.
Élémentaire
Cursus “introduction à l’IA”
Objectifs :
Temps nécessaire :
Activités :
- Présentation de l’IA / éthique
- Téléguidage
- Programmation
- Thymio le craintif
- L’arène
Collège
Cursus “4 niveaux d’autonomie”
Objectifs :
Temps nécessaire :
Activités :
- Téléguidage
- Programmation Page Ressources
- Thymio le craintif
- L’Arène
Cursus : “compréhension de l’IA”
Objectifs :
Temps nécessaire :
Activités :
- Introduction à l’AI + éthique (cours)
- Thymio le craintif
- L’Arène
- Garder la piste
- Ne restez pas là !
- La voiture Autonome
- Examen
Introduction
mBot 1 est un robot éducatif conçu par Makeblock, une entreprise spécialisée dans la création de kits de robots éducatifs, pour l'apprentissage de la robotique et de la programmation. Il est notamment très populaire dans les collèges pour enseigner la programmation avec Scratch.
Grâce à notre logiciel AlphAI, les enseignants peuvent maintenant faire découvrir et comprendre l’IA à leurs élèves.
Dans nos activités, vous aurez l’occasion d’entraîner des modèles d’IA en apprentissage supervisé ou par renforcement, afin de réaliser des tâches plus complexes avec le robot mBot 1.
ATTENTION : Le logiciel AlphAI est compatible avec le robot mBot 1 mais il n'est pas encore disponible pour le robot mBot 2.
Composition

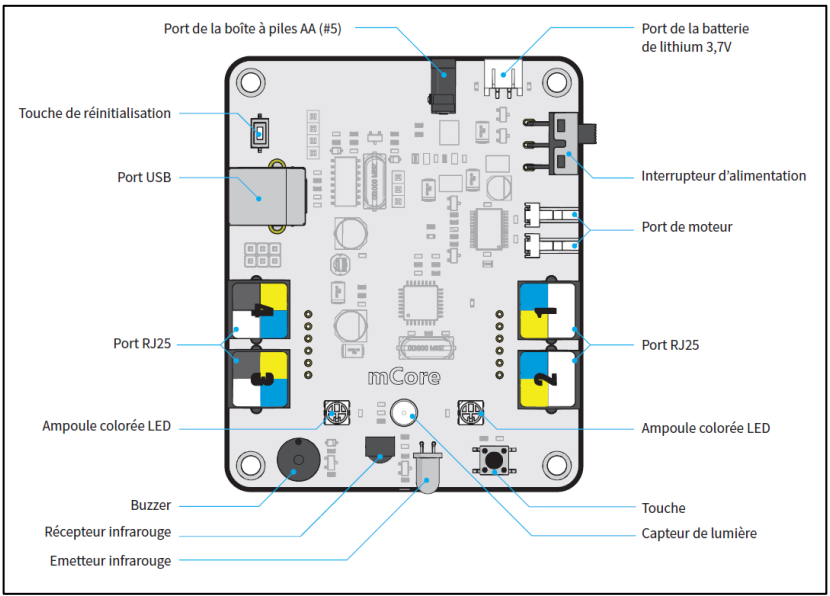
Le robot se constitue de différents capteurs modulables sur le robot mBot.
Les capteurs
- Un Capteur ultrason et un capteur de mouvement
Ultra-Sons : permet d’utiliser le capteur à ultra-sons situé à l’avant du robot. Il communique une valeur en fonction de la distance captée.
Il y a 3 modes d'utilisation :
- distance obstacle : la valeur renvoyée est la distance de l'obstacle mesurée en mètres.
- proximité obstacle : la valeur renvoyée est inversement proportionnelle à la distance mesurée.
- Absence / présence obstacle : le capteur renvoie 1 si un obstacle est détecté et 0 sinon. La distance de détection des obstacles peut être ajustée grâce au curseur en-dessous.
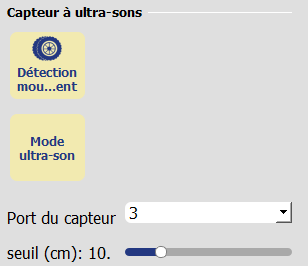
- Deux capteurs IR émetteur/récepteur
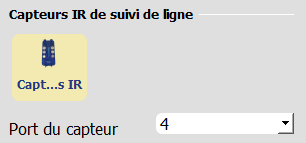
- Une caméra (option)
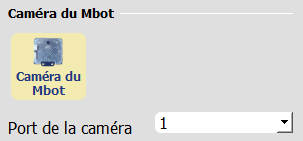
Les actions
Les actions que vous pouvez utiliser sur le logiciel sont :

Vous pouvez également créer une action personnalisée en cliquant sur le bouton :

La fenêtre suivante va alors apparaître :

Nommez votre action et cochez “action du robot” pour modifier les paramètres : la nouvelle action est désormais disponible.
Pour l'enregistrer et pouvoir la réutiliser dans le futur, cliquez sur Fichier > Sauvegarder > Enregistrer la configuration.
Environnement d’utilisation
Nous vous recommandons d’utiliser mBot 1 dans une arène AlphAI.
L’absence de murs limite les activités que vous pourrez réaliser.
Vous pouvez cependant faire simplement évoluer mBot sur une surface plane pour certaines activités.
Pour réaliser l’intégralité des activités sur le logiciel, mBot 1 aura besoin de :
- Une surface très plane. Utiliser idéalement une bâche blanche.
- Murs d’une hauteur supérieure au robot
- Une ou plusieurs lignes au sol d’une couleur très contrastée avec la bâche (on peut utiliser du scotch noir)
Branchez la clé usb makeblock à votre ordinateur
- Allumez le robot mBot 1
(Si vous vous connectez pour la première fois au robot: appuyez sur le logo bluetooth de la clé afin d’appairer le robot). Voici le guide fourni par MAKEBLOCK pour la connexion au mBot 1 : https://education.makeblock.com/help/mblock-block-based-makeblock-bluetooth-dongle-operation-guide/
- Lancez le logiciel AlphAI
- Dans l’écran d’accueil, choisissez en haut à droite le modèle de robot mBot
- Le robot apparaît sur l’écran, cliquez dessus et commencez les activités !
Deux cas de figure selon que vous ayez une boîte à piles ou une batterie lithium :
- Remplacement des piles ou recharge de celles-ci.
- Chargement de la batterie Lithium du robot par câble (USB B vers USB A)
- Temps de rechargement de la batterie 3-4h
- Temps d’utilisation de la batterie 1h
- Problèmes récurrents
Vous reporter à la FAQ
L’utilisation d’une arène est recommandé afin de faire toutes les activités disponibles sur le logiciel.
Si vous possédez une arène AlphAI, veuillez vous référer à cette page pour comprendre comment l’assembler et les différentes dispositions possibles :
Matériel :
- 1 robot minimum
- 1 ordinateur/robot
- Arène de base
Paramétrage :
- Apprentissage supervisé - Évitement d'obstacles (simple)
Durée :
30 minutes
Age :
8 ans et +
Les + de cette activité :
- Quantité de points de données très faibles.
- Facile à faire comprendre aux enfants les plus jeunes.
- Introduit des notions complexes pour aller plus loin dans la compréhension.
Recommandé pour découvrir en manipulant
Cette activité introduit parfaitement l’IA en utilisant le capteur ultrason et en expliquant en détail comment le robot prend une décision. Le robot est au d’abord entraîné par l’élève avec une quantité très limitée de points de données puis fonctionne parfaitement et nous permet de mieux comprendre la prise de décision du robot.
Contenu vidéo [en cours de réalisation]
Introduction
Construisez votre arène de manière à former un carré. Nous vous recommandons d’utiliser une arène conçue par Learning Robots, mais vous pouvez également construire votre propre arène.
Configuration
La configuration du logiciel peut se faire manuellement ou automatiquement.
Pour le configurer automatiquement :
Paramètres > Charger les paramètres d’exemple > Apprentissage supervisé – Évitement d’obstacles (simple)
La configuration peut également se faire manuellement en suivant les indications ci-contre.
- Capteurs > Ultrasons

- Actions > Avancer , Tourner
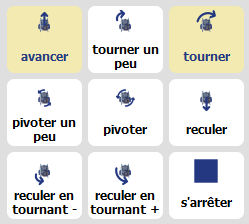
- IA > Type d’apprentissage”Apprentissage supervisé”, Algorithme« réseau de neurone », Vitesse d’apprentissage« 0.02 »,Couches de neurones intermédiaires : vide.
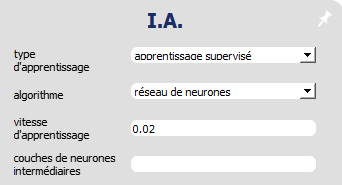
- Visualisation > Sélectionnez : « animation », « connexions », « activité synaptique », « valeurs entrée/sortie »
Entrainement
L’apprentissage du robot mBot peut se réaliser en seulement deux actions :
Lui apprendre à avancer tout droit lorsqu’il n’y a pas d’obstacle.
Lui apprendre à tourner (à droite ou à gauche) s' il y a un obstacle.
Avancer :
Dégagez tout objet se trouvant devant le robot et appuyez sur la flèche « ⇧ » de votre clavier ou cliquez sur l’action « Avancer » à droite de l’écran.
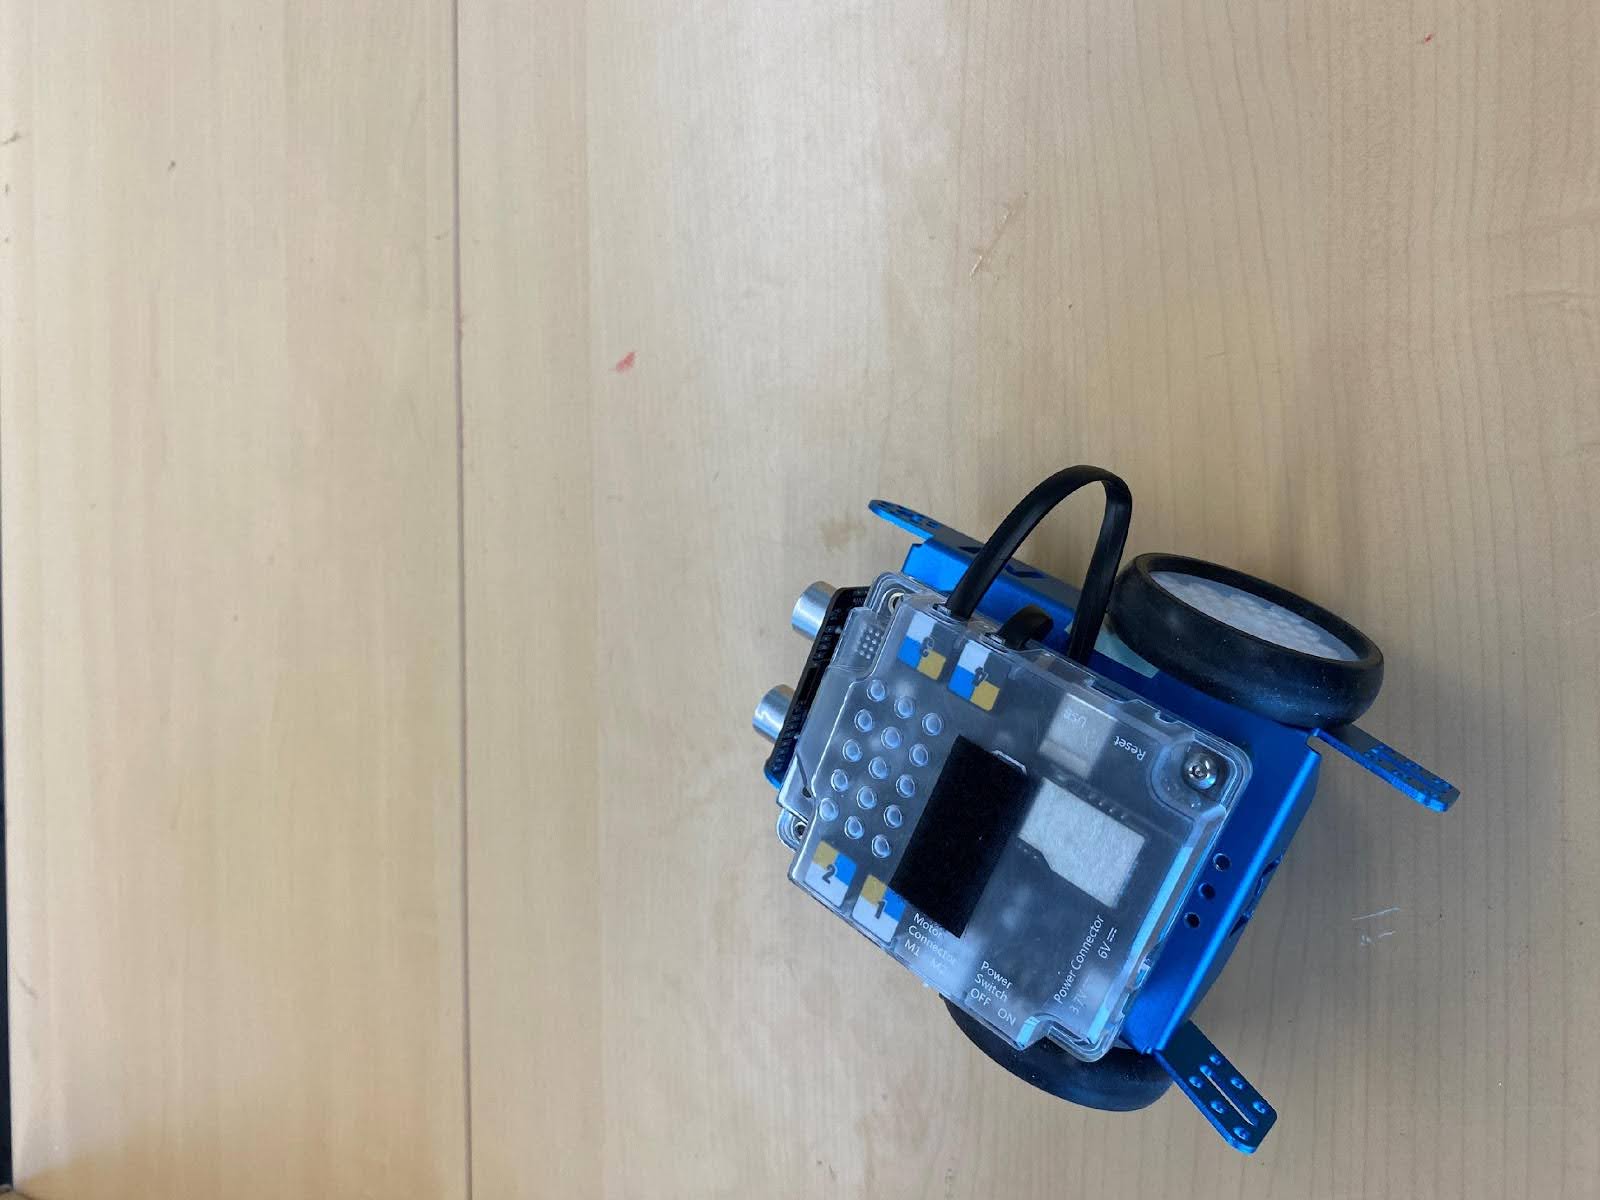
Tourner :
Placez un objet devant le robot et appuyez sur la flèche « ⇦ ou ⇨ » de votre clavier ou cliquez sur l’action « Tourner à droite » à droite de l’écran.
CA Y EST !
Votre robot est entraîné ! Appuyez désormais sur la barre espace ou cliquez sur « autonome » en bas à gauche de l’écran et laissez le robot se déplacer librement et réagir aux obstacles sur son passage.
A retenir :
En apprentissage supervisé, on entraîne l’IA à partir d’exemples. L’IA adapte son comportement de manière à reproduire ces exemples.
Compréhension
Partie 1
Comment le robot prend-il ses décisions ?
Désactivez le mode « Autonome » et « Apprentissage » en re-cliquant sur les boutons correspondants :
Chacun des petits carrés représente un neurone. On remarque que sur le neurone d’entrée (à gauche) la valeur augmente quand la distance augmente. (la valeur est égale à la distance en mètre). La valeur d’un neurone s’appelle le niveau d’activation.
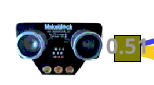
Pour ce qui est des 3 neurones de sortie (à droite), chacun obtient une valeur calculée. L’action correspondant à la valeur la plus élevée est celle qui sera choisie. S’il n’y a pas d’obstacle, c’est l’action que l’on donne en exemple au robot lorsqu’il n’y a pas d’obstacle, qui obtient la plus grande valeur. Dans notre cas, c’est l’action « Avancer ».
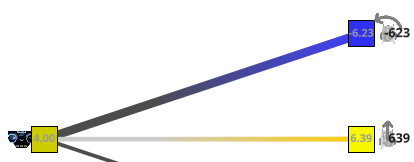
Sans obstacle « Avancer » = 6.39 « Tourner » = -6.23:

Avec obstacle « Avancer » = -0.24 « Tourner » = 3.28:
Partie 2
Comment sont calculés les niveaux d’activation des neurones ?
Mettre le logiciel en mode avancé : Paramètres > Affichage des paramètres > Avancé.
Puis afficher les valeurs qui nous intéressent : Visualisation > Valeur des connexions.

On voit apparaître 6 nouvelles valeurs:
Les 3 « poids » des connexions entre les neurones. (en noir, à côté du symbole *)
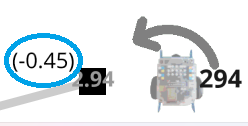
Les 3 « biais neuronaux » ou « valeurs au repos » : placées sur les connexions à côté de chaque neurone de sortie. (Entre parenthèses)
La valeur de sortie la plus élevée sera choisie comme action par le robot. Ces valeurs sont calculées par la formule suivante :
Sortie = Entrée * Connexion + Biais

4.00*2.50+(-0.79)=9.20
Partie 3
On remarque que l’équation précédente a la même forme que l’équation d’une droite :
y = a x + b.
y = Sortie, a = Poids de la connexion, x = Entrée, b = Biais
En mettant la formule sous cette forme on comprend que modifier a, x ou b modifiera le résultat y.
Nous pouvons donc vérifier la formule en modifiant une de ces valeurs. Parmi ces valeurs il n’existe qu’une seule valeur que nous pouvons modifier.
Il s’agit de l’entrée (x). En effet x représente le neurone d’entrée. Dans notre cas, le neurone d’entrée est le capteur ultrason du robot. Pour modifier la valeur de x il vous suffit d’approcher ou d’ éloigner votre main ou un objet du capteur ultrason du robot.
Obstacle très proche
En mettant sa main très proche du capteur ultrason on fait baisser la valeur de l’entrée x, puisque celle-ci est égale à la distance mesurée par le capteur.
Lorsque la valeur de l’entrée x est petite, les niveaux d’activation y des neurones de sortie se rapprochent des valeurs de biais b.
Dans ce cas, c'est l'action Tourner qui l’emporte car elle a la plus grande valeur de biais.
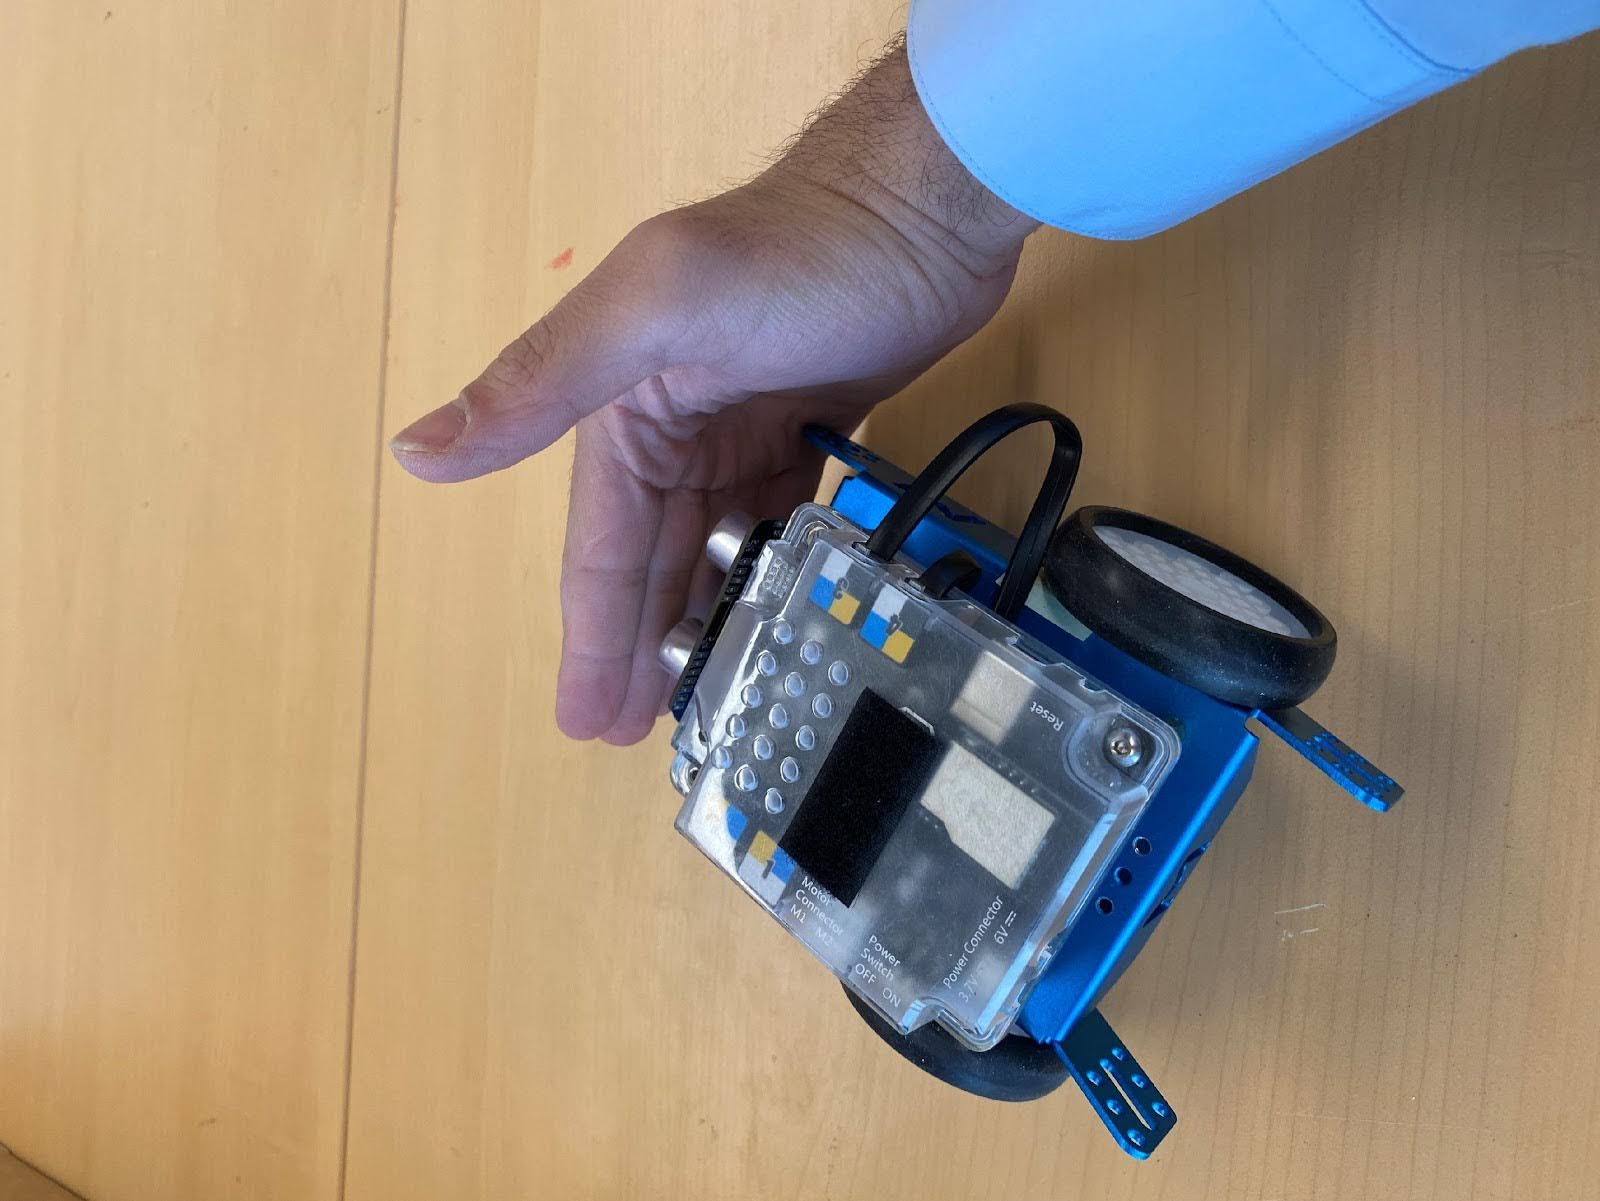
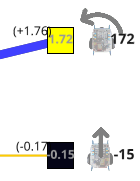
Éloigner l’obstacle
En éloignant sa main du capteur, on augmente progressivement la valeur de l’entrée x.
Lorsque la valeur de l’entrée x augmente, les niveaux d’activation y des neurones de sortie s’éloignent des biais neuronaux b. La valeur de l’action Tourner diminue car le poids de sa connexion est négatif, tandis que la valeur de l’action Avancer augmente car sa connexion est positive.
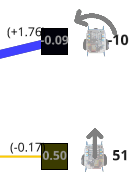
À partir d’une certaine valeur de x, c’est l’action Avancer qui l’emporte car sa valeur dépasse les autres.
Partie 4
Réinitialiser l’IA

Lorsque l’on réinitialise l’IA, les valeurs des connexions (a) et des biais (b) sont remplacées par des valeurs aléatoires. Vérifiez par vous-même !
Lorsque l’apprentissage est en cours (bouton « Apprentissage » actif et « mémoire d’expérience » non vide), les poids des connexions et des biais évoluent : c’est l’apprentissage automatique.
+ Mémoire d’expérience : 36 = Variation de (+3.78)
En revanche, lorsque l’apprentissage est arrêté (bouton « Apprentissage » blanc ou « mémoire d’expérience » vide), les valeurs de connexions et de biais se figent.
OU Mémoire d’expérience : vide = Fixation de (+3.78)
À retenir :
L’apprentissage supervisé est une méthode d’apprentissage automatique qui permet à un réseau de neurones d’apprendre un comportement à partir d’exemples donnés par des humains.
Lorsqu’un réseau de neurones apprend, ses paramètres internes (poids des connexions et valeurs des biais) évoluent. Ils se figent lorsque l’apprentissage est terminé.
Bonus
Si vous le souhaitez, vous pouvez ajouter des actions au robot et améliorer son entraînement afin de rendre ses déplacements plus complexes, plus naturels, et afin qu’il puisse sortir des impasses plus facilement.
Dans le volet « Actions » ajoutez par exemple « Reculer » et apprenez au robot également à reculer lorsqu’il est trop proche d’un obstacle.
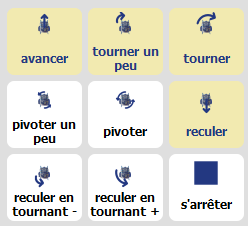
Vous pouvez aussi régler le degré du virage. Dans le volet « Actions » activez l’action « Tourner légèrement ». Vous pourrez entraîner le robot à effectuer un virage plus ou moins fort selon la distance avec l’obstacle.
Remarque : Lorsque le robot arrive en diagonale sur un obstacle, le capteur ultrason ne détecte pas bien cet obstacle. Savez-vous pourquoi ?
Pour résoudre ce problème, rdv dans l’activité 4 : Évitement d’obstacle complexe
Matériel :
- 1 robot minimum
- 1 ordinateur/robot
- Arène de base
Durée :
30 minutes
Age :
8 ans et +
Paramétrage :
- Apprentissage supervisé - Évitement d'obstacles (simple)
Les + de cette activité :
- Quantité de points de données très faibles.
- Facile à faire comprendre aux enfants les plus jeunes.
- Introduit des notions complexes pour aller plus loin dans la compréhension.
Matériel :
- 1 robot minimum
- 1 ordinateur/robot
- Environnement plat
Paramétrage :
- Apprentissage supervisé - Suivi de ligne
Durée :
1h30 (2*45min)
Age :
8 ans et +
Recommandé pour découvrir en manipulant
Apprenez à votre robot à réagir en fonction de situations précises !
Cette activité vous permettra d’apprendre comment paramétrer le logiciel AlphAI et son réseau de neurones pour faire fonctionner mBot dans un environnement simple.
Matériel
Pour la réalisation de cette activité, vous aurez besoin d’une piste de suivi de ligne noire sur fond blanc.
Vous pouvez imprimer une telle piste sur papier (le format minimal recommandé est A2, c’est-à-dire 2 pages A3 ou 4 pages A4).
Vous pouvez aussi réaliser une telle piste à l’aide de scotch noir sur une plus grande variété de surfaces. Il faut simplement s’assurer que la surface est bien détectée comme du blanc par le robot et que le scotch s’enlève sans laisser de trace.
Pour créer vos propres circuits, gardez ces quelques règles en tête :
- Plus les courbes sont serrées, et plus le robot risque de sortir de la piste.
- Pour ajouter un peu de difficulté, il faut s’assurer que la piste comporte des virages à droite et à gauche.
- Les intersections sont des points où le robot risque de ne pas toujours prendre la décision souhaitée ! Elles ajoutent de la difficulté.
Configuration
La configuration du logiciel peut se faire manuellement ou automatiquement.
Pour le configurer automatiquement :
Paramètres > Charger les paramètres d’exemple > Apprentissage supervisé – Évitement d’obstacles (simple)
La configuration peut également se faire manuellement en suivant les indications ci-contre.
- Capteurs > Infrarouges
- Actions > Avancer , Tourner , Reculer
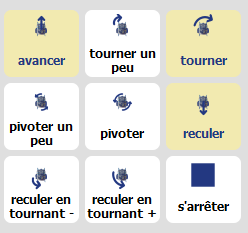
- IA > Type d’apprentissage”Apprentissage supervisé”, Algorithme« réseau de neurone », Vitesse d’apprentissage« 0.02 »,Couches de neurones intermédiaires : vide.
- Visualisation > Sélectionnez : « animation », « connexions », « activité synaptique », « valeurs entrée/sortie »
Entrainement
L’apprentissage du robot mBot peut se réaliser avec seulement 4 actions :
Lui apprendre à avancer:
Placez les deux capteurs infra-rouges au-dessus de la ligne noire et appuyez sur la flèche “⇧” de votre clavier ou cliquez sur l’action « Avancer » à droite de l’écran.
Lui apprendre à tourner à droite:
Placez le capteur de droite au-dessus de la ligne noire et le capteur de gauche sur du blanc et appuyez sur la flèche “⇨” de votre clavier ou cliquez sur l’action « Tourner à droite » à droite de l’écran.
Lui apprendre à tourner à gauche:
Placez le capteur de gauche au-dessus de la ligne noire et le capteur de droite sur du blanc et appuyez sur la flèche ⇦ de votre clavier ou cliquez sur l’action « Tourner à gauche » à droite de l’écran.
Lui apprendre à reculer:
Placez les deux capteurs infra-rouges au-dessus du blanc et appuyez sur la flèche ⇩ de votre clavier ou cliquez sur l’action « Avancer » à droite de l’écran.
Votre robot est entraîné !
Placez-le au-dessus de la ligne noire et appuyez sur la barre espace ou cliquez sur autonome en bas à gauche de l’écran et laissez le robot se mouvoir librement.
Compréhension
Partie 1
Comment le robot choisit-il entre avancer et reculer ?
Désactivez les modes autonome et apprentissage en cliquant sur les boutons correspondants.
Dans cette activité, il y a deux neurones d’entrées (deux carrés à gauche) qui correspondent chacun à un capteur infra-rouge sous le robot.
Lorsque les capteurs détectent du noir, leurs neurones ont une valeur de 0.00.
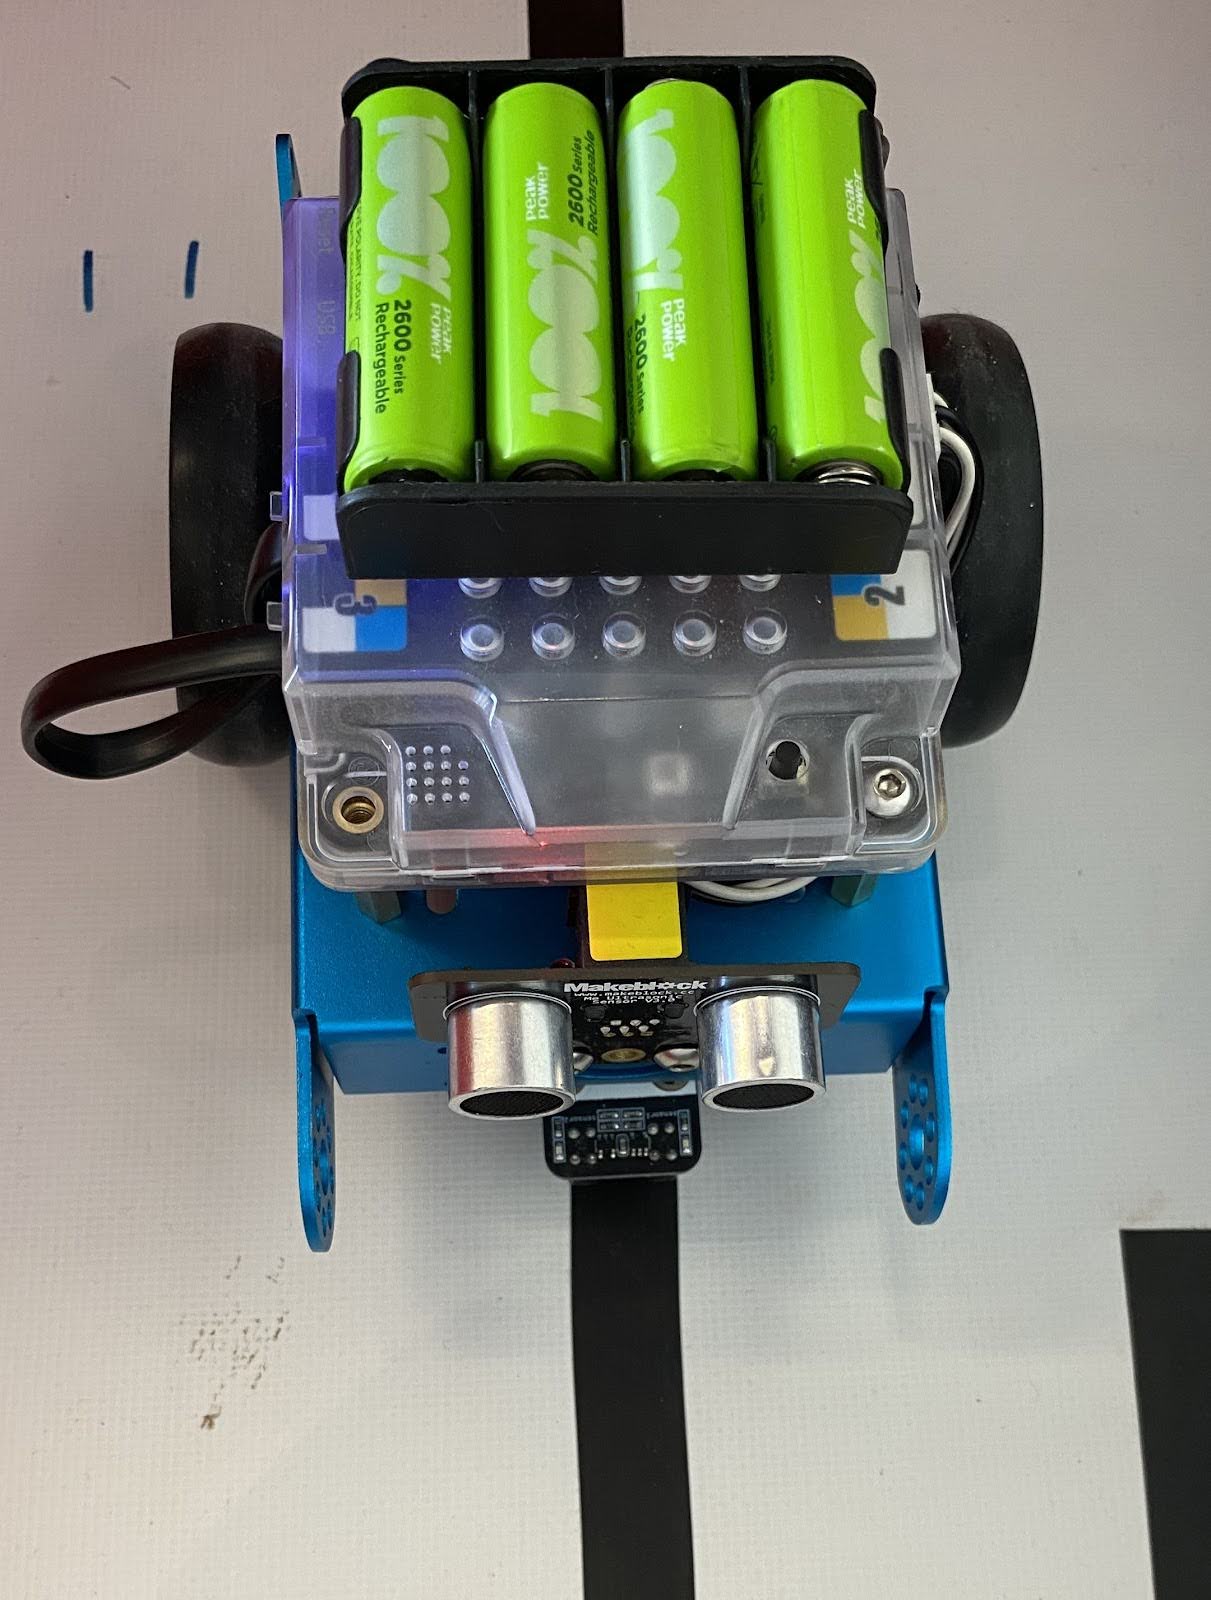
Le robot va alors décider d’aller tout droit pour suivre la ligne.
Lorsque les capteurs détectent du blanc, leur neurone correspondant est égal à 1.00.
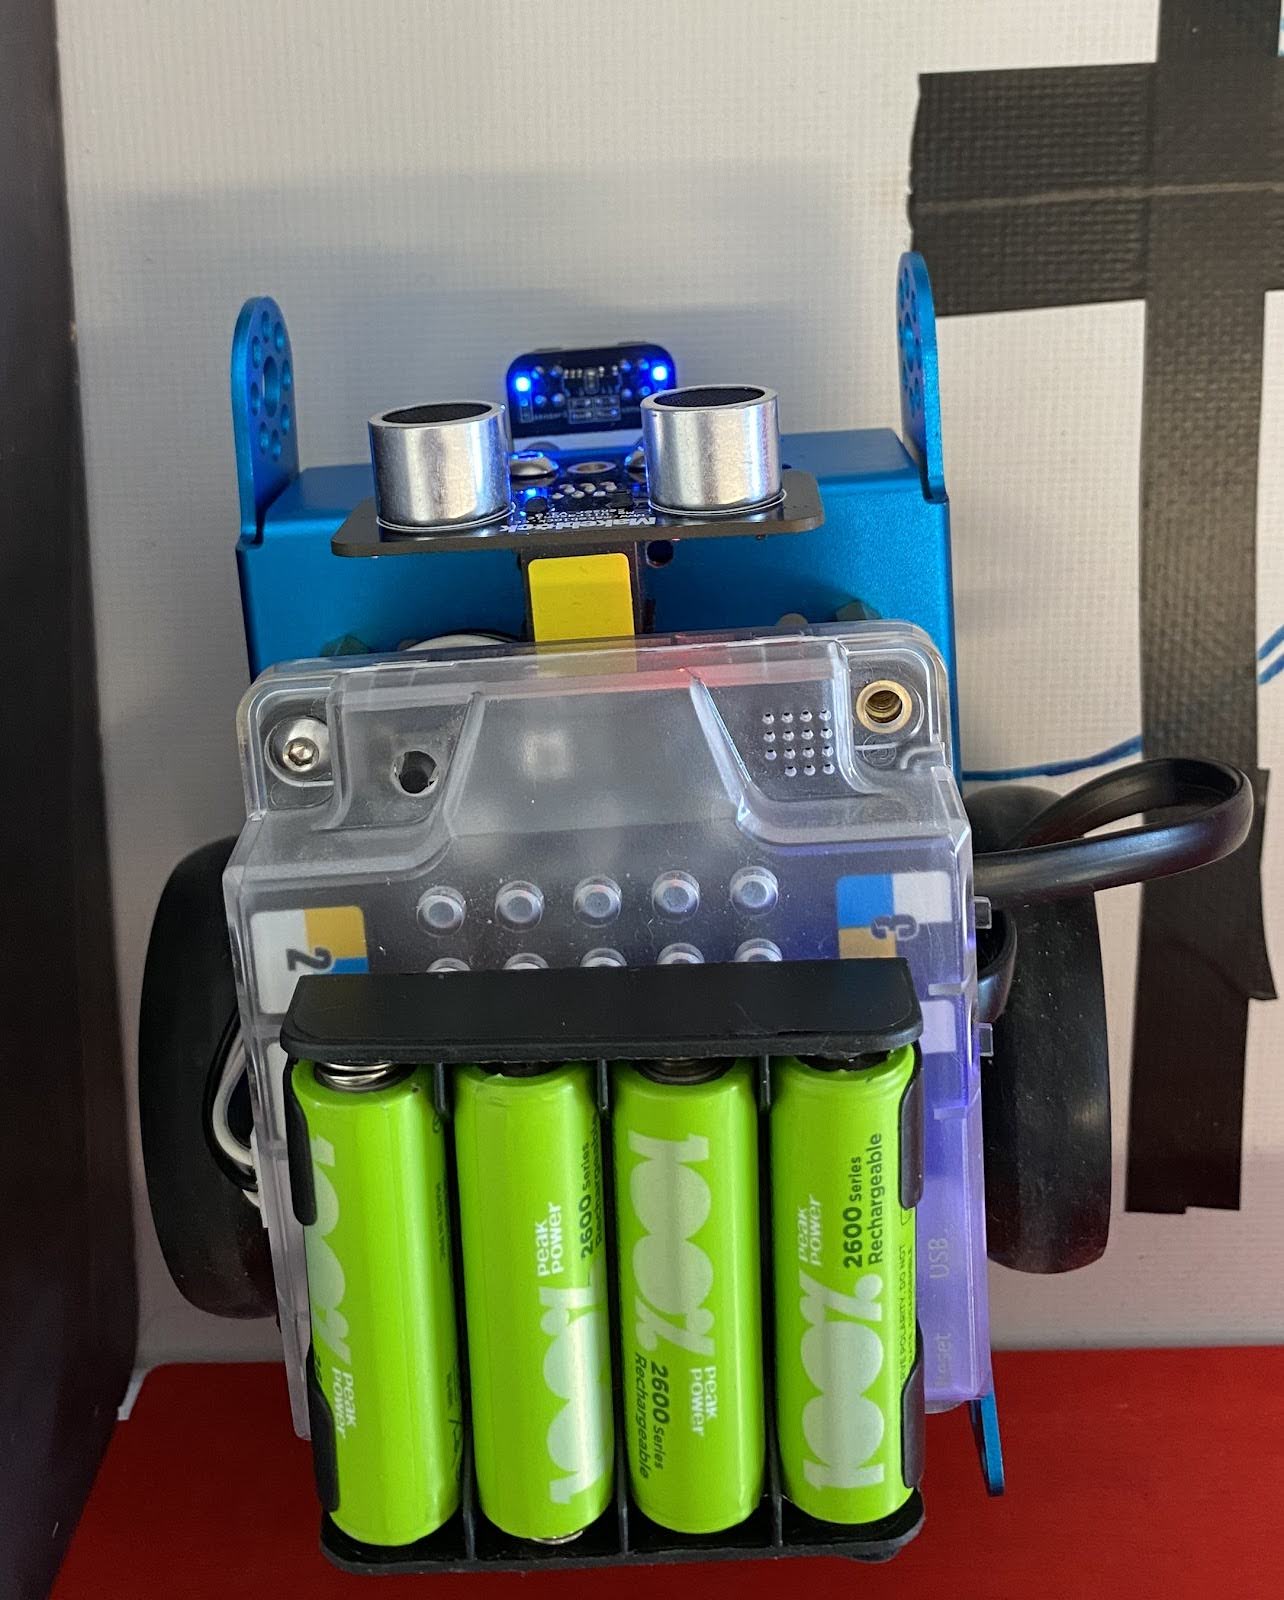

Le robot va alors décider de reculer pour retrouver la ligne.
💡Les diodes au dessus des capteurs s’allument lorsque le capteur détecte du blanc. Elles sont éteintes lorsque du noir est détecté.
Partie 2
Comment le robot sait-il quand et dans quelle direction tourner ?
Un neurone d’entrée peut recevoir une information différente de l’autre.
Un des deux capteurs infra-rouge peut détecter du blanc, alors que l’autre détecte du noir.
Cela permet au robot de savoir si la ligne se trouve sur sa droite ou sur sa gauche.
Lorsque le capteur de gauche détecte du blanc et le capteur de droite détecte du noir.
À votre avis, dans quelle direction le robot va-t-il tourner ?
Lorsque le capteur de droite détecte du blanc et le capteur de gauche détecte du noir.
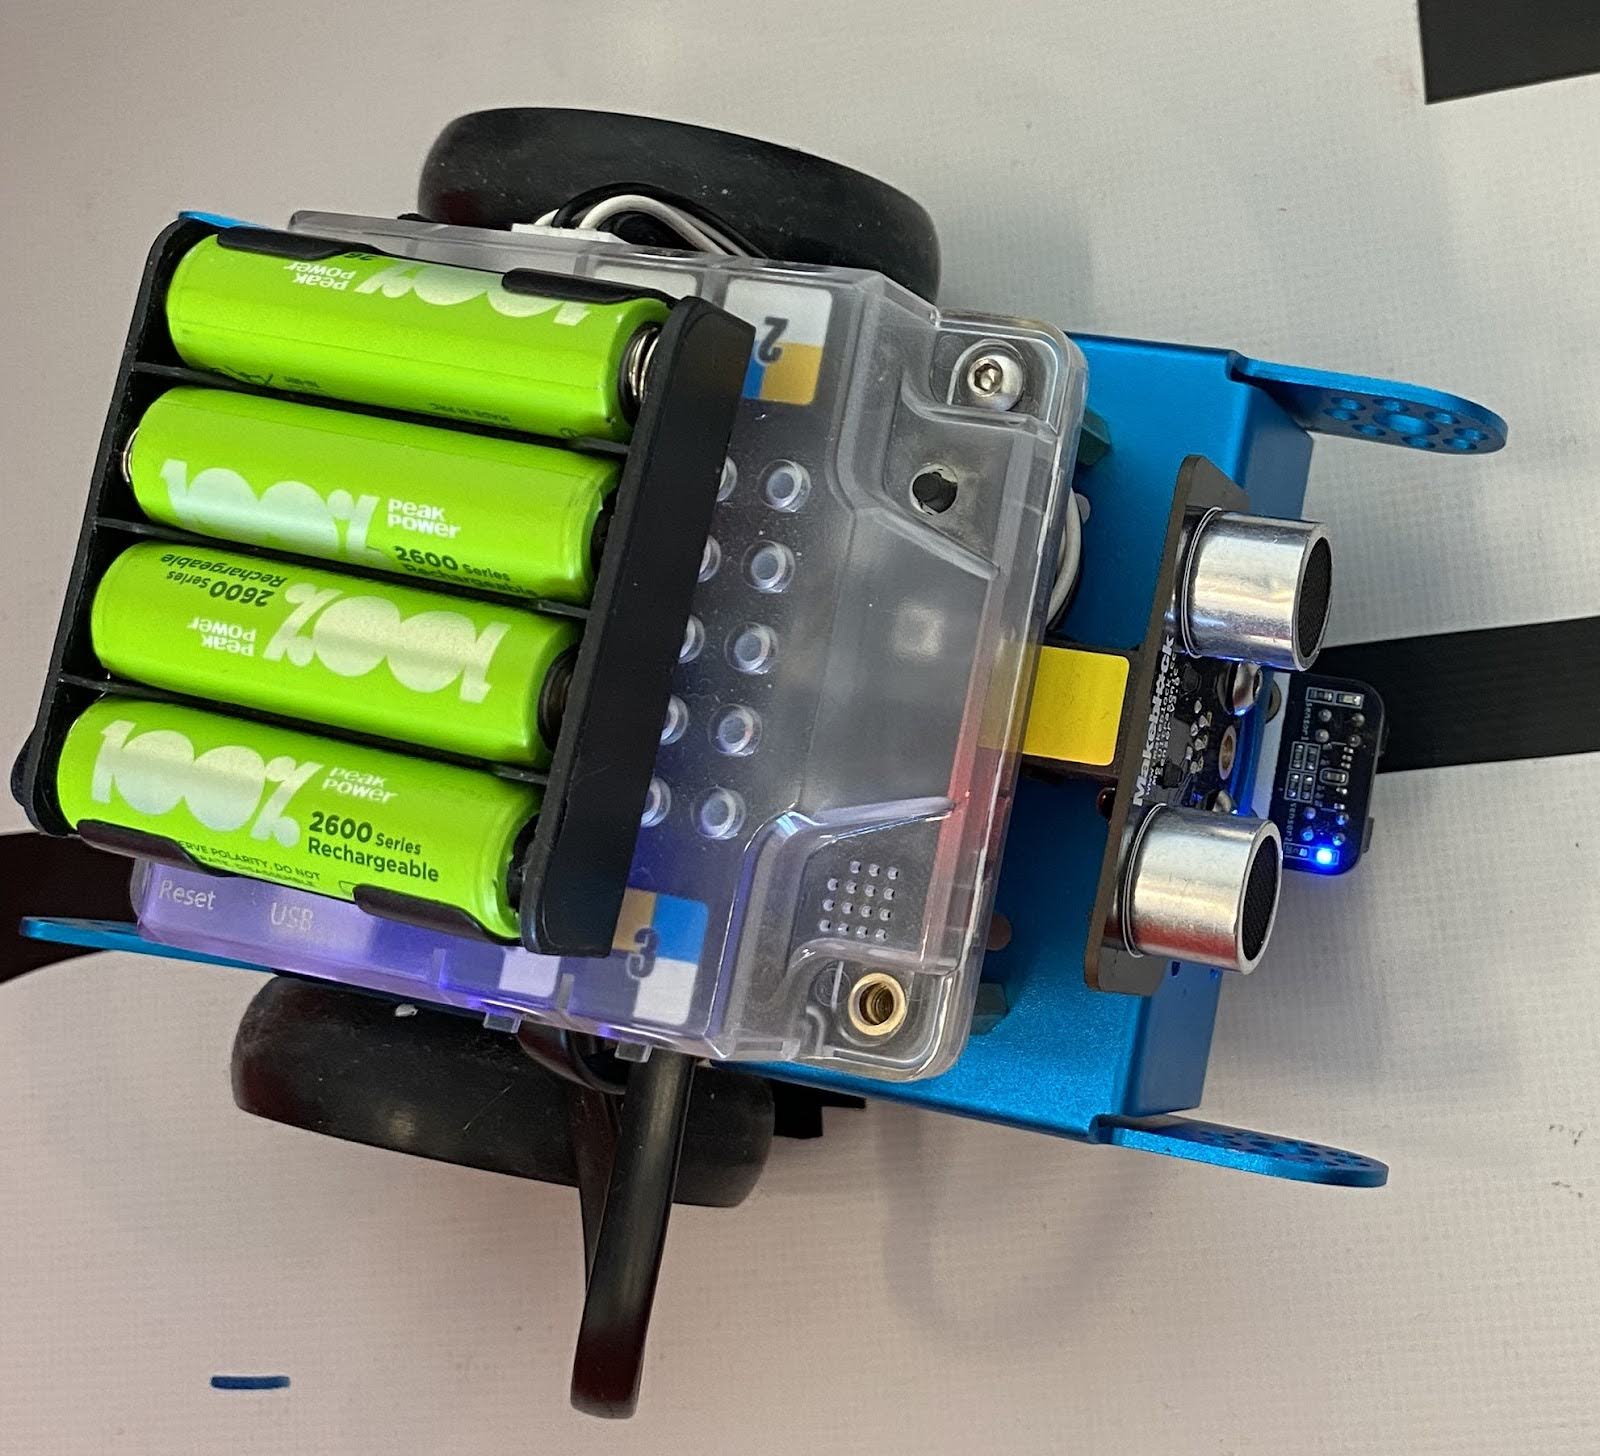
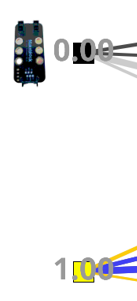
À votre avis, dans quelle direction le robot va-t-il tourner ?
Bonus
Ajuster la vitesse du robot à la piste.
Vous pouvez ajuster la vitesse du robot à la piste. Pour cela, rendez-vous dans l’onglet “Actions” et déplacez le curseur vitesse.
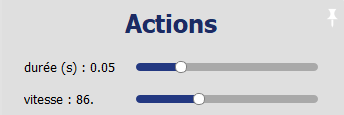
Attention, lorsque la vitesse est trop faible, le robot ne parvient plus du tout à bouger !
Que se passe-t-il lorsque la vitesse est trop élevée ?
Trouvez la vitesse optimale pour votre circuit ! (Cela dépend de la courbure maximale des virages et de la largeur de la ligne.)
Il est aussi possible de repartir de 0 pour réaliser un nouvel entrainement de mBot. Pour cela il vous faudra activer le mode apprentissage puis cliquer sur le bouton réinitialiser l’IA. La mémoire du robot est alors effacée et il est possible de recommencer.
Lors de l’entraînement, observez l’évolution des poids des connexions !


A retenir :
Contrairement au capteur à ultra-son, les capteurs à infrarouges sont binaires : ils ne peuvent détecter que du blanc ou du noir. Le nombre d'entrées possibles est donc très limité, et le potentiel de généralisation de l'IA à de nouvelles valeurs d'entrée n'est pas exploité dans cette activité.
Matériel :
- 1 robot minimum
- 1 ordinateur/robot
- Environnement plat
Durée :
1h30 (2*45min)
Age :
8 ans et +
Paramétrage :
- Apprentissage supervisé - Suivi de ligne
Matériel :
- 1 robot minimum
- 1 ordinateur/robot
- Environnement plat
Paramétrage :
- Apprentissage supervisé - Caméra
Durée :
1h30 (2*45 min)
Age :
8 ans et +
Recommandé pour découvrir en manipulant
Apprenez à votre robot à réagir en fonction de situations précises !
Cette activité vous permettra d’apprendre comment paramétrer le logiciel AlphAI et son réseau de neurones pour faire fonctionner Mbot dans un environnement simple.
Matériel
Un ordinateur avec une webcam.
Des post-it de 4 couleurs différentes ou des petites feuilles de papier sur lesquelles on a dessiné des grosses flèches de couleurs. Exemples ci-dessous.
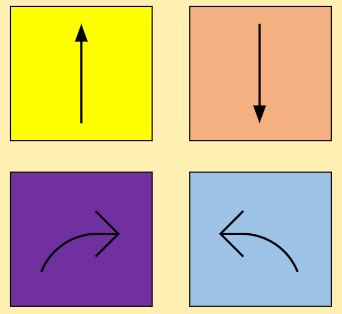
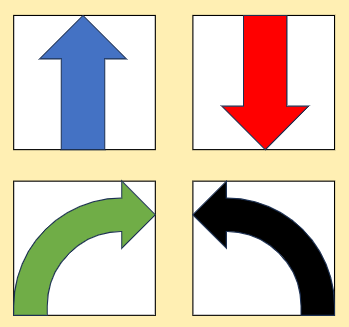
Configuration
La configuration du logiciel peut se faire manuellement ou automatiquement.
Pour le configurer automatiquement :
Paramètres > Charger les paramètres d’exemple > Apprentissage supervisé – Évitement d’obstacles (simple)
La configuration peut également se faire manuellement en suivant les indications ci-contre.
- Capteurs > Caméra 21*16

- Actions > Avancer , Tourner , Reculer , S’arrêter
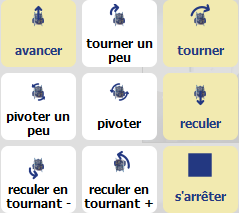
- IA > Type d’apprentissage”Apprentissage supervisé”, Algorithme« réseau de neurone », Vitesse d’apprentissage« 0.02 »,Couches convolutionnelles:vides,Couches de neurones intermédiaires : 50 50.
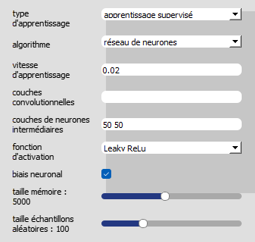
Niveau 1
Reconnaître une couleur
Pour chacune des actions avancer, reculer, tourner à gauche ou à droite :
- Choisissez une couleur à attribuer à cette action.
- Placez le post-it de cette couleur devant la caméra de l’ordinateur.
- Appuyez sur l’icône de l’action correspondante (ou utilisez le clavier). Le robot réalise l’action demandée et mémorise l’association de cette image avec cette action.
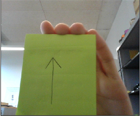
= Avancer
=Reculer
=tourner à gauche
=tourner à droite
S’arrêter
Il faut maintenant apprendre au robot à s’arrêter lorsqu’il ne voit aucun post-it coloré à l’image.
Cliquez sur l’action s’arrêter (carré noir) lorsque aucun post-it n’est visible à la caméra. Le robot ne bouge pas mais il mémorise l’association de cette image avec l’action s’arrêter.
Vous pouvez vérifier que l’association a bien été mémorisée en consultant la taille de la mémoire d’expérience en haut de l’écran.

=S’arrêter
Maintenant que l’entraînement du robot est terminé, il suffit d’activer le mode autonome en cliquant sur le bouton correspondant ou en pressant la barre espace.
Munissez-vous de vos post-it colorés et placez-les devant la caméra pour contrôler le robot !
Compréhension
Comment le robot prend-t-il des décisions ?
Désactivez le mode autonome en cliquant sur le bouton ou en appuyant sur la barre espace.
Chaque pixel de l’image est décomposé en 3 couleurs : rouge, vert et bleu. On voit donc à l’écran 3 versions monochromes de l’image qui, lorsqu’elles sont superposées, permettent d’obtenir l’image en couleurs.
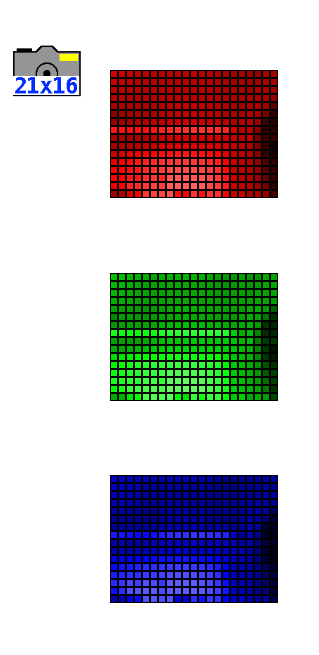
Attention : il s’agit ici de synthèse additive des couleurs, à ne pas confondre avec les couleurs primaires en peinture ! (Qui correspondent à une synthèse soustractive.)
Chaque pixel d’une image monochrome est associé à un neurone d’entrée dont la valeur va permettre de calculer les niveaux d’activation des couches successives, jusqu’à la couche de sortie.
Comment la caméra détecte-elle les couleurs ?
La couleur du post-it influence les pixels. En effet, une couleur jaune va être détecté par l’assombrissement de la zone correspondante dans l’image bleue. En effet, la couleur jaune est une superposition de rouge et de vert, mais ne contient pas de bleu.
Canal bleu pour un post-it jaune
Pour un post-it bleu
Le principe est le même pour les deux autres canaux de couleur. La caméra va donc différencier les couleurs présentes sur les post-it et ainsi permettre au robot de prendre une décision.

Canal rouge pour le post-it jaune

Pour le post-it bleu
Lorsque nous présentons un post-it devant la caméra, comme le montre la photo ci-dessous, nous pouvons voir que la caméra détecte bien la zone de couleur.
Cela affecte les valeurs des neurones d’entrée qui vont propager cette information aux couches de neurones successives.
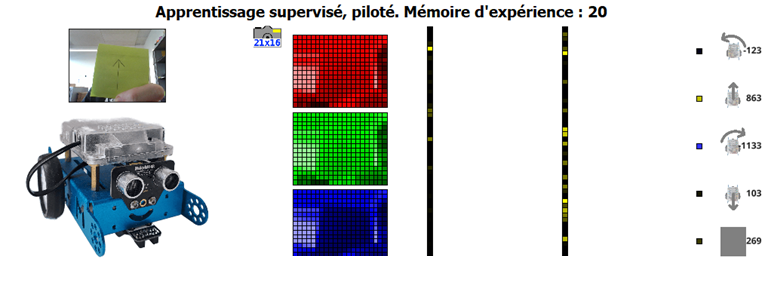
Lorsque le réseau de neurones est entraîné, les calculs réalisés le conduisent à donner en sortie la valeur la plus élevée à l’action qui correspond le mieux aux données qu’il a mémorisées.
Le choix de s’arrêter repose sur le même principe. Cependant, dans ce cas il n’y a pas de post-it ! Le réseau de neurones détecte plutôt des détails plus spécifiques dans l’image (personne, arrière-plan, etc.).
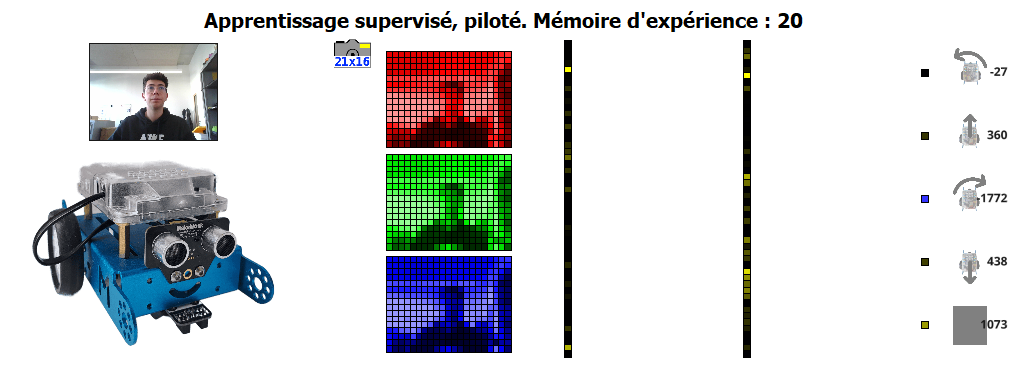
Les calculs conduisent à donner la plus forte valeur à l’action s’arrêter lorsque ces détails sont détectés.
⚠️L’unique capteur présent dans cette activité est la caméra de l’ordinateur. Cela signifie que le robot n’est pas capable de savoir s’il y a un obstacle devant lui. C’est entièrement à vous de le guider pour éviter un blocage, un choc ou une chute.
Niveau 2
Déplacement avec la main
Pour effectuer le déplacement du robot avec la main vous devez faire preuve de plus de rigueur lors de l'entraînement de votre mBot. Cela signifie que, pour un entraînement optimal, vous devrez réaliser plusieurs points d’apprentissage pour chaque action de votre robot.
Il est important lors de l'entraînement de veiller à ce que l’arrière-plan de l’image (tout ce qui n’est pas votre main) soit suffisamment fixe: même cadrage, même luminosité, même nombre de personnes présentes et aux mêmes places, etc. Il faudra aussi respecter ces règles pendant la phase d’utilisation !
Avancer, reculer, tourner à gauche, tourner à droite
Placez votre main au premier plan dans l’image.
Adaptez la position de votre main en fonction de l’action à apprendre.
Enregistrez plusieurs exemples pour chaque action (par exemple, 10 points de données par action).
=Avancer
=Reculer
=Tourner à gauche
= Tourner à droite
S’arrêter
Comme dans la partie précédente, il faut apprendre au robot à s’arrêter lorsqu’il ne détecte pas de main au premier plan dans l’image.
=S’arrêter
Maintenant que l'entraînement du robot est terminé, il suffit d’activer le mode autonome en cliquant sur le bouton correspondant ou en pressant la barre espace.
Placez votre main devant la caméra comme lors de l'entraînement et observez les réactions du robot !
Compréhension
Le fonctionnement de la caméra est identique dans les deux apprentissages.
Mais cette fois-ci, le réseau de neurones doit apprendre à détecter la position de votre main dans l’image, plutôt que la couleur d’un post-it. Il s’agit d’une tâche plus complexe pour un réseau de neurones, car il n’y a pas de limite objective entre une position centrale et une position à droite, par exemple. Le réseau va donc devoir déterminer lui-même où placer les limites entre les 4 positions possibles.
De plus, de nombreux éléments perturbateurs vont pouvoir altérer les prises de décision du réseau. Le réseau doit apprendre que la taille de votre main, sa forme, la position des doigts, son orientation, etc., ne sont pas importants pour la prise de décision : seulement la position de la main doit être prise en compte. C’est pour cela qu’il faut donner plusieurs exemples pour chaque type d’action.
L’arrière-plan de l’image est aussi une source importante de perturbations. C’est pour cela qu’il est important de veiller à conserver un arrière-plan le plus fixe possible.
Ce niveau vous permettra d’obtenir un résultat fluide lors des déplacements du robot, allant de pair avec une meilleure compréhension du fonctionnement de l’intelligence artificielle.
Pendant l'entraînement
Pendant l’autonomie
=OK
La caméra est dans la même position et renvoie les mêmes informations pour les 2 phases. Le robot se concentre sur ma main et non l’arrière-plan.
💡Astuce: Si vous réalisez cette activité seul, assurez-vous de pouvoir observer le robot sans déplacer votre tête durant l'entraînement et l’autonomie.
Les biais explicites
Les IA actuelles fonctionnent grâce à de l’apprentissage automatique à partir d’exemples. Ces exemples sont appelés données d’apprentissage. La qualité du résultat obtenu dépend donc en premier lieu de la qualité de ces données d’apprentissage.
En apprentissage automatique, on cherche à éviter dans les données d’apprentissage la présence de deux types de biais (c’est-à-dire des erreurs, des phénomènes indésirables ou de manière générale des écarts entre le résultat souhaité et le résultat obtenu).
Le premier type de biais est appelé biais explicite. Il s’agit d’une erreur humaine de classification lors de l’entraînement de l’IA. Exemple : Si on a demandé au robot de reculer lorsque la caméra voit l’image ci-dessous (par exemple parce qu’on a appuyé sur la mauvaise touche par inadvertance).
+

(Reculer)
=Biais Explicite
Dans ce cas, le réseau de neurones va avoir du mal à prendre une décision lorsque la caméra observe une image similaire, à cause de cette contradiction présente dans ses données d’apprentissage.
Pour éliminer ce type de biais, il suffit de supprimer ces erreurs présentes dans les données.

Les biais implicites
Les biais implicites sont plus difficiles à détecter car il ne s’agit pas d’erreurs objectives, mais plutôt d’un manque de diversité des données, qui ne suffisent pas à couvrir tous les cas rencontrés lors de l’utilisation.
Voici une règle simple à retenir : lorsque l’IA est confrontée à une situation qui est trop différente de toutes ses données d’apprentissage, alors le choix de l’IA face à cette situation est imprévisible !
Pour éviter cela, il faut, lors de l’entraînement, être particulièrement attentif à générer une diversité d’exemples représentative des situations que l’IA est susceptible de rencontrer lors de son utilisation.
Données d'entraînement
Image à analyser
Quelle décision l’IA va-t-elle prendre ?
Comment améliorer les données d’entraînement pour s’assurer que cette décision soit la bonne ? (indice : il faudrait utiliser 4 exemples).
Matériel :
- 1 robot minimum
- 1 ordinateur/robot
- Environnement plat
Durée :
1h30 (2*45 min)
Age :
8 ans et +
Paramétrage :
- Apprentissage supervisé - Caméra
Matériel :
- 1 robot minimum
- 1 ordinateur/robot
- Environnement plat
Paramétrage :
- Apprentissage supervisé - Évitement d’obstacles (complexe)
Durée :
1h30 (2*45 min)
Age :
8 ans et +
Recommandé pour découvrir en manipulant
Apprenez à votre robot à réagir en fonction de situations précises !
Cette activité vous permettra d’apprendre comment paramétrer le logiciel AlphAI et son réseau de neurones pour faire fonctionner Mbot dans un environnement simple.
Matériel
Pour la réalisation de cette activité vous aurez besoin d’assembler une petite arène carrée :
Nous vous recommandons d’utiliser notre arène individuelle disponible sur notre site ou chez nos distributeurs.
Vous pouvez également créer votre propre arène. Il faut pour cela une surface plane et propre (par exemple une table), entourée de barrières de couleur différente du sol, et assez solides pour arrêter le robot.
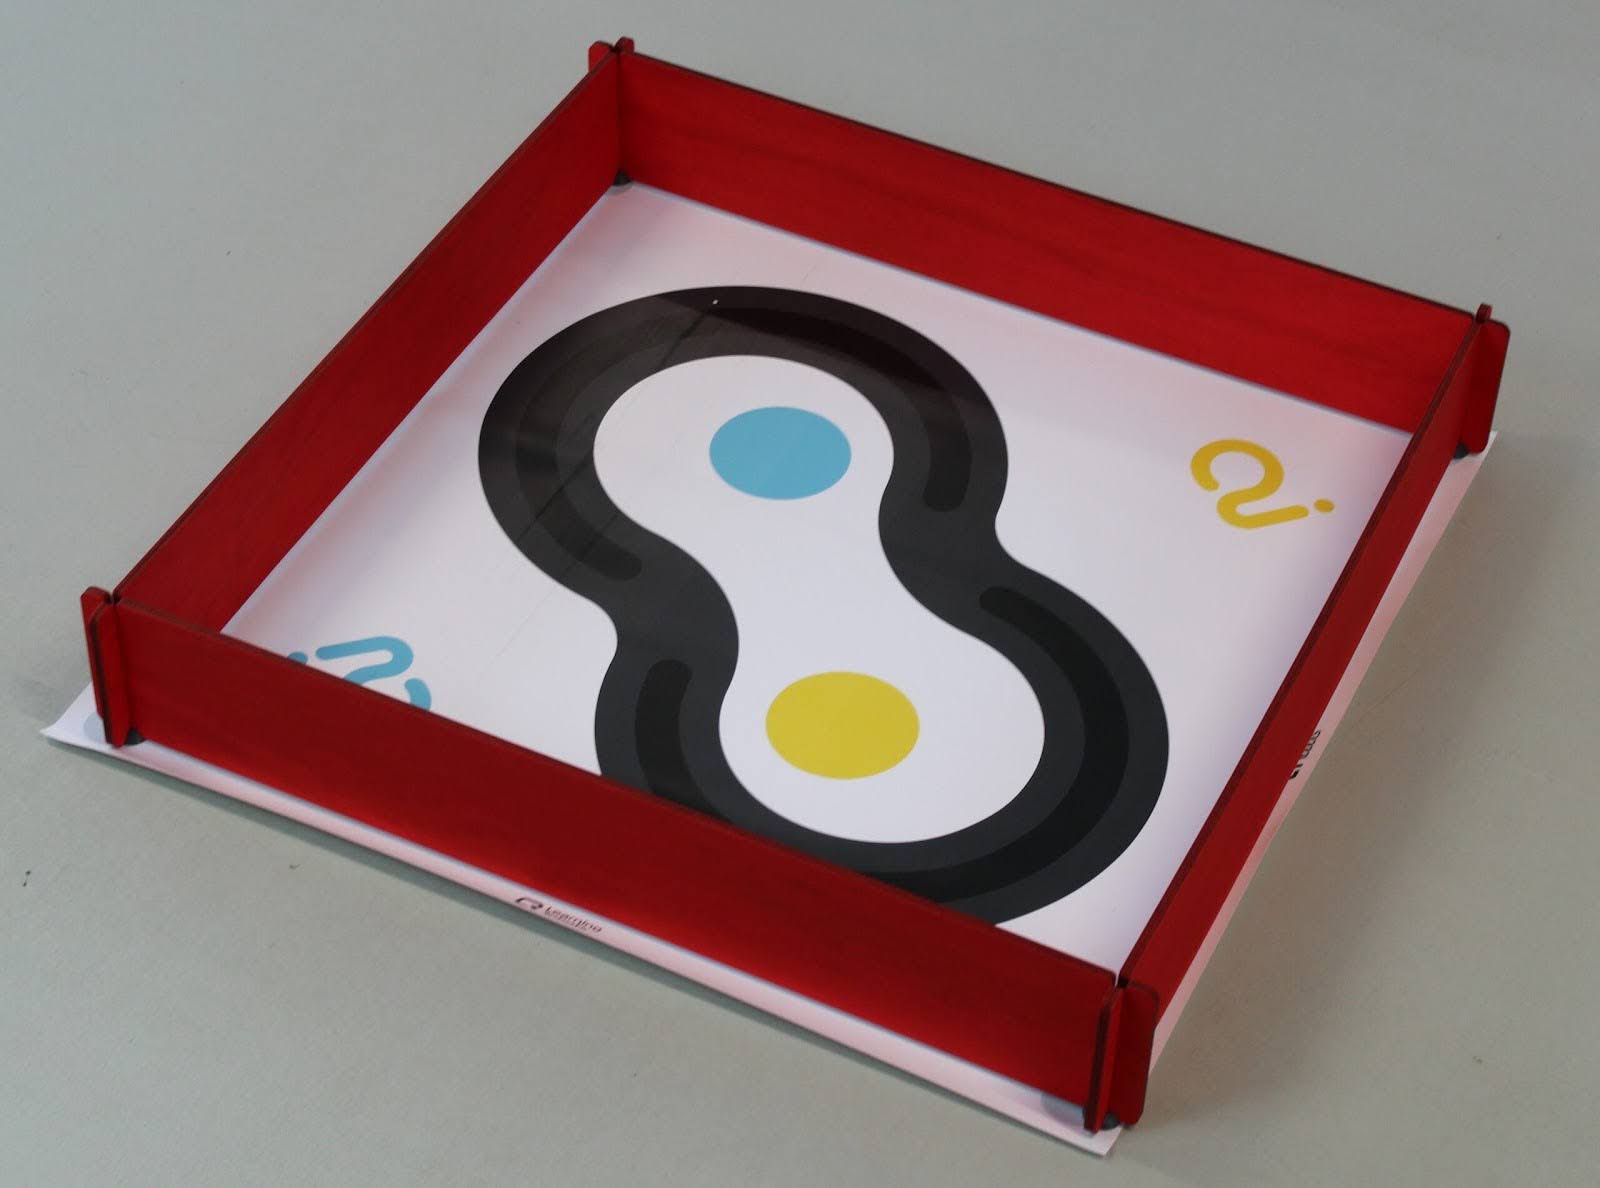
Configuration
La configuration du logiciel peut se faire manuellement ou automatiquement. Pour le configurer automatiquement : Paramètres > Charger les paramètres d’exemple > Apprentissage supervisé – Évitement d’obstacles (simple). La configuration peut également se faire manuellement en suivant les indications ci-contre.
- Capteurs > Ultrason et Détection de mouvement

- Actions > Avancer , Tourner , Reculer en tournant
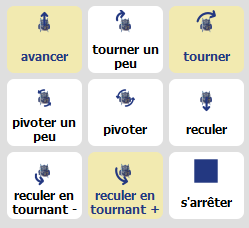
- IA > Type d’apprentissage ”Apprentissage supervisé”, Algorithme « réseau de neurone », Vitesse d’apprentissage « 0.02 », Couches de neurones intermédiaires : 15.
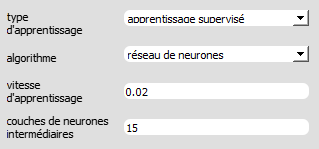
- Visualisation > Sélectionnez : « animation », « connexions », « activité synaptique », « valeurs entrée/sortie »
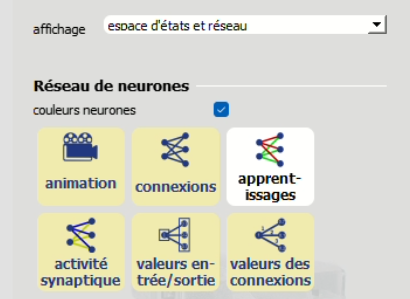
Capteur Ultra-son - Concept
Durant la première activité (évitement d’obstacle simple) nous avons, à la fin, remarqué que le robot ne détectait pas le mur devant lui lorsque celui-ci se trouvait en diagonale. En effet l’émetteur du capteur ultrason fonctionne en envoyant une onde ultrasonore qui rebondit sur le mur et revient vers le récepteur.
L'ultrason calcule donc la distance de l’objet en face en fonction du temps que met l’onde à atteindre le récepteur.
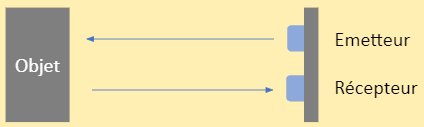
Mais si l’objet se trouve en diagonale, le trajet de l’onde émise sera beaucoup plus grand et la distance calculée sera absurde. Le robot se trouve donc bloqué contre le mur sans pouvoir avancer car l’action dominante lorsqu’il ne voit pas d’obstacle et « Avancer ».
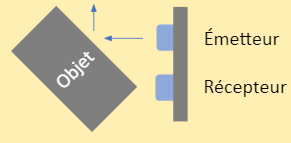
Pour aller plus loin
Le capteur ultrason mesure le temps que met l’onde pour revenir jusqu’au récepteur. La vitesse est égale à la distance divisée par le temps V=d/t donc la distance c’est la vitesse fois le temps d=V×t. Le capteur sait à quelle vitesse l’onde se propage (à la vitesse du son ~330 m/s), il sait également à quel moment il a émis l’onde. Il lui reste plus qu’à diviser cette valeur par 2 car l’onde ultrasonore fait 2 fois le chemin entre le capteur et l’objet, une fois de l’émetteur à l’objet et une deuxième fois de l’objet au récepteur.
Calcul de la distance pour un capteur à ultrasons : (V×t)/2
Entrainement
L’apprentissage du robot pour cette activité est légèrement plus complexe
Avancer
Dégagez tout objet se trouvant devant le robot et appuyez sur la flèche « ⇧ » de votre clavier ou cliquez sur l’action « Avancer » à droite de l’écran.
= Avancer
Tourner
Placez un objet devant le robot et appuyez sur la flèche « ⇦ ou ⇨ » de votre clavier ou cliquez sur l’action « Tourner à droite » à droite de l’écran.
Capture ecran - mBot - A1 - 2b
=Tourner
Reculer en tournant
Première étape : Activer le capteur de blocage des roues
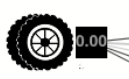
Désactiver le mode apprentissage
Placez le robot contre le mur
Cliquez sur avancer plusieurs fois jusqu’à ce que le capteur de blocage des roues s’active
Deuxième étape : Ne touchez plus le robot
Troisième étape : Activer le mode apprentissage
Quatrième étape : Cliquez sur reculer en tournant à gauche ou à droite


NB : Vous devez prendre le soin avant d’appuyer sur reculer en tournant de choisir 1 seul côté droit ou gauche. Sinon le robot ne saura pas quel côté choisir et cela compromet la clarté de la compréhension de l’exercice.
ÇA Y EST !
Votre robot est entraîné ! Appuyez désormais sur la barre espace ou cliquez sur « autonome » en bas à gauche de l’écran et laissez le robot se déplacer librement dans l’arène et réagir aux obstacles sur son passage.
Compréhension
Détection de mouvement
Pour résoudre le problème du capteur ultrason, nous avons ajouté un nouveau capteur : il s’agit d’un détecteur de blocage. Ce capteur permet au logiciel de déterminer si le robot est bloqué ou non. Pour ce faire, le capteur analyse la distance calculée de l’ultrason, si celle-ci reste la même durant plusieurs actions, le capteur s’active et le robot comprend qu’il est bloqué.
Le robot n’est pas bloqué,
le capteur affiche « 1 »
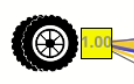
Le robot se bloque mais le capteur affiche toujours « 1 »
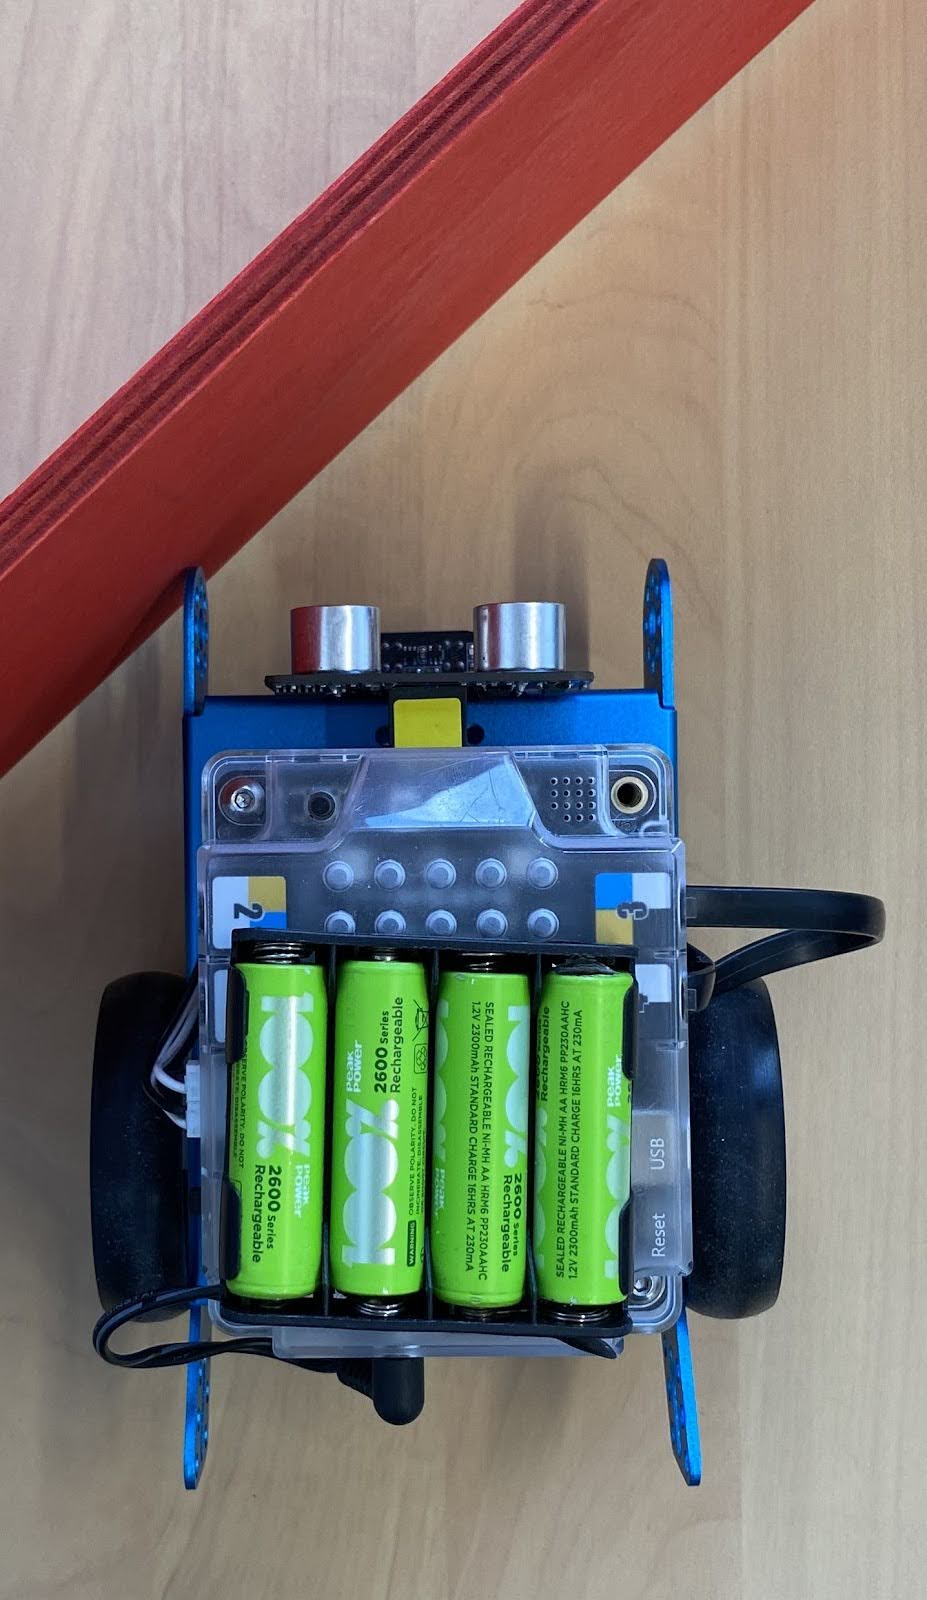
Si après plusieurs actions la valeur calculée par l’ultrason est identique le capteur affiche «0»
Graphe des états
La première chose qui saute aux yeux lorsque l’on lance cette activité, est la présence d’un graphique, aux premiers abords, très complexe. Ce graphique s’appelle « l’espace des états ». Ce graphique montre les choix que le robot prend en fonction de son « état ».
Chacun des capteurs de cette activité est représenté dans le graphique :
Axe des ordonnées = capteur ultrason.
Axe des abscisses = capteur de blocage.
L’état du robot est représenté par un petit carré, pour mieux comprendre essayez d’approcher et d’éloigner votre main du robot, le petit carré se déplacera sur l’axe des ordonnées.
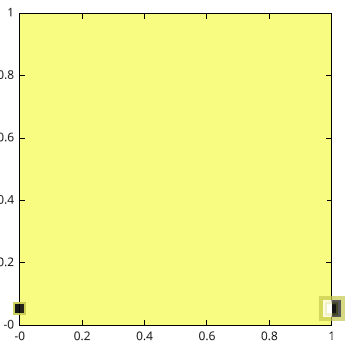
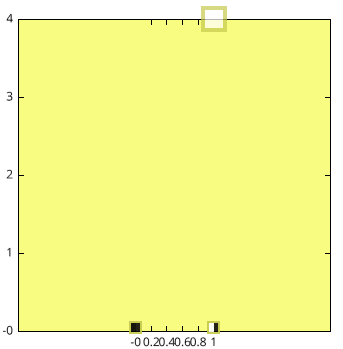
Si on bloque le robot contre un objet et qu’on avance plusieurs fois, le capteur de blocage des roues va s’allumer et le carré se déplacera sur l’axe des abscisses.
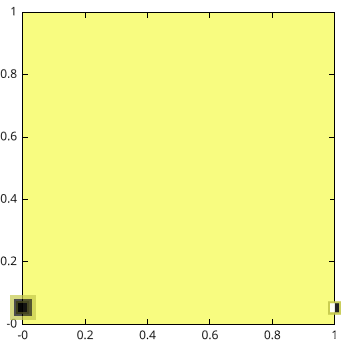
Enfin, les couleurs représentent chacune des actions possibles avec le robot (jaune = avancer, vert = tourner à droite …).


Durant l’entraînement vous avez constaté que lorsque vous effectuez une action, le graphe changera de couleur. Comme les couleurs représentent des actions, cela signifie que l’action que choisira le robot sera défini par son « état » dans le graphe des états.
Exemple
Ici la mémoire d’expérience est vide. Les couleurs présentes dans le graphe ont donc été choisies aléatoirement.
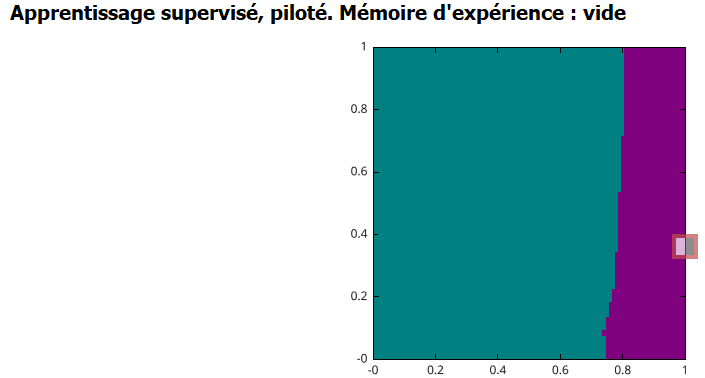
En autonomie, le robot reculerait à droite en arrière jusqu’à ce qu’il se bloque et il reculerait ensuite à gauche jusqu’à se débloquer.
Ici nous lui avons appris à avancer sans obstacle et à tourner à droite face à un obstacle.
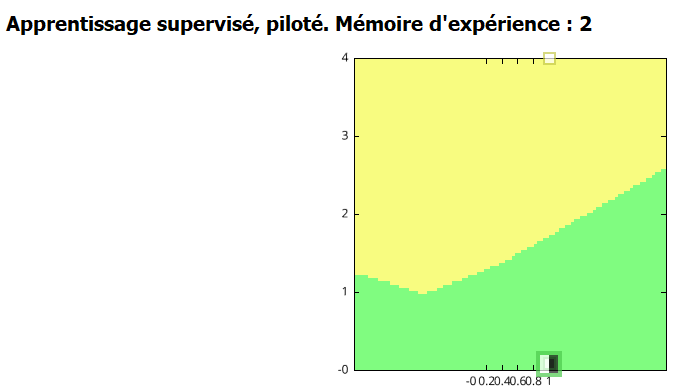
En autonomie, le robot avancera jusqu’à ce qu’il croise un obstacle pour tourner à droite jusqu’à s’éloigner de l’obstacle.
Défi
En autonomie, comment réagirait le robot dans ces différentes dispositions (sans prendre en compte l’état actuel du robot dans l’espace des états) :
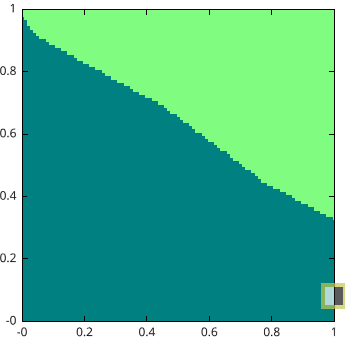
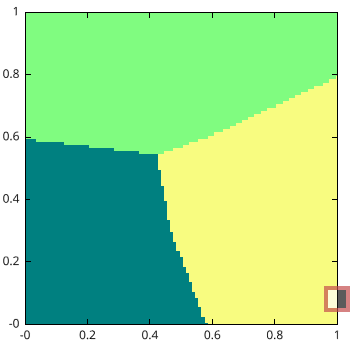
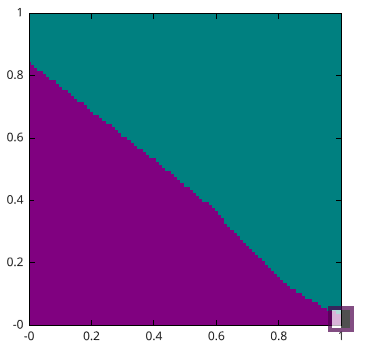
Algorithme KNN
Désactivez le mode « Autonome » et « Apprentissage » en recliquant sur les boutons correspondants :
L’algorithme KNN (K nearest neighbours) aussi appelé algorithme des K plus proches voisins, est un algorithme d’intelligence artificielle plus simple à comprendre.
Cette activité se déroule de la même manière que la dernière (évitement d’obstacles – complexe) et sert à faire la même chose, mais elle le fait d’une manière différente. Vous aurez remarqué que le graphe des états ne s’est pas colorié de la même façon. En effet là où le graphe des états mettait un petit moment à se former et les couleurs n’était pas instantanément fixé, ici dès que l’on clique sur une action la limite de coloriage se dessine directement et d’un seul coup.
Dans cet algorithme, le robot se promène dans un espace…
Et chaque point de donnée apprise au robot est enregistré dans ce même espace.
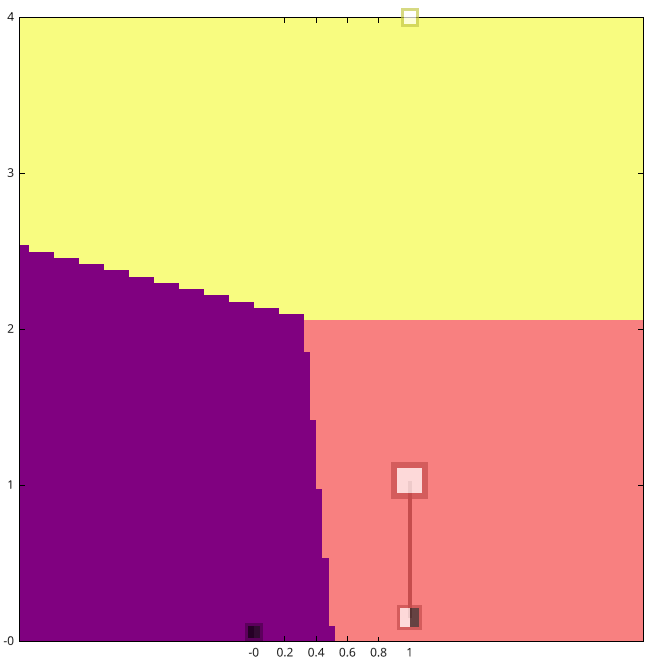
Pour prendre une décision le robot fait juste le choix du point de donnée le plus proche de sa position dans l’espace.
L’algorithme des K plus proches voisins est beaucoup plus simple à comprendre et nous permet, utilisateurs, de livrer une moindre quantité de données pour faire fonctionner l’IA, la marge d’erreur est largement réduite.
Comme dit précédemment, les couleurs se forment instantanément, les couleurs représentent seulement le périmètre dans lequel, par rapport aux autres points de données, la position du robot sera plus proche de ce point.
Exemple : Ici le robot se trouve plus proche du carré correspondant à l’action tourner à gauche, en autonomie le robot tournerait donc à gauche.
Rappel : Dans l’algorithme des réseaux de neurones pour prendre une décision, le robot faisait ce calcul
Sortie = Entrée * Connexion + Biais
Matériel :
- 1 robot minimum
- 1 ordinateur/robot
- Environnement plat
Durée :
1h30 (2*45 min)
Age :
8 ans et +
Paramétrage :
- Apprentissage supervisé - Évitement d’obstacles (complexe)
Matériel :
- 1 robot minimum
- 1 ordinateur/robot
- Environnement plat
Paramétrage :
- Apprentissage supervisé - Évitement d’obstacles (complexe)
Durée : 1h30 (2*45 min)
Age : 8 ans et +
Recommandé pour découvrir en manipulant
Apprenez à votre robot à réagir en fonction de situations précises !
Cette activité vous permettra d’apprendre comment paramétrer le logiciel AlphAI et son réseau de neurones pour faire fonctionner mBot dans un environnement simple.
Matériel
Pour la réalisation de cette activité vous aurez besoin d’assembler une petite arène carrée :
Nous vous recommandons d’utiliser notre arène individuelle disponible sur notre site ou chez nos distributeurs.
Vous pouvez également créer votre propre arène. Il faut pour cela une surface plane et propre (par exemple une table), entourée de barrières de couleur différente du sol, et assez solides pour arrêter le robot.
Configuration
La configuration du logiciel peut se faire manuellement ou automatiquement.Pour le configurer automatiquement :Paramètres > Charger les paramètres d’exemple > Apprentissage par renforcement– Évitement d’obstaclesLa configuration peut également se faire manuellement en suivant les indications ci-contre.
- Capteurs > Ultrason, Détection de mouvement, dernière action effectuée

- Actions > Avancer, Tourner, Reculer en tournant
- Récompense > “Évitement d’obstacle”

- IA > Type d’apprentissage”Apprentissage par renforcement”, Algorithme« deep Q-Learning »,Couches de neurones intermédiaires : 300 100 50.


- Visualisation > Sélectionnez : « réseau de neurones», « connexions », « activité synaptique »
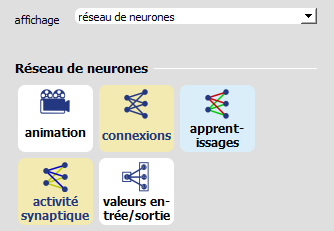
Concept
Pour cette activité, il n’y a pas de phase d’entraînement.
En apprentissage par renforcement, le robot apprend de lui-même par essai/erreur. La simple pression sur le bouton Autonome suffit à commencer l’activité et laisser le robot s’entraîner tout seul.
Une fois le bouton actionné il ne reste plus qu’à observer le robot et le laisser s’entraîner tout seul.
Vous pouvez également constater que le réseau de neurones est beaucoup plus imposant et dispose de plusieurs couches intermédiaires. L’IA par renforcement est une IA beaucoup plus complexe qui fait beaucoup plus de calculs que celle utilisée pour l’apprentissage supervisé.
L’enjeu de cette activité est de comprendre :
- Comment le robot prend une décision.
- Comment sa décision évolue au fil de son entraînement.
- Comment le robot évite les obstacles et se déplace dans l’arène sans toucher les murs.
- Comprendre les systèmes de récompenses
La grosse différence entre l’apprentissage supervisé et l’apprentissage par renforcement réside dans le système de récompense. Comme vous pouvez le constater, il y a désormais ces deux blocs « Récompense » et « Niveau » en bas de l’écran. Mais à quoi correspondent-elles ?

Chaque action est attribuée une récompense comprise entre -100 et 100. Le niveau lui correspond à la moyenne de toutes les récompenses.
Avancer = +100
Tourner à droite/gauche = +55
Reculer en tournant = -50
Lorsque les roues se bloquent le robot prend une récompense de -50
Au même titre que nous les humains, le robot aime recevoir des récompenses positives et n’aime pas les récompenses négatives.
Le robot va donc essayer les différentes actions qu’il peut faire, et ce de manière totalement aléatoire au début, puis va vite comprendre que certaines actions lui apportent de meilleures récompenses par rapport à d’autres et il va chercher à les maximiser puis les optimiser. Le niveau représente la moyenne de toutes les récompenses accumulées, il donne une bonne indication du niveau général du robot, c’est-à-dire de sa capacité à se déplacer dans l’arène en évitant les murs. En simulant un grand nombre d'essais, le niveau atteint son pic à environ 80-90. A ce niveau le robot ne reçoit quasiment plus du tout de récompense négative et la moyenne ne fait qu’augmenter à mesure du temps.
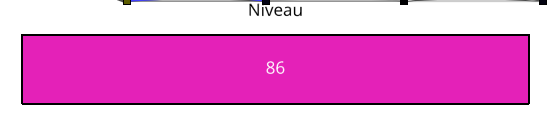
Le tout lorsque l’on programme une intelligence artificielle par renforcement est d’appliquer les plus grosses récompenses aux actions que l’on veut qu’il maîtrise.
Par exemple pour une intelligence à qui on voudrait qu’elle apprenne à se garer à une place de parking précise, on la programmait en appliquant une récompense de plus en plus positive à mesure qu’elle se rapproche de la place en question, et de plus en plus négative à mesure qu’elle s’éloigne.
Le système de récompense est la méthode d’apprentissage qui se rapproche le plus de la nôtre. En effet, notre manière d’enseigner fonctionne également avec un système de récompense, pour aider les étudiants à apprendre on a inventé le système de note ; on récompense les élèves qui ont bien appris leur leçon et on punit les autres.
Matériel :
- 1 robot minimum
- 1 ordinateur/robot
- Environnement plat
Durée : 1h30 (2*45 min)
Age : 8 ans et +
Paramétrage :
- Apprentissage supervisé - Évitement d’obstacles (complexe)
Paramétrage & sauvegarde
Le logiciel AlphAI vous permet de complètement personnaliser les paramètres selon vos envies et objectifs.
Choisissez un niveau d’autonomie, un algorithme, les capteurs et actions que vous souhaitez utiliser, … et inventez votre propre activité !
Vous pouvez également partir d'une configuration d'exemple puis le personnaliser.
Une fois que vous êtes satisfait des paramètres choisis, vous pouvez les enregistrer sur votre ordinateur afin de les réutiliser plus tard !
Vous avez inventé une activité intéressante, ludique et pédagogique ? Nous aimerions beaucoup l’essayer, et pourquoi pas la proposer à tous les utilisateurs du logiciel !
N'hésitez pas à nous contacter ici pour que nous puissions échanger ensemble à ce sujet.
Le robot LEGO Spike est une plateforme éducative modulaire développée par LEGO Education. Conçue pour initier les élèves à la programmation, à la robotique et aux sciences de l’ingénieur, elle devient un outil particulièrement puissant lorsqu’elle est utilisée avec le logiciel AlphAI. Grâce à cette combinaison, les apprenants découvrent non seulement la mécanique et la logique algorithmique, mais aussi les concepts d’intelligence artificielle de manière intuitive et ludique.
La gamme LEGO Spike se décline principalement en deux modèles :
- LEGO Spike Prime : conçu pour les collégiens et lycéens, il propose des moteurs plus puissants, une brique centrale dotée d’un affichage et de nombreux ports, ainsi qu’un large éventail de capteurs.
- LEGO Spike Essential : destiné aux élèves de primaire, il est plus simple, plus compact, mais conserve l’essentiel pour des activités robotiques et logiques.
🧩 Composition du robot
Chaque pack LEGO Spike comprend une série d’éléments que l’on peut regrouper en trois grandes catégories :
🔧 1. Éléments de construction
- Blocs LEGO Technic pour assembler les structures
- Essieux, engrenages, connecteurs pour créer des mécanismes variés
- Plateformes de montage modulaires
⚙️ 2. Effectuateurs
- Une matrice programmable (hub) avec des ports d'entrées et de sorties
- Moteurs moyens et grands : utilisés pour animer les robots (roues, bras, pinces, etc.)
Les moteurs sont précis et dotés d’un retour de position utile dans les tâches d’IA.
👁️ 3. Capteurs
- Capteur de distance (ultrasons) : détecte des obstacles ou mesure des distances
- Capteur de couleur : identifie les couleurs, détecte la lumière réfléchie
- Capteur de force (bouton) : détecte une pression ou un appui
- Accéléromètre intégré : mesure l’inclinaison et les mouvements du robot
Le nombre et le type de ces capteurs peuvent varier selon la version (Essential ou Prime), mais chacun permet d’exploiter des stratégies d’IA variées, comme la reconnaissance d’environnement ou la réaction à des stimuli sensoriels.
🖥️ Environnement d’utilisation
Les robots LEGO Spike sont conçus pour fonctionner sur des surfaces planes, comme des tables ou sols lisses, afin de garantir des déplacements précis et reproductibles. Ils peuvent être utilisés dans des contextes variés : salle de classe, laboratoire, ou espace de démonstration.
Avant de connecter votre robot LEGO Spike au logiciel AlphAI, assurez-vous que ce dernier est bien installé sur votre appareil.
👉 Si ce n’est pas encore le cas, rendez-vous dans la section Logiciel puis dans la sous-section Installation du logiciel.
🟡 Étapes de connexion
- Allumez votre LEGO Spike
Appuyez sur le bouton situé sur le hub programmable. Un quadrillage 3x3 s’allume sur le hub, indiquant que le robot est sous tension. - Lancez le logiciel AlphAI
Ouvrez le logiciel AlphAI sur votre ordinateur ou tablette. Patientez quelques instants pendant le chargement. - Sélectionnez le modèle de robot
En haut à gauche de l’écran, cliquez sur l’encart affichant une icône de robot, intitulé « Modèle robot ».
Choisissez « LEGO Spike » parmi les options proposées. - Suivez les instructions à l’écran
AlphAI vous guidera dans les étapes de connexion du robot. Dans la majorité des cas, la procédure est automatique.
⚙️ À noter : installation de PyBricks
Dans certaines situations, une installation préalable de PyBricks peut être nécessaire pour établir la connexion entre AlphAI et votre LEGO Spike.
Si c’est le cas, le logiciel vous l’indiquera clairement et vous accompagnera pas à pas dans cette installation.
🤝 Besoin d’aide ?
Notre équipe est à votre disposition pour vous assister dans la prise en main de la solution AlphAI avec LEGO Spike.
N’hésitez pas à nous contacter en cas de difficulté ou de question.
Cette première activité vous invite à concevoir et entraîner votre propre robot autonome avec LEGO Spike et le logiciel AlphAI. Un excellent moyen de découvrir l’intelligence artificielle de manière concrète, ludique… et accessible à tous !
🧠 Étape 1 : Imagine et construis ton robot
Laissez libre cours à votre imagination ! Construisez un robot LEGO Spike selon vos envies :
- Choisissez ses capteurs (ultrason, couleur, bouton…)
- Décidez des actions qu’il devra effectuer (avancer, tourner, émettre un son…)
Une fois votre robot assemblé, connectez-le au logiciel AlphAI comme expliqué dans la section précédente.
🎛️ Étape 2 : Configure les capteurs
Dans AlphAI, cliquez sur l’onglet « Capteurs » situé dans la barre de navigation verticale bleue à gauche.
Sélectionnez les capteurs effectivement présents sur votre robot pour permettre au logiciel de les prendre en compte pendant l’apprentissage.
⚙️ Étape 3 : Définis les actions possibles
Rendez-vous maintenant dans l’onglet « Actions », toujours dans le menu vertical à gauche.
Choisissez les actions que votre robot pourra exécuter, selon les situations qu’il rencontrera.
📚 Étape 4 : Entraîne ton robot (Apprentissage supervisé)
Activez le mode « Apprentissage ».
Lorsque les capteurs sont stimulés (ou non), assignez à chaque situation une action correspondante.
Ainsi, vous étiquetez les données, c’est-à-dire que vous montrez à AlphAI comment réagir dans chaque cas. Le logiciel construit alors un modèle d’intelligence artificielle, basé ici sur l’apprentissage supervisé.
🧩 Le réseau de neurones utilisé dans cette activité est volontairement simple : une couche d’entrée (les capteurs), une couche de sortie (les actions), et aucune couche cachée.
Vous pouvez observer l’évolution de l’apprentissage en cliquant sur l’onglet « Visualisation » pour voir soit les données en temps réel, soit la structure du réseau de neurones.
🚀 Étape 5 : Laisse l’IA prendre le relais
Quand l’entraînement est terminé, passez en mode autonome.
Votre robot agit alors de manière indépendante, guidé uniquement par l’intelligence artificielle que vous avez entraînée.
🎯 Objectif pédagogique
Cette activité met en lumière la puissance de l’IA dans la robotique éducative :
→ En quelques minutes, vous donnez vie à un robot capable de réagir intelligemment à son environnement.
→ Là où il faudrait parfois des centaines de lignes de code, l’IA permet d’obtenir un comportement pertinent par simple démonstration.
C’est la force de l’apprentissage automatique : il permet d’automatiser l’intelligence sans complexité technique, et c’est exactement ce que vous expérimenterez ici.
Cette activité permet d’explorer le fonctionnement d’un capteur de couleurs avec le robot LEGO Spike et de découvrir comment l’intelligence artificielle peut apprendre à reconnaître et réagir à des couleurs spécifiques, via un processus appelé apprentissage supervisé.
Les élèves vont construire un tri-objet simple, entraîner un modèle IA, et observer comment il peut fonctionner en autonomie.
🧩 Objectifs de l’activité
- Comprendre comment un capteur de couleur fonctionne.
- Entraîner un modèle d’IA à réagir à des couleurs spécifiques.
- Expérimenter la généralisation : que se passe-t-il si une couleur n’a pas été vue pendant l’apprentissage ?
- Découvrir les limites et les forces de l’apprentissage automatique dans un contexte concret.
🛠️ Matériel nécessaire
- 1 set LEGO Spike Prime par groupe de 2 à 3 élèves.
- Ordinateur avec le logiciel AlphAI installé.
- Objets de différentes couleurs (idéalement des briques LEGO et des objets non-LEGO).
🚀 Étapes de l’activité
- Configurer le capteur de couleur
- Dans AlphAI, allez dans l’onglet « Capteurs », sélectionnez « Capteur de couleur », puis choisissez « LEGO bricks – 9 couleurs ».
- Tester la reconnaissance des couleurs
- Passez différentes briques sous le capteur pour observer lesquelles sont correctement reconnues.
- Discutez des limites : certaines nuances proches sont parfois mal interprétées.
- Définir les actions associées aux couleurs
- Dans l’onglet « Actions », sélectionnez des actions simples (sons, émoticônes, mouvements).
- Attribuez une action par couleur détectée.
- Entraîner le modèle
- Activez le mode « Apprentissage ».
- Montrez une couleur au capteur, puis cliquez sur l’action à associer.
- Répétez pour chaque couleur. Le compteur de données d’apprentissage augmente à chaque exemple.
- Tester le mode autonome
- Cliquez sur le bouton « Autonome ».
- Le robot exécute alors automatiquement l’action correspondant à la couleur détectée, d’après ce qu’il a appris.
- Tester la généralisation
- Essayez avec une couleur non utilisée à l’apprentissage (ex. orange si seul le rouge a été entraîné). Le robot choisit alors l’action la plus proche.
🧹 Nettoyage des données
Il est possible de revoir les données d’apprentissage :
- Supprimez les données mal étiquetées.
- Observez l’impact de données biaisées ou en trop faible quantité.
Cela permet de comprendre l’importance d’un jeu de données propre et équilibré dans tout projet d’IA.
🌈 Mode avancé : détection en RGB
Pour aller plus loin, activez le mode « RGB » dans l’onglet capteur :
- Le capteur n’identifie plus des couleurs fixes mais lit les valeurs Rouge, Vert, Bleu (entre 0 et 255).
- Cela permet de détecter des objets non-LEGO aux couleurs plus variées.
Les élèves peuvent alors entraîner de nouveaux comportements en fonction de la lecture RGB, ce qui rend le tri plus réaliste pour des objets du quotidien.
🧠 En résumé
Cette activité met en lumière :
- Les fondements de l’apprentissage supervisé.
- L’importance des données d’entraînement dans la performance d’un modèle IA.
- Les applications concrètes de l’IA dans des scénarios simples mais réalistes (tri de déchets, reconnaissance visuelle, etc.).